
1. Introduction
In our previous article, we looked at building a dashboard for viewing the current status of the Avengers using DataStax Astra, a DBaaS powered by Apache Cassandra using Stargate to offer additional APIs for working with it.
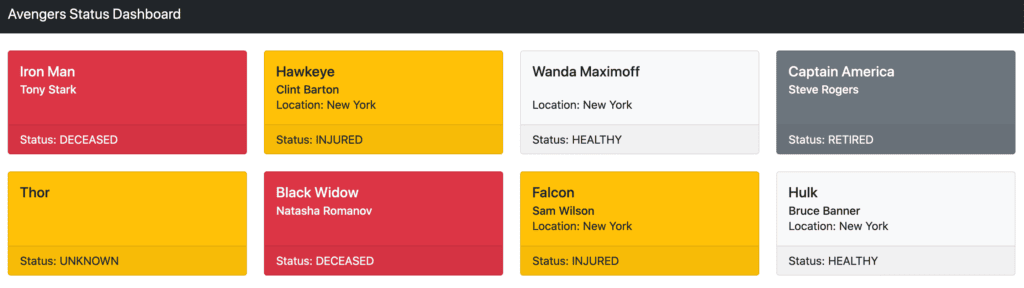
Avengers Status Dashboard built with Cassandra and Stargate
In this article, we will be extending this to store discrete events instead of the rolled-up summary. This will allow us to view these events in the UI. We will allow the user to click on a single card and get a table of the events that have led us to this point. Unlike with the summary, these events will each represent one Avenger and one discrete point in time. Every time a new event is received then it will be appended to the table, along with all the others.
We are using Cassandra for this because it allows a very efficient way to store time-series data, where we are writing much more often than we are reading. The goal here is a system that can be updated frequently – for example, every 30 seconds – and can then allow users to easily see the most recent events that have been recorded.
2. Building out the Database Schema
Unlike with the Document API that we used in the previous article, this will be built using the REST and GraphQL APIs. These work on top of a Cassandra table, and these APIs can completely cooperate with each other and the CQL API.
In order to work with these, we need to have already defined a schema for the table we are storing our data into. The table we are using is designed to work with a specific schema – find events for a given Avenger in order of when they happened.
This schema will look as follows:
CREATE TABLE events (
    avenger text,
    timestamp timestamp,
    latitude decimal,
    longitude decimal,
    status decimal,
    PRIMARY KEY (avenger, timestamp)
) WITH CLUSTERING ORDER BY (timestamp DESC);
With data that looks similar to this:
| avenger | timestamp | latitude | longitude | status |
|---|---|---|---|---|
| falcon | 2021-05-16 09:00:30.000000+0000 | 40.715255 | -73.975353 | 0.999954 |
| hawkeye | 2021-05-16 09:00:30.000000+0000 | 40.714602 | -73.975238 | 0.99986 |
| hawkeye | 2021-05-16 09:01:00.000000+0000 | 40.713572 | -73.975289 | 0.999804 |
This defines our table to have multi-row partitions, with a partition key of “avenger”, and a clustering key of “timestamp”. The partition key is used by Cassandra to determine which node the data is stored on. The clustering key is used to determine the order that the data is stored within the partition.
By indicating that the “avenger” is our partition key it will ensure that all data for the same Avenger is kept together. By indicating that the “timestamp” is our clustering key, it will store the data within this partition in the most efficient order for us to retrieve. Given that our core query for this data is selecting every event for a single Avenger – our partition key – ordered by the timestamp of the event – our clustering key – Cassandra can allow us to access this very efficiently.
In addition, the way the application is designed to be used means that we are writing event data on a near-continuous basis. For example, we might get a new event from every Avenger every 30 seconds. Structuring our table in this way makes it very efficient to insert the new events into the correct position in the correct partition.
For convenience sake, our script for pre-populating our database will also create and populate this schema.
3. Building the Client Layer Using Astra, REST, & GraphQL APIs
We are going to interact with Astra using both the REST and GraphQL APIs, for different purposes. The REST API will be used for inserting new events into the table. The GraphQL API will be used for retrieving them again.
In order to best do this, we will need a client layer that can perform the interactions with Astra. These are the equivalent of the DocumentClient class that we built in the previous article, for these other two APIs.
3.1. REST Client
Firstly, our REST Client. We will be using this to insert new, whole records and so only needs a single method that takes the data to insert:
@Repository
public class RestClient {
  @Value("https://${ASTRA_DB_ID}-${ASTRA_DB_REGION}.apps.astra.datastax.com/api/rest/v2/keyspaces/${ASTRA_DB_KEYSPACE}")
  private String baseUrl;

  @Value("${ASTRA_DB_APPLICATION_TOKEN}")
  private String token;

  private RestTemplate restTemplate;

  public RestClient() {
    this.restTemplate = new RestTemplate();
    this.restTemplate.setRequestFactory(new HttpComponentsClientHttpRequestFactory());
  }

  public <T> void createRecord(String table, T record) {
    var uri = UriComponentsBuilder.fromHttpUrl(baseUrl)
      .pathSegment(table)
      .build()
      .toUri();
    var request = RequestEntity.post(uri)
      .header("X-Cassandra-Token", token)
      .body(record);
    restTemplate.exchange(request, Map.class);
  }
}
3.2. GraphQL Client
Then, our GraphQL Client. This time we are taking a full GraphQL query and returning the data that it fetches:
@Repository
public class GraphqlClient {
  @Value("https://${ASTRA_DB_ID}-${ASTRA_DB_REGION}.apps.astra.datastax.com/api/graphql/${ASTRA_DB_KEYSPACE}")
  private String baseUrl;

  @Value("${ASTRA_DB_APPLICATION_TOKEN}")
  private String token;

  private RestTemplate restTemplate;

  public GraphqlClient() {
    this.restTemplate = new RestTemplate();
    this.restTemplate.setRequestFactory(new HttpComponentsClientHttpRequestFactory());
  }

  public <T> T query(String query, Class<T> cls) {
    var request = RequestEntity.post(baseUrl)
      .header("X-Cassandra-Token", token)
      .body(Map.of("query", query));
    var response = restTemplate.exchange(request, cls);

    return response.getBody();
  }
}
As before, our baseUrl and token fields are configured from our properties defining how to talk to Astra. These client classes each know how to build the complete URLs needed to interact with the database. We can use them to make the correct HTTP requests to perform the desired actions.
That’s all that’s needed to interact with the Astra since these APIs work by simply exchanging JSON documents over HTTP.
4. Recording Individual Events
In order to display events, we need to be able to record them. This will build on top of the functionality we had before to update the statuses table, and will additionally insert new records into the events table.
4.1. Inserting Events
The first thing we need is a representation of the data in this table. This will be represented as a Java Record:
public record Event(String avenger,
  String timestamp,
  Double latitude,
  Double longitude,
  Double status) {}
This directly correlates to the schema we defined earlier. Jackson will convert this into the correct JSON for the REST API when we actually make the API calls.
Next, we need our service layer to actually record these. This will take the appropriate details from outside, augment them with the timestamp and call our REST client to create the new record:
@Service
public class EventsService {
  @Autowired
  private RestClient restClient;

  public void createEvent(String avenger, Double latitude, Double longitude, Double status) {
    var event = new Event(avenger, Instant.now().toString(), latitude, longitude, status);

    restClient.createRecord("events", event);
  }
}
4.2. Update API
Finally, we need a controller to receive the events. This is extending the UpdateController that we wrote in the previous article to wire in the new EventsService and to then call it from our update method.
@RestController
public class UpdateController {
  ......
  @Autowired
  private EventsService eventsService;

  @PostMapping("/update/{avenger}")
  public void update(@PathVariable String avenger, @RequestBody UpdateBody body) throws Exception {
    eventsService.createEvent(avenger, body.lat(), body.lng(), body.status());
    statusesService.updateStatus(avenger, lookupLocation(body.lat(), body.lng()), getStatus(body.status()));
  }
  ......
}
At this point, calls to our API to record the status of an Avenger will both update the statuses document and insert a new record into the events table. This will allow us to record every update event that happens.
This means that every single time we receive a call to update the status of an Avenger we will be adding a new record to this table. In reality, we will need to support the scale of data being stored either by pruning or by adding additional partitioning, but that is out of scope for this article.
5. Making Events Available to Users via the GraphQL API
Once we have events in our table, the next step is to make them available to users. We will achieve this using the GraphQL API, retrieving a page of events at a time for a given Avenger, always ordered so that the most recent ones come first.
Using GraphQL we also have the ability to only retrieve the subset of fields that we are actually interested in, rather than all of them. If we are fetching a large number of records then this can help keep the payload size down and thus improve performance.
5.1. Retrieving Events
The first thing we need is a representation of the data we are retrieving. This is a subset of the actual data stored in the table. As such, we will want a different class to represent it:
public record EventSummary(String timestamp,
  Double latitude,
  Double longitude,
  Double status) {}
We also need a class that represents the GraphQL response for a list of these. This will include a list of event summaries and the page state to use for a cursor to the next page:
public record Events(List<EventSummary> values, String pageState) {}We can now create a new method within our Events Service to actually perform the search.
public class EventsService {
  ......
  @Autowired
  private GraphqlClient graphqlClient;

  public Events getEvents(String avenger, String offset) {
    var query = "query {" +
      "  events(filter:{avenger:{eq:\"%s\"}}, orderBy:[timestamp_DESC], options:{pageSize:5, pageState:%s}) {" +
      "    pageState " +
      "    values {" +
      "     timestamp " +
      "     latitude " +
      "     longitude " +
      "     status" +
      "   }" +
      "  }" +
      "}";

    var fullQuery = String.format(query, avenger, offset == null ? "null" : "\"" + offset + "\"");

    return graphqlClient.query(fullQuery, EventsGraphqlResponse.class).data().events();
  }

  private static record EventsResponse(Events events) {}
  private static record EventsGraphqlResponse(EventsResponse data) {}
}
Here we have a couple of inner classes that exist purely to represent the JSON structure returned by the GraphQL API down to the part that is interesting to us – these are entirely an artefact of the GraphQL API.
We then have a method that constructs a GraphQL query for the details that we want, filtering by the avenger field and sorting by the timestamp field in descending order. Into this we substitute the actual Avenger ID and the page state to use before passing it on to our GraphQL client to get the actual data.
5.2. Displaying Events in the UI
Now that we can fetch the events from the database, we can then wire this up to our UI.
Firstly we will update the StatusesController that we wrote in the previous article to support the UI endpoint for fetching the events:
public class StatusesController {
  ......

  @Autowired
  private EventsService eventsService;

  @GetMapping("/avenger/{avenger}")
  public Object getAvengerStatus(@PathVariable String avenger, @RequestParam(required = false) String page) {
    var result = new ModelAndView("dashboard");
    result.addObject("avenger", avenger);
    result.addObject("statuses", statusesService.getStatuses());
    result.addObject("events", eventsService.getEvents(avenger, page));

    return result;
  }
}
Then we need to update our templates to render the events table. We’ll add a new table to the dashboard.html file that is only rendered if the events object is present in the model received from the controller:
......
    <div th:if="${events}">
      <div class="row">
        <table class="table">
          <thead>
            <tr>
              <th scope="col">Timestamp</th>
              <th scope="col">Latitude</th>
              <th scope="col">Longitude</th>
              <th scope="col">Status</th>
            </tr>
          </thead>
          <tbody>
            <tr th:each="data, iterstat: ${events.values}">
              <th scope="row" th:text="${data.timestamp}">
                </td>
              <td th:text="${data.latitude}"></td>
              <td th:text="${data.longitude}"></td>
              <td th:text="${(data.status * 100) + '%'}"></td>
            </tr>
          </tbody>
        </table>
      </div>

      <div class="row" th:if="${events.pageState}">
        <div class="col position-relative">
          <a th:href="@{/avenger/{id}(id = ${avenger}, page = ${events.pageState})}"
            class="position-absolute top-50 start-50 translate-middle">Next
            Page</a>
        </div>
      </div>
    </div>
  </div>
......
This includes a link at the bottom to go to the next page, which passes through the page state from our events data and the ID of the avenger that we are looking at.
And finally, we need to update the status cards to allow us to link through to the events table for this entry. This is simply a hyperlink around the header in each card, rendered in status.html:
......
  <a th:href="@{/avenger/{id}(id = ${data.avenger})}">
    <h5 class="card-title" th:text="${data.name}"></h5>
  </a>
......
We can now start up the application, and click through from the cards to see the most recent events that lead up to this status:
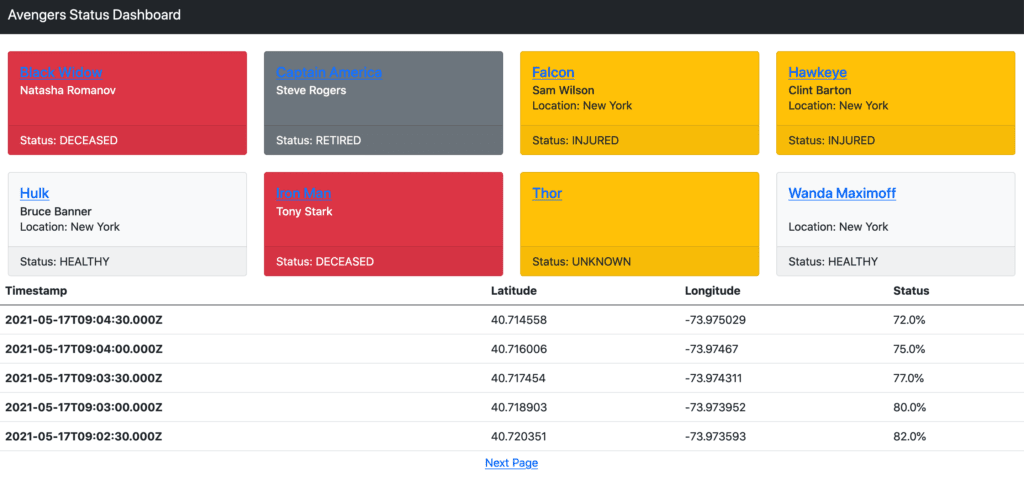
Avengers Status Dashboard extended with status updates using GraphQL
6. Summary
Here we have seen how the Astra REST and GraphQL APIs can be used to work with row-based data, and how they can work together. We’re also starting to see how well Cassandra, and these APIs, can be used for massive data sets.
All of the code from this article can be found on GitHub.