
1. Introduction
In this article, we are going to build “Tony Stark’s Avengers Status Dashboard”, used by The Avengers to monitor the status of the members of the team.
This will be built using DataStax Astra, a DBaaS powered by Apache Cassandra using Stargate to offer additional APIs for working with it. On top of this, we will be using a Spring Boot application to render the dashboard and show what’s going on.
We will be building this with Java 16, so make sure this is installed and ready to use before continuing.
2. What Is Astra?
DataStax Astra is a Database as a Service offering that is powered by Apache Cassandra. This gives us a fully hosted, fully managed Cassandra database that we can use to store our data, which includes all of the power that Cassandra offers for scalability, high availability and performance.
On top of this, Astra also incorporates the Stargate data platform that exposes the exact same underlying data via different APIs. This gives us access to traditional Cassandra tables using REST and GraphQL APIs – both of which are 100% compatible with each other and the more traditional CQL APIs. These can make access to our data incredibly flexible with only a standard HTTP client – such as the Spring RestTemplate.
It also offers a JSON Document API that allows for much more flexible data access. With this API there is no need for a schema, and every record can be a different shape if needed. Additionally, records can be as complex as needed, supporting the full power of JSON for representing the data.
This does come with a cost though – the Document API is not interchangeable with the other APIs, so it is important to decide ahead of time how data needs to be modeled and which APIs are best used to access it.
3. Our Application Data Model
We are building our system around the Astra system on top of Cassandra. This will have a direct reflection on the way that we model our data.
Cassandra is designed to allow massive amounts of data with very high throughput, and it stores records in tabular form. Astra adds to this some alternative APIs – REST and GraphQL – and the ability to represent documents as well as simple tabular data – using the Document API.
This is still backed by Cassandra, which does schema design differently. In modern systems, space is no longer a constraint. Duplicating data becomes a non-issue, removing the need for joins across collections or partitions of data. This means that we can denormalize our data within our collections to suit our needs.
As such, our data model is going to be built around two collections – events and statuses. The events collection is a record of every status event that has ever happened – this can potentially get very large, something for which Cassandra is ideal. This will be covered in more detail in the next article.
Records in this collection will look as follows:
| avenger | falcon |
|---|---|
| timestamp | 2021-04-02T14:23:12Z |
| latitude | 40.714558 |
| longitude | -73.975029 |
| status | 0.72 |
This gives us a single event update, giving the exact timestamp and location of the update and a percentage value for the status of the Avenger.
The statuses collection contains a single document that contains the dashboard data, which is a denormalized, summarized view of the data that goes into the events collection. This document will look similar to this:
{
    "falcon": {
	"realName": "Sam Wilson",
	"location": "New York",
	"status": "INJURED",
	"name": "Falcon"
    },
    "wanda": {
        "realName": "Wanda Maximoff",
        "location": "New York",
        "status": "HEALTHY"
    }
}
Here we have some general data that doesn’t change – the name and realName fields – and we have some summary data that is generated from the most recent event for this Avenger – location is derived from the latitude and longitude values, and status is a general summary of the status field from the event.
This article is focused on the statuses collection, and accessing it using the Document API. Our next article will show how to work with the events collection which is row-based data instead.
4. How to Set Up DataStax Astra
Before we can start our application, we need a store for our data. We are going to use the Cassandra offering from DataStax Astra. To get started, we need to register a free account with Astra and create a new database. This needs to be given a reasonable name for both the database and the keyspace within:
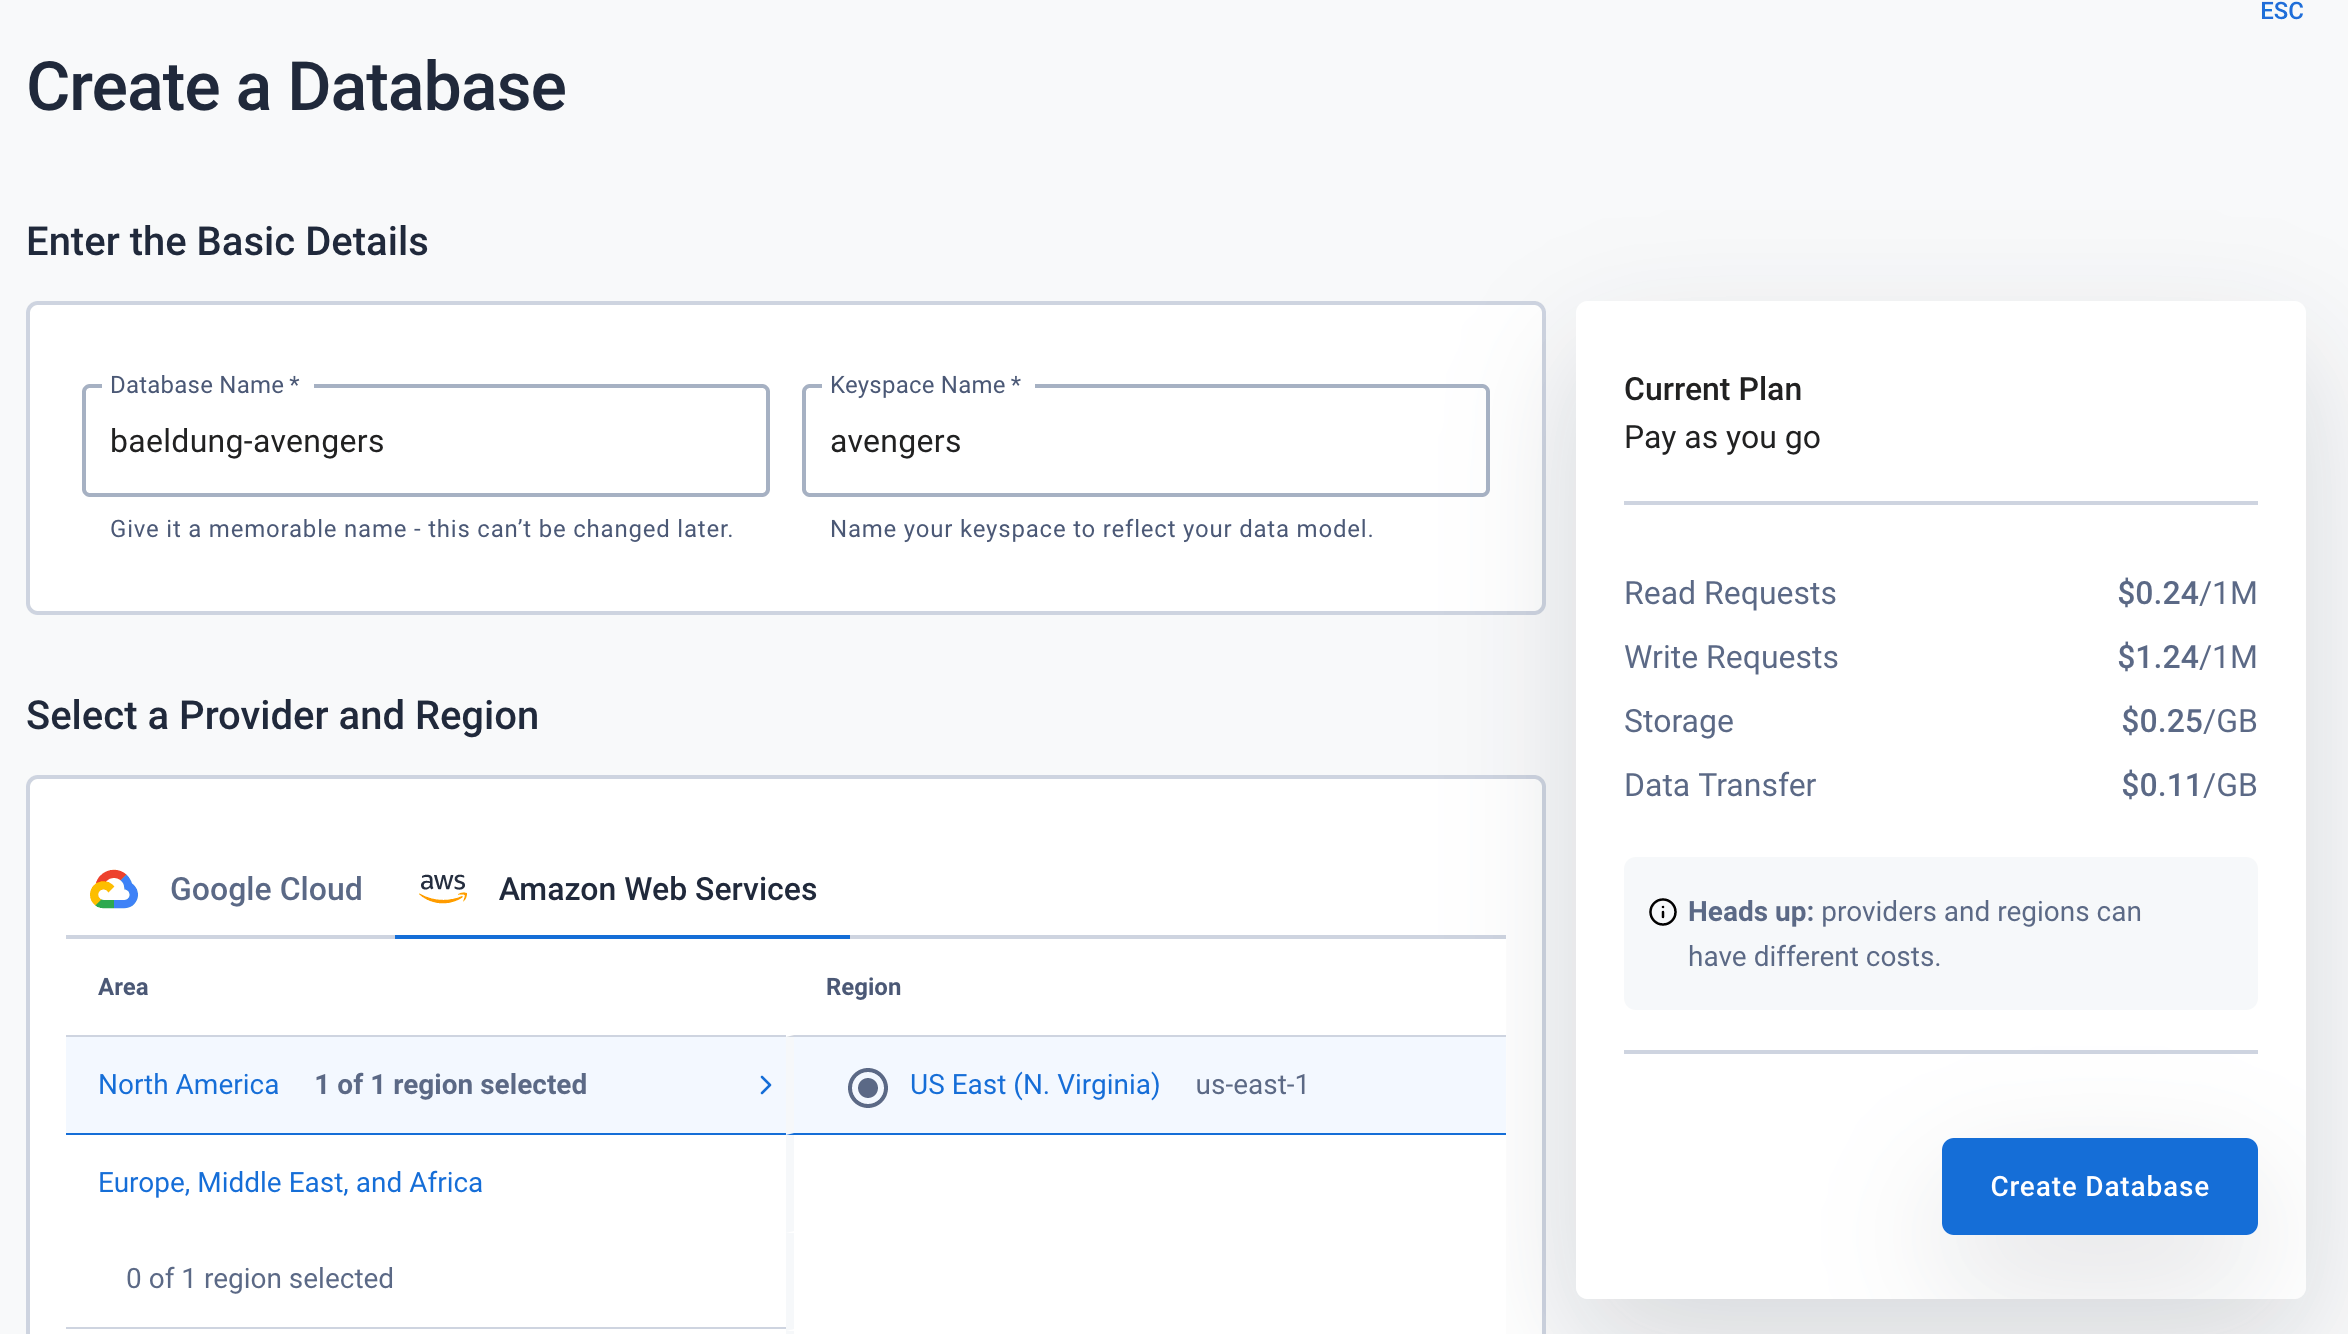
(Note – screens are accurate at the time of publication but might have changed since)
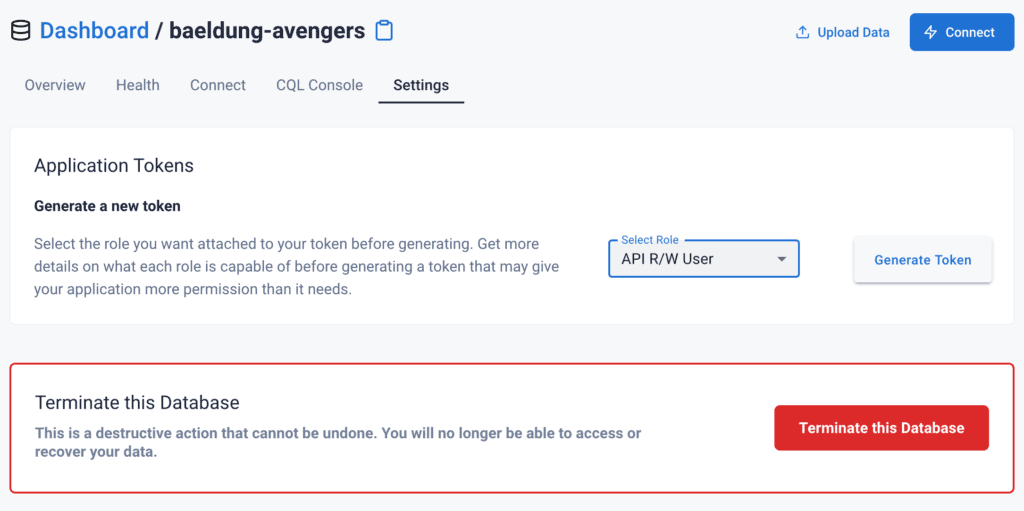
This will take a few minutes to set up. Once this is done, we will need to create an access token.
In order to do this, we need to visit the “Settings” tab for the newly created database and generate a token:
Once all of this is done, we will also need our database details. This includes:
- Database ID
- Region
- Keyspace
These can be found on the “Connect” tab.
Finally, we need some data. For the purposes of this article, we are using some pre-populated data. This can be found in a shell script here.
5. How to Set Up Spring Boot
We are going to create our new application using Spring Initializr; we’re also going to use Java 16 – allowing us to use Records. This in turn means we need Spring Boot 2.5 – currently this means 2.5.0-M3.
In addition, we need Spring Web and Thymeleaf as dependencies:
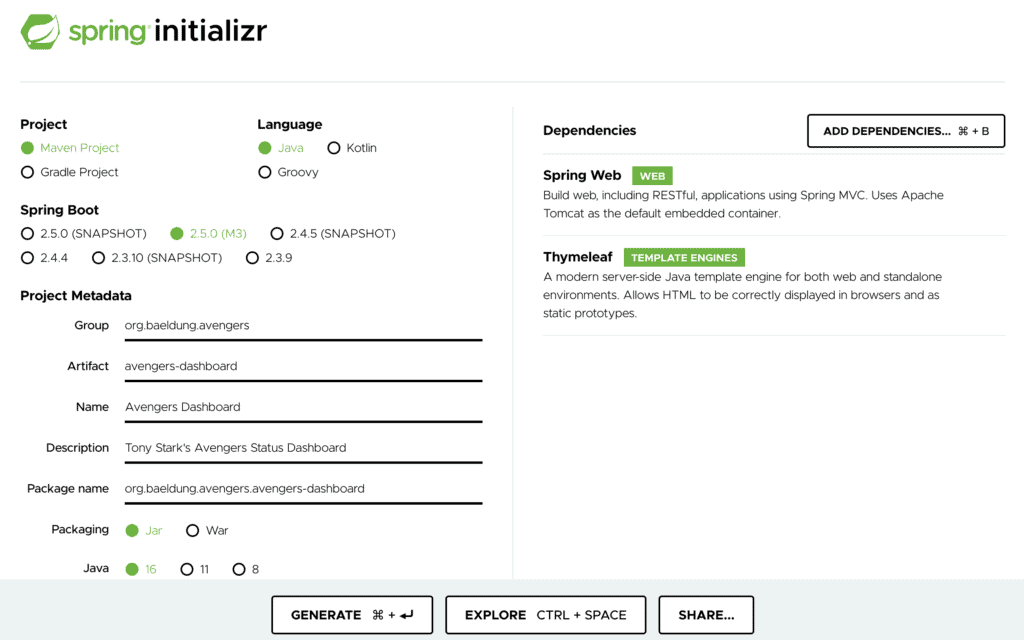
Once this is ready, we can download and unzip it somewhere and we are ready to build our application.
Before moving on, we also need to configure our Cassandra credentials. These all go into src/main/resources/application.properties as taken from the Astra dashboard:
ASTRA_DB_ID=e26d52c6-fb2d-4951-b606-4ea11f7309ba
ASTRA_DB_REGION=us-east-1
ASTRA_DB_KEYSPACE=avengers
ASTRA_DB_APPLICATION_TOKEN=AstraCS:xxx-token-here
These secrets are being managed like this purely for the purposes of this article. In a real application, they should be managed securely, for example using Vault.
6. Writing a Document Client
In order to interact with Astra, we need a client that can make the API calls necessary. This will work directly in terms of the Document API that Astra exposes, allowing our application to work in terms of rich documents. For our purposes here, we need to be able to fetch a single record by ID and to provide partial updates to the record.
In order to manage this, we will write a DocumentClient bean that encapsulates all of this:
@Repository
public class DocumentClient {
  @Value("https://${ASTRA_DB_ID}-${ASTRA_DB_REGION}.apps.astra.datastax.com/api/rest/v2/namespaces/${ASTRA_DB_KEYSPACE}")
  private String baseUrl;

  @Value("${ASTRA_DB_APPLICATION_TOKEN}")
  private String token;

  @Autowired
  private ObjectMapper objectMapper;

  private RestTemplate restTemplate;

  public DocumentClient() {
    this.restTemplate = new RestTemplate();
    this.restTemplate.setRequestFactory(new HttpComponentsClientHttpRequestFactory());
  }

  public <T> T getDocument(String collection, String id, Class<T> cls) {
    var uri = UriComponentsBuilder.fromHttpUrl(baseUrl)
      .pathSegment("collections", collection, id)
      .build()
      .toUri();
    var request = RequestEntity.get(uri)
      .header("X-Cassandra-Token", token)
      .build();
    var response = restTemplate.exchange(request, cls);
    return response.getBody();
  }

  public void patchSubDocument(String collection, String id, String key, Map<String, Object> updates) {
    var updateUri = UriComponentsBuilder.fromHttpUrl(baseUrl)
      .pathSegment("collections", collection, id, key)
      .build()
      .toUri();
    var updateRequest = RequestEntity.patch(updateUri)
      .header("X-Cassandra-Token", token)
      .body(updates);
    restTemplate.exchange(updateRequest, Map.class);
  }
}
Here, our baseUrl and token fields are configured from the properties that we defined earlier. We then have a getDocument() method that can call Astra to get the specified record from the desired collection, and a patchSubDocument() method that can call Astra to patch part of any single document in the collection.
That’s all that’s needed to interact with the Document API from Astra since it works by simply exchanging JSON documents over HTTP.
Note that we need to change the request factory used by our RestTemplate. This is because the default one that is used by Spring doesn’t support the PATCH method on HTTP calls.
7. Fetching Avengers Statuses via the Document API
Our first requirement is to be able to retrieve the statuses of the members of our team. This is the document from the statuses collection that we mentioned earlier. This will be built on top of the DocumentClient that we wrote earlier.
7.1. Retrieving Statuses from Astra
To represent these, we will need a Record as follows:
public record Status(String avenger,
  String name,
  String realName,
  String status,
  String location) {}
We also need a Record to represent the entire collection of statuses as retrieved from Cassandra:
public record Statuses(Map<String, Status> data) {}This Statuses class represents the exact same JSON as will be returned by the Document API, and so can be used to receive the data via a RestTemplate and Jackson.
Then we need a service layer to retrieve the statuses from Cassandra and return them for use:
@Service
public class StatusesService {
  @Autowired
  private DocumentClient client;

  public List<Status> getStatuses() {
    var collection = client.getDocument("statuses", "latest", Statuses.class);

    var result = new ArrayList<Status>();
    for (var entry : collection.data().entrySet()) {
      var status = entry.getValue();
      result.add(new Status(entry.getKey(), status.name(), status.realName(), status.status(), status.location()));
    }

    return result;
  }
}
Here, we are using our client to get the record from the “statuses” collection, represented in our Statuses record. Once retrieved we extract only the documents to return back to the caller. Note that we do have to rebuild the Status objects to also contain the IDs since these are actually stored higher up in the document within Astra.
7.2. Displaying the Dashboard
Now that we have a service layer to retrieve the data, we need to do something with it. This means a controller to handle incoming HTTP requests from the browser, and then render a template showing the actual dashboard.
First then, the controller:
@Controller
public class StatusesController {
  @Autowired
  private StatusesService statusesService;

  @GetMapping("/")
  public ModelAndView getStatuses() {
    var result = new ModelAndView("dashboard");
    result.addObject("statuses", statusesService.getStatuses());

    return result;
  }
}
This retrieves the statuses from Astra and passes them on to a template to render.
Our main “dashboard.html” template is then as follows:
<!doctype html>
<html lang="en">
<head>
  <meta charset="utf-8" />
  <meta name="viewport" content="width=device-width, initial-scale=1" />
  <link href="https://cdn.jsdelivr.net/npm/[email protected]/dist/css/bootstrap.min.css" rel="stylesheet"
    integrity="sha384-eOJMYsd53ii+scO/bJGFsiCZc+5NDVN2yr8+0RDqr0Ql0h+rP48ckxlpbzKgwra6" crossorigin="anonymous" />
  <title>Avengers Status Dashboard</title>
</head>
<body>
  <nav class="navbar navbar-expand-lg navbar-dark bg-dark">
    <div class="container-fluid">
      <a class="navbar-brand" href="#">Avengers Status Dashboard</a>
    </div>
  </nav>

  <div class="container-fluid mt-4">
    <div class="row row-cols-4 g-4">
      <div class="col" th:each="data, iterstat: ${statuses}">
        <th:block th:switch="${data.status}">
          <div class="card text-white bg-danger" th:case="DECEASED" th:insert="~{common/status}"></div>
          <div class="card text-dark bg-warning" th:case="INJURED" th:insert="~{common/status}"></div>
          <div class="card text-dark bg-warning" th:case="UNKNOWN" th:insert="~{common/status}"></div>
          <div class="card text-white bg-secondary" th:case="RETIRED" th:insert="~{common/status}"></div>
          <div class="card text-dark bg-light" th:case="*" th:insert="~{common/status}"></div>
        </th:block>
      </div>
    </div>
  </div>

  <script src="https://cdn.jsdelivr.net/npm/[email protected]/dist/js/bootstrap.bundle.min.js"
    integrity="sha384-JEW9xMcG8R+pH31jmWH6WWP0WintQrMb4s7ZOdauHnUtxwoG2vI5DkLtS3qm9Ekf"
    crossorigin="anonymous"></script>
</body>
</html>
And this makes use of another nested template, under “common/status.html”, to display the status of a single Avenger:
<div class="card-body">
<h5 class="card-title" th:text="${data.name}"></h5>
<h6 class="card-subtitle"><span th:if="${data.realName}" th:text="${data.realName}"></span> </h6>
<p class="card-text"><span th:if="${data.location}">Location: <span th:text="${data.location}"></span></span> </p>
</div>
<div class="card-footer">Status: <span th:text="${data.status}"></span></div>
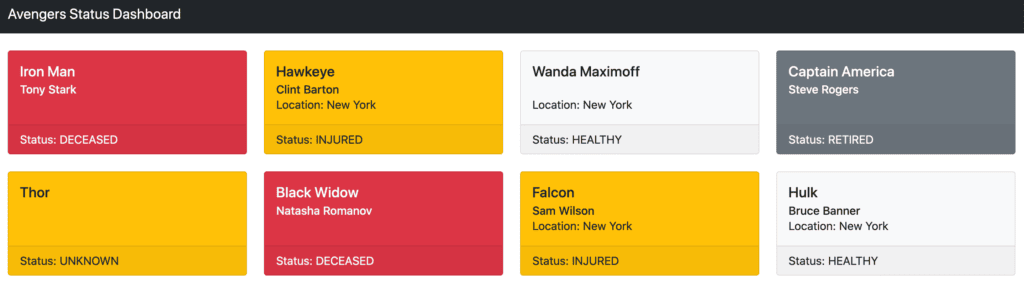
This makes use of Bootstrap to format up our page, and displays one card for each Avenger, coloured based on the status and displaying the current details of that Avenger:
8. Status Updates via the Document API
We now have the ability to display the current status data of the various Avengers members. What we’re missing is the ability to update them with feedback from the field. This will be a new HTTP controller that can update our document via the Document API to reflect the newest status details.
In the next article, this same controller will record both the latest status into the statuses collection but also the events collection. This will allow us to record the entire history of events for later analysis from the same input stream. As such, the inputs into this controller are going to be the individual events and not the rolled-up statuses.
8.1. Updating Statuses in Astra
Because we are representing the statuses data as a single document, we only need to update the appropriate portion of it. This uses the patchSubDocument() method of our client, pointing at the correct portion for the identified avenger.
We do this with a new method in the StatusesService class that will perform the updates:
public void updateStatus(String avenger, String location, String status) throws Exception {
  client.patchSubDocument("statuses", "latest", avenger,
    Map.of("location", location, "status", status));
}
8.2. API to Update Statuses
We now need a controller that can be called in order to trigger these updates. This will be a new RestController endpoint that takes the avengers ID and the latest event details:
@RestController
public class UpdateController {
  @Autowired
  private StatusesService statusesService;

  @PostMapping("/update/{avenger}")
  public void update(@PathVariable String avenger, @RequestBody UpdateBody body) throws Exception {
    statusesService.updateStatus(avenger, lookupLocation(body.lat(), body.lng()), getStatus(body.status()));
  }

  private String lookupLocation(Double lat, Double lng) {
    return "New York";
  }

  private String getStatus(Double status) {
    if (status == 0) {
      return "DECEASED";
    } else if (status > 0.9) {
      return "HEALTHY";
    } else {
      return "INJURED";
    }
  }

  private static record UpdateBody(Double lat, Double lng, Double status) {}
}
This allows us to accept requests for a particular Avenger, containing the current latitude, longitude, and status of that Avenger. We then convert these values into status values and pass them on to the StatusesService to update the status record.
In a future article, this will be updated to also create a new events record with this data, so that we can track the entire history of events for every Avenger.
Note that we are not correctly looking up the name of the location to use for the latitude and longitude – it is just hard-coded. There are various options for implementing this but they are out of scope for this article.
9. Summary
Here we have seen how we can leverage the Astra Document API on top of Cassandra to build a dashboard of statuses. Since Astra is serverless, your demo database will scale to zero when unused, so you will not continue to incur usage charges. In our next article, we will instead work with the Row APIs that allow us to work with very large numbers of records in a very easy manner.
All of the code from this article can be found over on GitHub.