Distributed Transaction Management Using Apache Seata
Last updated: May 6, 2026


Mocking is an essential part of unit testing, and the Mockito library makes it easy to write clean and intuitive unit tests for your Java code.
Get started with mocking and improve your application tests using our Mockito guide:
Handling concurrency in an application can be a tricky process with many potential pitfalls. A solid grasp of the fundamentals will go a long way to help minimize these issues.
Get started with understanding multi-threaded applications with our Java Concurrency guide:
Spring 5 added support for reactive programming with the Spring WebFlux module, which has been improved upon ever since. Get started with the Reactor project basics and reactive programming in Spring Boot:
Since its introduction in Java 8, the Stream API has become a staple of Java development. The basic operations like iterating, filtering, mapping sequences of elements are deceptively simple to use.
But these can also be overused and fall into some common pitfalls.
To get a better understanding on how Streams work and how to combine them with other language features, check out our guide to Java Streams:
Explore Spring Boot 3 and Spring 6 in-depth through building a full REST API with the framework:
Yes, Spring Security can be complex, from the more advanced functionality within the Core to the deep OAuth support in the framework.
I built the security material as two full courses - Core and OAuth, to get practical with these more complex scenarios. We explore when and how to use each feature and code through it on the backing project.
You can explore the course here:
Spring Data JPA is a great way to handle the complexity of JPA with the powerful simplicity of Spring Boot.
Get started with Spring Data JPA through the guided reference course:
Refactor Java code safely — and automatically — with OpenRewrite.
Refactoring big codebases by hand is slow, risky, and easy to put off. That’s where OpenRewrite comes in. The open-source framework for large-scale, automated code transformations helps teams modernize safely and consistently.
Each month, the creators and maintainers of OpenRewrite at Moderne run live, hands-on training sessions — one for newcomers and one for experienced users. You’ll see how recipes work, how to apply them across projects, and how to modernize code with confidence.
Join the next session, bring your questions, and learn how to automate the kind of work that usually eats your sprint time.
1. Introduction
In this tutorial, we’re going to take a look at Apache Seata, formally from Alibaba but now part of the Apache Incubator project. We’ll see what it is, how to use it and what we can do with it.
2. Why Distributed Transactions?
To write robust applications, we often make use of database transactions to ensure that any changes to our data are atomic. That is, either the entire change happens, or none of it does. This helps ensure that our data remains in a valid state at all times.
When we have a single service that manages our data, this is easy to achieve. We start a new transaction when a request comes into our system. All data changes occur within this transaction, and we commit only if the entire request succeeds.
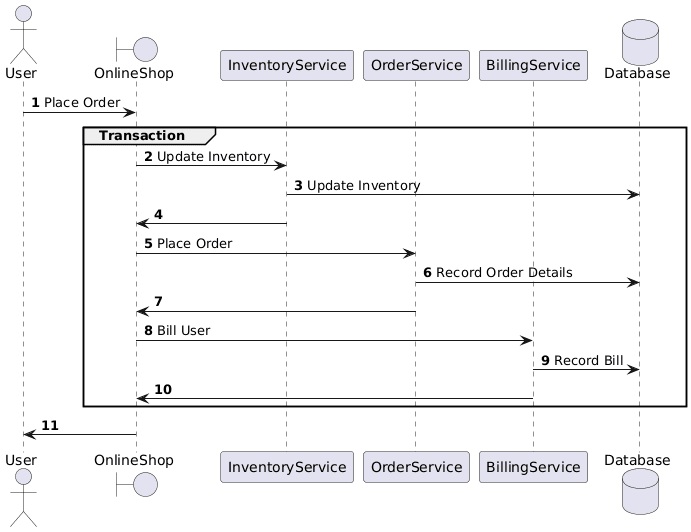
Here, if something goes wrong when recording the bill for the user, the order and inventory changes are reverted, and the system remains in the correct state.
If we move towards running this as many distributed services, suddenly our transactions are distributed as well:
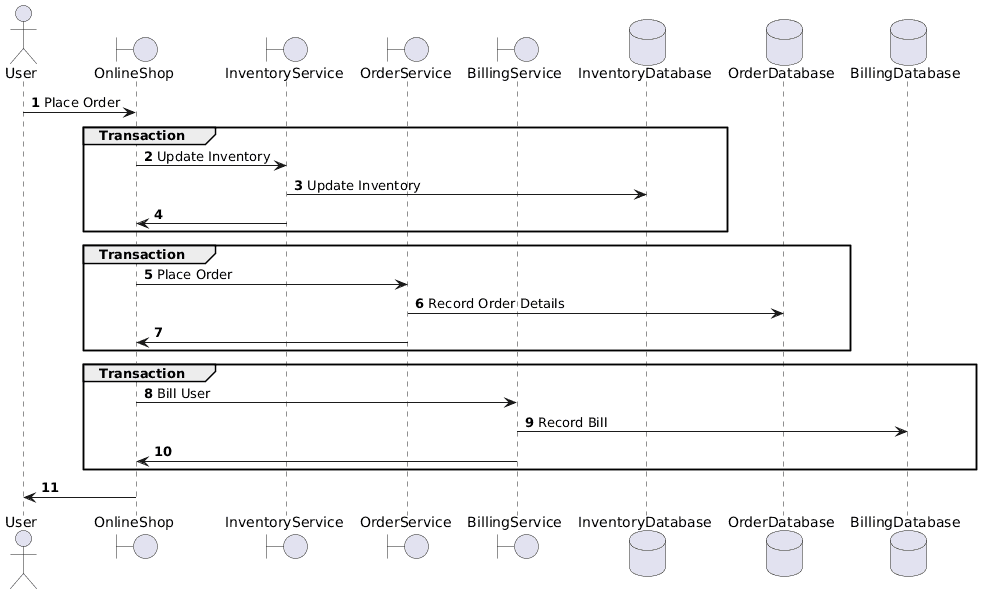
This is exactly the same flow, but by splitting our inventory, order and billing services into separate applications, we’ve also split them into separate transactions. Now, if recording the bill fails, the inventory and order changes have already been committed and cannot easily be reverted.
This is where distributed transactions come in. If we have a way to maintain our database transactions across multiple applications, we get both the benefits of splitting our system up, as well as the benefits of a single transaction for the entire user action.
3. What Is Apache Seata?
Apache Seata is an open source project, originally part of Alibaba group, that helps us to manage distributed transactions in our Java microservices applications.
When using Seata, we run an additional service that acts as the Transaction Coordinator. When a request comes into our application, the originating service, acting as the Transaction Manager, starts a new distributed transaction within the transaction coordinator. All other services then take part in this same transaction until it either gets persisted or reverted:

Here, our flow is essentially the same, but we’ve also added in our transaction coordinator and wrapped everything in a single distributed transaction. This will ensure that all three databases either commit or rollback together, and so our overall system remains in a valid state.
4. Seata Server
Before we can use Seata, we need to ensure that we have a running Seata Server. This acts as the transaction coordinator in our overall system.
The easiest way to get this working is as a Docker container that we can run in our environment. For example, we can include it in a Docker Compose file as follows:
services:
  seata-server:
    image: apache/seata-server:2.6.0
By default, this listens on port 8091 and uses the local filesystem within the container to track distributed transactions.
We’re then ready to set up our application to work with Seata.
5. Using Spring Boot
Seata provides a Spring Boot starter that we can use to set it up. If we’re using Maven, we can include this dependency in our pom.xml file:
<dependency>
    <groupId>org.apache.seata</groupId>
    <artifactId>seata-spring-boot-starter</artifactId>
    <version>2.6.0</version>
</dependency>
5.1. Configuring Seata
We then need to provide a configuration file for Seata. This needs to be present on the classpath, so we’ll create it as src/main/resources/seata.conf:
transport {
  type = "TCP"
  server = "NIO"
  heartbeat = true
  thread-factory {
    boss-thread-prefix = "NettyBoss"
    worker-thread-prefix = "NettyServerNIOWorker"
    server-executor-thread-size = 100
    share-boss-worker = false
    client-selector-thread-size = 1
    client-selector-thread-prefix = "NettyClientSelector"
    client-worker-thread-prefix = "NettyClientWorkerThread"
  }
  shutdown {
    wait = 3
  }
  serialization = "seata"
  compressor = "none"
}

service {
  vgroupMapping.my_tx_group = "default"
  default.grouplist = "seata-server:8091"
  enableDegrade = false
  disableGlobalTransaction = false
}

client {
  rm {
    asyncCommitBufferLimit = 10000
    lock {
      retryInterval = 10
      retryTimes = 30
      retryPolicyBranchRollbackOnConflict = true
    }
    reportRetryCount = 5
    tableMetaCheckEnable = false
    reportSuccessEnable = false
    sagaBranchRegisterEnable = false
  }
  tm {
    commitRetryCount = 5
    rollbackRetryCount = 5
    defaultGlobalTransactionTimeout = 60000
    degradeCheck = false
  }
  undo {
    dataValidation = true
    logSerialization = "jackson"
    logTable = "undo_log"
    compress {
      enable = true
      type = "zip"
      threshold = "64k"
    }
  }
  log {
    exceptionRate = 100
  }
}
Most of this is standard, but note we have to configure the host and port of the Seata server in the field service.default.grouplist.
We also need to add some configuration to Spring to enable it to work with Seata. We do this within our application.properties file:
seata.enabled=true
seata.application-id=${spring.application.name}
seata.tx-service-group=my_tx_group

seata.registry.type=file
seata.registry.file.name=seata.conf

seata.config.type=file
seata.config.file.name=seata.conf

seata.service.vgroup-mapping.my_tx_group=default
seata.service.grouplist.default=seata-server:8091

seata.data-source-proxy-mode=AT
seata.enable-auto-data-source-proxy=true
This also contains the host and port of the Seata server in the seata.service.grouplist.default property. We also need to ensure that several of the properties match up with the Seata configuration file, and that the seata.registry.file.name and seata.config.file.name properties point to our seata.conf file.
Finally, if we’re using AT mode as configured here, we’ll need to create a special undo_log table in our service database:
CREATE TABLE IF NOT EXISTS undo_log (
    id            BIGSERIAL    NOT NULL,
    branch_id     BIGINT       NOT NULL,
    xid           VARCHAR(128) NOT NULL,
    context       VARCHAR(128) NOT NULL,
    rollback_info BYTEA        NOT NULL,
    log_status    INT          NOT NULL,
    log_created   TIMESTAMP(0) NOT NULL,
    log_modified  TIMESTAMP(0) NOT NULL,
    CONSTRAINT pk_undo_log PRIMARY KEY (id),
    CONSTRAINT ux_undo_log UNIQUE (xid, branch_id)
);
We configure the exact table name in our seata.conf file.
At this point, Seata integrates with our service. If we start our project now, we’ll see several log messages indicating this:
2026-03-14T07:53:37.728Z  INFO 1 --- [apache-seata-a] [           main] o.a.s.s.b.a.SeataAutoConfiguration       : Automatically configure Seata
2026-03-14T07:53:37.802Z  INFO 1 --- [apache-seata-a] [           main] ServiceLoader$InnerEnhancedServiceLoader : Load compatible class io.seata.spring.annotation.ScannerChecker
2026-03-14T07:53:37.984Z  INFO 1 --- [apache-seata-a] [           main] ServiceLoader$InnerEnhancedServiceLoader : Load compatible class io.seata.integration.tx.api.remoting.RemotingParser
2026-03-14T07:53:37.996Z  INFO 1 --- [apache-seata-a] [           main] o.a.s.s.a.GlobalTransactionScanner       : Initializing Global Transaction Clients ...
.....
2026-03-14T07:53:45.533Z  INFO 1 --- [apache-seata-a] [           main] o.a.s.c.rpc.netty.RmNettyRemotingClient  : RM will register :jdbc:postgresql://postgres:5432/seata
2026-03-14T07:53:45.540Z  INFO 1 --- [apache-seata-a] [           main] o.a.s.c.rpc.netty.NettyPoolableFactory   : NettyPool create channel to transactionRole:RMROLE,address:172.18.0.2:8091,msg:< RegisterRMRequest{resourceIds='jdbc:postgresql://postgres:5432/seata', version='2.6.0', applicationId='apache-seata-a', transactionServiceGroup='my_tx_group', extraData='null'} >
2026-03-14T07:53:45.586Z  INFO 1 --- [apache-seata-a] [           main] o.a.s.c.rpc.netty.RmNettyRemotingClient  : register RM success. client version:2.6.0, server version:2.6.0,channel:[id: 0x0a28dceb, L:/172.18.0.6:39884 - R:172.18.0.2/172.18.0.2:8091]
2026-03-14T07:53:45.590Z  INFO 1 --- [apache-seata-a] [           main] o.a.s.c.rpc.netty.NettyPoolableFactory   : register success, cost 34 ms, version:2.6.0,role:RMROLE,channel:[id: 0x0a28dceb, L:/172.18.0.6:39884 - R:172.18.0.2/172.18.0.2:8091]
2026-03-14T07:53:45.634Z  INFO 1 --- [apache-seata-a] [           main] .s.s.a.d.SeataAutoDataSourceProxyCreator : Auto proxy data source 'dataSource' by 'AT' mode.
5.2. Global Transactions
Once Spring fully integrates with Seata, we can start using it. We do this with the @GlobalTransaction annotation, which we use to mark the start of a transaction that should be distributed between services:
@PostMapping("/a/{mode}")
@GlobalTransactional
public void handle() {
    // Controller logic here
}
We can use this anywhere that we’d typically use the @Transactional annotation, and this will start a new database transaction. This transaction registers with Seata and can span multiple services instead of remaining local.
Note that we only include this annotation at the start of the global transaction. Subsequent services in the same transaction needn’t include it. We’ll manage them differently, as we’ll see shortly.
If we wish, we can also provide some configuration for our transaction in a familiar way to the standard @Transactional annotation:
@GlobalTransactional(rollbackFor = MyException.class, timeoutMills = 10000)Here, we indicate that the transaction should roll back for any subclasses of MyException, with a 10-second timeout.
5.3. Transaction Propagation
Unfortunately, if we try this now, then we’ll discover that the transactions don’t propagate correctly. We’d see log messages in our service indicating that it’s registered with Seata, but subsequent services wouldn’t do anything.
Seata manages this by passing a special XID value between services. Typically, this goes in the HTTP header TX_XID on the calls between our services.
If we’re using standard Spring then we need to manage this ourselves. This includes adding it to all outgoing HTTP calls and receiving it on all incoming calls.
If we’re using Spring RestClient then we can write a ClientHttpRequestInterceptor implementation that will do this for us:
public class SeataXidClientInterceptor implements ClientHttpRequestInterceptor {

    @Override
    public ClientHttpResponse intercept(HttpRequest request, byte[] body, ClientHttpRequestExecution execution)
        throws IOException {

        String xid = RootContext.getXID();
        if (StringUtils.hasText(xid)) {
            request.getHeaders().add(RootContext.KEY_XID, xid);
        }

        return execution.execute(request, body);
    }
}
This simply adds our XID value to the outgoing HTTP request.
We must then ensure that our RestClient always uses this:
@Bean
public RestClient restClient() {
    return RestClient.builder()
        .requestInterceptor(new SeataXidClientInterceptor())
        .build();
}
We can do the exact same with any other HTTP clients too – e.g. WebClient or RestTemplate.
At this point, all of our outbound calls will indicate the XID for our global transactions. However, we still need to consume them in our downstream services. We can do this with a servlet filter:
@Component
@Order(Ordered.HIGHEST_PRECEDENCE)
public class SeataXidFilter implements Filter {

    @Override
    public void doFilter(ServletRequest req, ServletResponse res, FilterChain chain)
        throws IOException, ServletException {

        HttpServletRequest httpRequest = (HttpServletRequest) req;
        String xid = httpRequest.getHeader(RootContext.KEY_XID);

        boolean bound = false;
        if (StringUtils.hasText(xid) && !xid.equals(RootContext.getXID())) {
            RootContext.bind(xid);
            bound = true;
        }

        try {
            chain.doFilter(req, res);
        } finally {
            if (bound) {
                RootContext.unbind();
            }
        }
    }
}
This does the exact opposite – if there’s an XID present on the incoming HTTP request then bind it to the local service before continuing with the request, and ensure that we unbind it at the end.
At this point, our transaction now correctly spans our services and the entire set will commit or roll back together.
6. Using Spring Cloud
Unlike Spring Boot, Spring Cloud can handle some of this automatically for us.
In a Spring Cloud setup, we need to use a different dependency in our project. We also need to be careful with the versions here – the newest 2025.1.0.0 version only works with Spring Boot 4, whereas the 2025.0.0.0 version requires Spring Boot 3.
This dependency comes as a BOM that we can import into our dependency management section to manage versions, and then as the actual starter dependency:
<dependencyManagement>
    <dependencies>
        <dependency>
            <groupId>com.alibaba.cloud</groupId>
            <artifactId>spring-cloud-alibaba-dependencies</artifactId>
            <version>2025.0.0.0</version>
            <type>pom</type>
            <scope>import</scope>
        </dependency>
    </dependencies>
</dependencyManagement>
...
<dependencies>
    <dependency>
        <groupId>com.alibaba.cloud</groupId>
        <artifactId>spring-cloud-starter-alibaba-seata</artifactId>
    </dependency>
</dependencies>
We still need to do the same configuration as before, using our seata.conf and application.properties files. However, the framework handles most transaction propagation for us.
The Spring Cloud Starter will automatically set our service up so that any incoming HTTP requests will join a global transaction if required. This removes the need for our servlet filter.
The starter also configures RestTemplate beans to automatically forward the XID value to downstream services, so if we’re using this, then we don’t need additional setup here either. Unfortunately, it doesn’t work with RestClient or WebClient, so if we’re using those, then we’ll still need to configure it manually.
7. Summary
In this article, we’ve taken a quick look at Apache Seata. We’ve seen what it is, and how we can use it in our applications. Next time you’re writing transactional services, why not give it a go?


