1. Introduction
Apache POI is an open-source library for software developers to create and manipulate Microsoft Office documents. Among other features, it allows developers to change document formatting programmatically.
In this article, we’ll discuss how to change cells’ style in Microsoft Excel when using a class called CellStyle. That is to say, using this class, we can write code to modify the style of cells in a Microsoft Excel document. Firstly, it is a feature provided by the Apache POI library that allows a style with multiple formatting properties to be created inside a workbook. Secondly, the style can then be applied to multiple cells in that workbook.
Besides that, we’ll also look at common pitfalls of using the CellStyle class.
2. Apache POI and Maven Dependency
Let’s add Apache POI as a dependency to our project pom.xml file:
<dependency>
    <groupId>org.apache.poi</groupId>
    <artifactId>poi</artifactId>
    <version>5.2.5</version>
</dependency>
3. Creating CellStyle
Let’s start with instantiating CellStyle:
Workbook workbook = new XSSFWorkbook(fileLocation);
CellStyle cellStyle = wb.createCellStyle();
Next, well set the needed formatting property. For instance, the code below will set it to have a date format:
cellStyle.setDataFormat(createHelper.createDataFormat().getFormat("m/d/yy h:mm"));
Most importantly, we can set multiple formatting properties of a CellStyle to get desired style combination. For instance, we’re applying the below code to the same CellStyle object. Therefore, it has a date-formatted style as well as center-aligned text style:
cellStyle.setAlignment(HorizontalAlignment.CENTER);
Take note that CellStyle has several formatting properties that we can modify:
| Property |
Description |
| DataFormat |
Data format for the cell, such as date |
| Alignment |
Type of horizontal alignment for the cell |
| Hidden |
Whether the cell is to be hidden |
| Indention |
Number of spaces to indent the text in the cell |
| BorderBottom, BorderLeft, BorderRight, BorderTop |
Type of border to use for the bottom, left, right, and top border of the cell |
| Font |
Font property for this style, such as font color |
We’ll be looking at the Font property again later when we use it to change the font style.
The Font property of a CellStyle is where we set font-related formatting. For instance, we can set the font name, color, and size. We can set whether the font is bold or italic. Both properties of Font can either be true or false. We can also set underline style to:
| Value |
Property |
| U_NONE |
Text without underline |
| U_SINGLE |
Single underline text where only the word is underlined |
| U_SINGLE_ACCOUNTING |
Single underline text where almost the entire cell width is underlined |
| U_DOUBLE |
Double underline text where only the word is underlined |
| U_DOUBLE_ACCOUNTING |
Double underline text where almost the entire cell width is underlined |
Let’s continue from the previous example. We’ll write a class called CellStyler with a method that creates a style for warning text:
public class CellStyler {
    public CellStyle createWarningColor(Workbook workbook) {
        CellStyle style = workbook.createCellStyle();
        Font font = workbook.createFont();
        font.setFontName("Courier New");
        font.setBold(true);
        font.setUnderline(Font.U_SINGLE);
        font.setColor(HSSFColorPredefined.DARK_RED.getIndex());
        style.setFont(font);

        style.setAlignment(HorizontalAlignment.CENTER);
        style.setVerticalAlignment(VerticalAlignment.CENTER);
        return style;
    }
}
Now, let’s create an Apache POI workbook and get the first worksheet:
Workbook workbook = new XSSFWorkbook(fileLocation);
Sheet sheet = workbook.getSheetAt(0);
Note that we’re setting row height so that we can see the effect of text alignment:
Row row1 = sheet.createRow(0);
row1.setHeightInPoints((short) 40);
Let’s instantiate the class and use it to set the style
CellStyler styler = new CellStyler();
CellStyle style = styler.createWarningColor(workbook);

Cell cell1 = row1.createCell(0);
cell1.setCellStyle(style);
cell1.setCellValue("Hello");

Cell cell2 = row1.createCell(1);
cell2.setCellStyle(style);
cell2.setCellValue("world!");
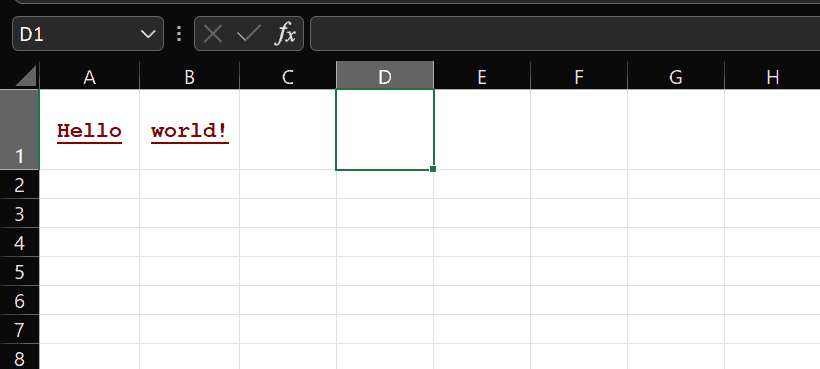
Now, let’s save this workbook to a file and open the file in Microsoft Excel to view the font styling effect, where we should see:

5. Common Pitfalls
Let’s look at two common mistakes made when using CellStyle.
5.1. Accidentally Modify All Cell Styles
Firstly, it’s a common mistake to get CellStyle from a cell and start to modify it. Apache POI documentation for the getCellStyle method mentions that a cell’s getCellStyle method will always return a non-null value. This means that the cell has a default value, which is also the default style that is initially being used by all cells in the workbook. Therefore, the below code will make all cells have date format:
cell.setCellValue(rdf.getEffectiveDate());
cell.getCellStyle().setDataFormat(HSSFDataFormat.getBuiltinFormat("d-mmm-yy"));
5.2. Create New Style for Each Cell
Another common mistake is to have too many similar styles in a workbook:
CellStyle style1 = codeToCreateCellStyle();
Cell cell1 = row1.createCell(0);
cell1.setCellStyle(style1);

CellStyle style2 = codeToCreateCellStyle();
Cell cell2 = row1.createCell(1);
cell2.setCellStyle(style2);
A CellStyle is scoped to a workbook. Because of this, a similar style should be shared by multiple cells. In the above example, the style should be created only once and shared between cell1 and cell2:
CellStyle style1 = codeToCreateCellStyle();
Cell cell1 = row1.createCell(0);
cell1.setCellStyle(style1);
cell1.setCellValue("Hello");

Cell cell2 = row1.createCell(1);
cell2.setCellStyle(style1);
cell2.setCellValue("world!");
6. Summary
In this article, we’ve learned how to use CellStyle and its Font property to style a cell in Apache POI. Styling a cell is relatively straightforward if we manage to avoid pitfalls, as described in this article.
In the code example, we have shown how to programmatically style spreadsheet documents as needed, as if we were using the Excel application itself. This is most important when there are requirements to generate a spreadsheet with a nice-looking presentation of data.
As always, the source code for the article is available over on GitHub.


