

Mocking is an essential part of unit testing, and the Mockito library makes it easy to write clean and intuitive unit tests for your Java code.
Get started with mocking and improve your application tests using our Mockito guide:
Handling concurrency in an application can be a tricky process with many potential pitfalls. A solid grasp of the fundamentals will go a long way to help minimize these issues.
Get started with understanding multi-threaded applications with our Java Concurrency guide:
Spring 5 added support for reactive programming with the Spring WebFlux module, which has been improved upon ever since. Get started with the Reactor project basics and reactive programming in Spring Boot:
Since its introduction in Java 8, the Stream API has become a staple of Java development. The basic operations like iterating, filtering, mapping sequences of elements are deceptively simple to use.
But these can also be overused and fall into some common pitfalls.
To get a better understanding on how Streams work and how to combine them with other language features, check out our guide to Java Streams:
Explore Spring Boot 3 and Spring 6 in-depth through building a full REST API with the framework:
Yes, Spring Security can be complex, from the more advanced functionality within the Core to the deep OAuth support in the framework.
I built the security material as two full courses - Core and OAuth, to get practical with these more complex scenarios. We explore when and how to use each feature and code through it on the backing project.
You can explore the course here:
Spring Data JPA is a great way to handle the complexity of JPA with the powerful simplicity of Spring Boot.
Get started with Spring Data JPA through the guided reference course:
Refactor Java code safely — and automatically — with OpenRewrite.
Refactoring big codebases by hand is slow, risky, and easy to put off. That’s where OpenRewrite comes in. The open-source framework for large-scale, automated code transformations helps teams modernize safely and consistently.
Each month, the creators and maintainers of OpenRewrite at Moderne run live, hands-on training sessions — one for newcomers and one for experienced users. You’ll see how recipes work, how to apply them across projects, and how to modernize code with confidence.
Join the next session, bring your questions, and learn how to automate the kind of work that usually eats your sprint time.
1. Introduction
When it comes to big data and many potential parties interested in it, distribution is critical. To that end, there are simple and complex solutions.
In this tutorial, we’ll take a look at Alibaba Nacos. First, we see what it is. After that, we go over different ways to configure and use Nacos. Finally, we demonstrate what we can do with the platform.
2. What Is Nacos?
Nacos is a platform offering various tools:
- dynamic service discovery
- configuration management
- distributed locking
It’s mainly used for building highly distributed systems.
At its core, Nacos provides a service discovery system enabling us to dynamically start and stop instances of different services, and still have other services able to reach them. This is particularly valuable in microservices applications where we might have a larger number of applications that each have a varied number of running instances.
Nacos also offers tools for managing the configuration of applications, providing a way to configure everything in a single place and have the suite of running instances automatically reflect this. Furthermore, we also have tools for distributed locking, enabling distributed applications to share finite resources without conflict.
As expected, there are some more recently introduced features for working with AI Agents – including MCP Servers, Skills, Prompts, and AgentCard discovery. However, these are out of scope for this article.
3. Running Nacos
The easiest way to get started quickly with Nacos is by using Docker.
In particular, we can start a standalone Nacos instance using a fairly simple docker-compose.yml file:
services:
  nacos:
    image: nacos/nacos-server:latest
    environment:
      - MODE=standalone
      - NACOS_AUTH_TOKEN=U2VjdXJlTmFjb3NBdXRoVG9rZW5Gb3JEZW1vUHVycG9zZXMxMjM=
      - NACOS_AUTH_IDENTITY_KEY=serverIdentity
      - NACOS_AUTH_IDENTITY_VALUE=nacos-demo-node
    ports:
      - "8080:8080"
      - "8848:8848"
      - "9848:9848"
The NACOS_AUTH_TOKEN variable must contain a string that’s at least 32 characters long and then base-64 encoded. On the other hand, NACOS_AUTH_IDENTITY_KEY and NACOS_AUTH_IDENTITY_VALUE can contain any values that identify the current Nacos instance.
At this point, we can run the setup:
$ docker compose up
.....
nacos-1  | 2026-04-27 14:20:53,304 INFO Nacos Console started successfully in 311 ms
Once started, we can access the console on http://localhost:8080.
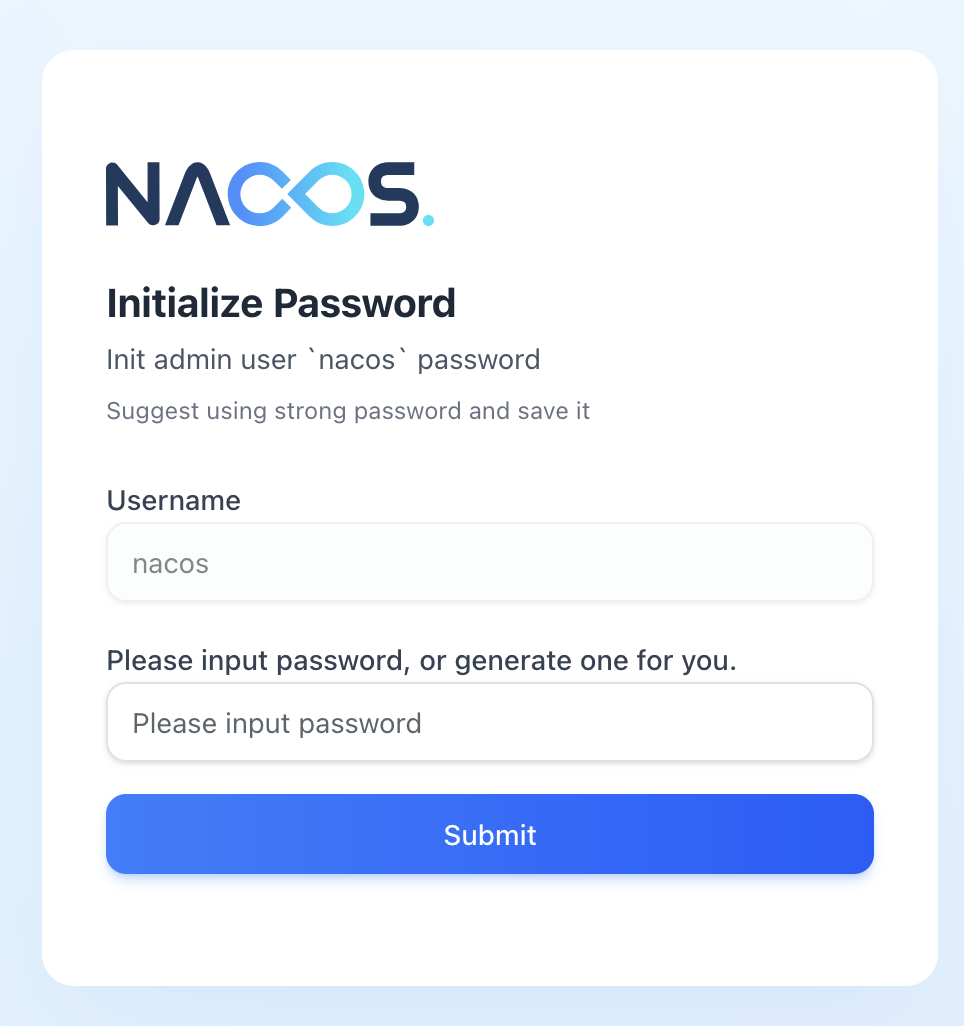
On first access, we need to configure a password for the nacos user:
Now, let’s log into the management console:
Running Nacos in this way, we get a set of default data already present to work with, but we can use this UI to configure a custom environment.
4. Using Nacos With Java SDK
Now that we’ve got Nacos running, we can use it from applications.
To do this, we first need to add the client dependency to the project. At the time of writing, the latest version is 3.2.1.
If using Maven, we can include this dependency in the pom.xml file:
<dependency>
    <groupId>com.alibaba.nacos</groupId>
    <artifactId>nacos-client</artifactId>
    <version>3.2.1</version>
</dependency>
To leverage Nacos within the application, we need to know the address of the Nacos server we’re working with, the namespace we’re going to use if it’s not the default, and any other configuration properties for the service in question:
Properties properties = new Properties();
properties.setProperty(PropertyKeyConst.SERVER_ADDR, "localhost:8848");
properties.setProperty(PropertyKeyConst.NAMESPACE, "public");
Now, we can then create a client for each of the Nacos services that we require:
ConfigService configService = NacosFactory.createConfigService(properties);
NamingService namingService = NacosFactory.createNamingService(properties);
LockService lockService = NacosFactory.createLockService(properties);
These service clients are then ready for us to use.
5. Configuration Management
Nacos enables the management of configuration settings in a single, central place, so services can make use of them automatically.
5.1. Managing Configuration
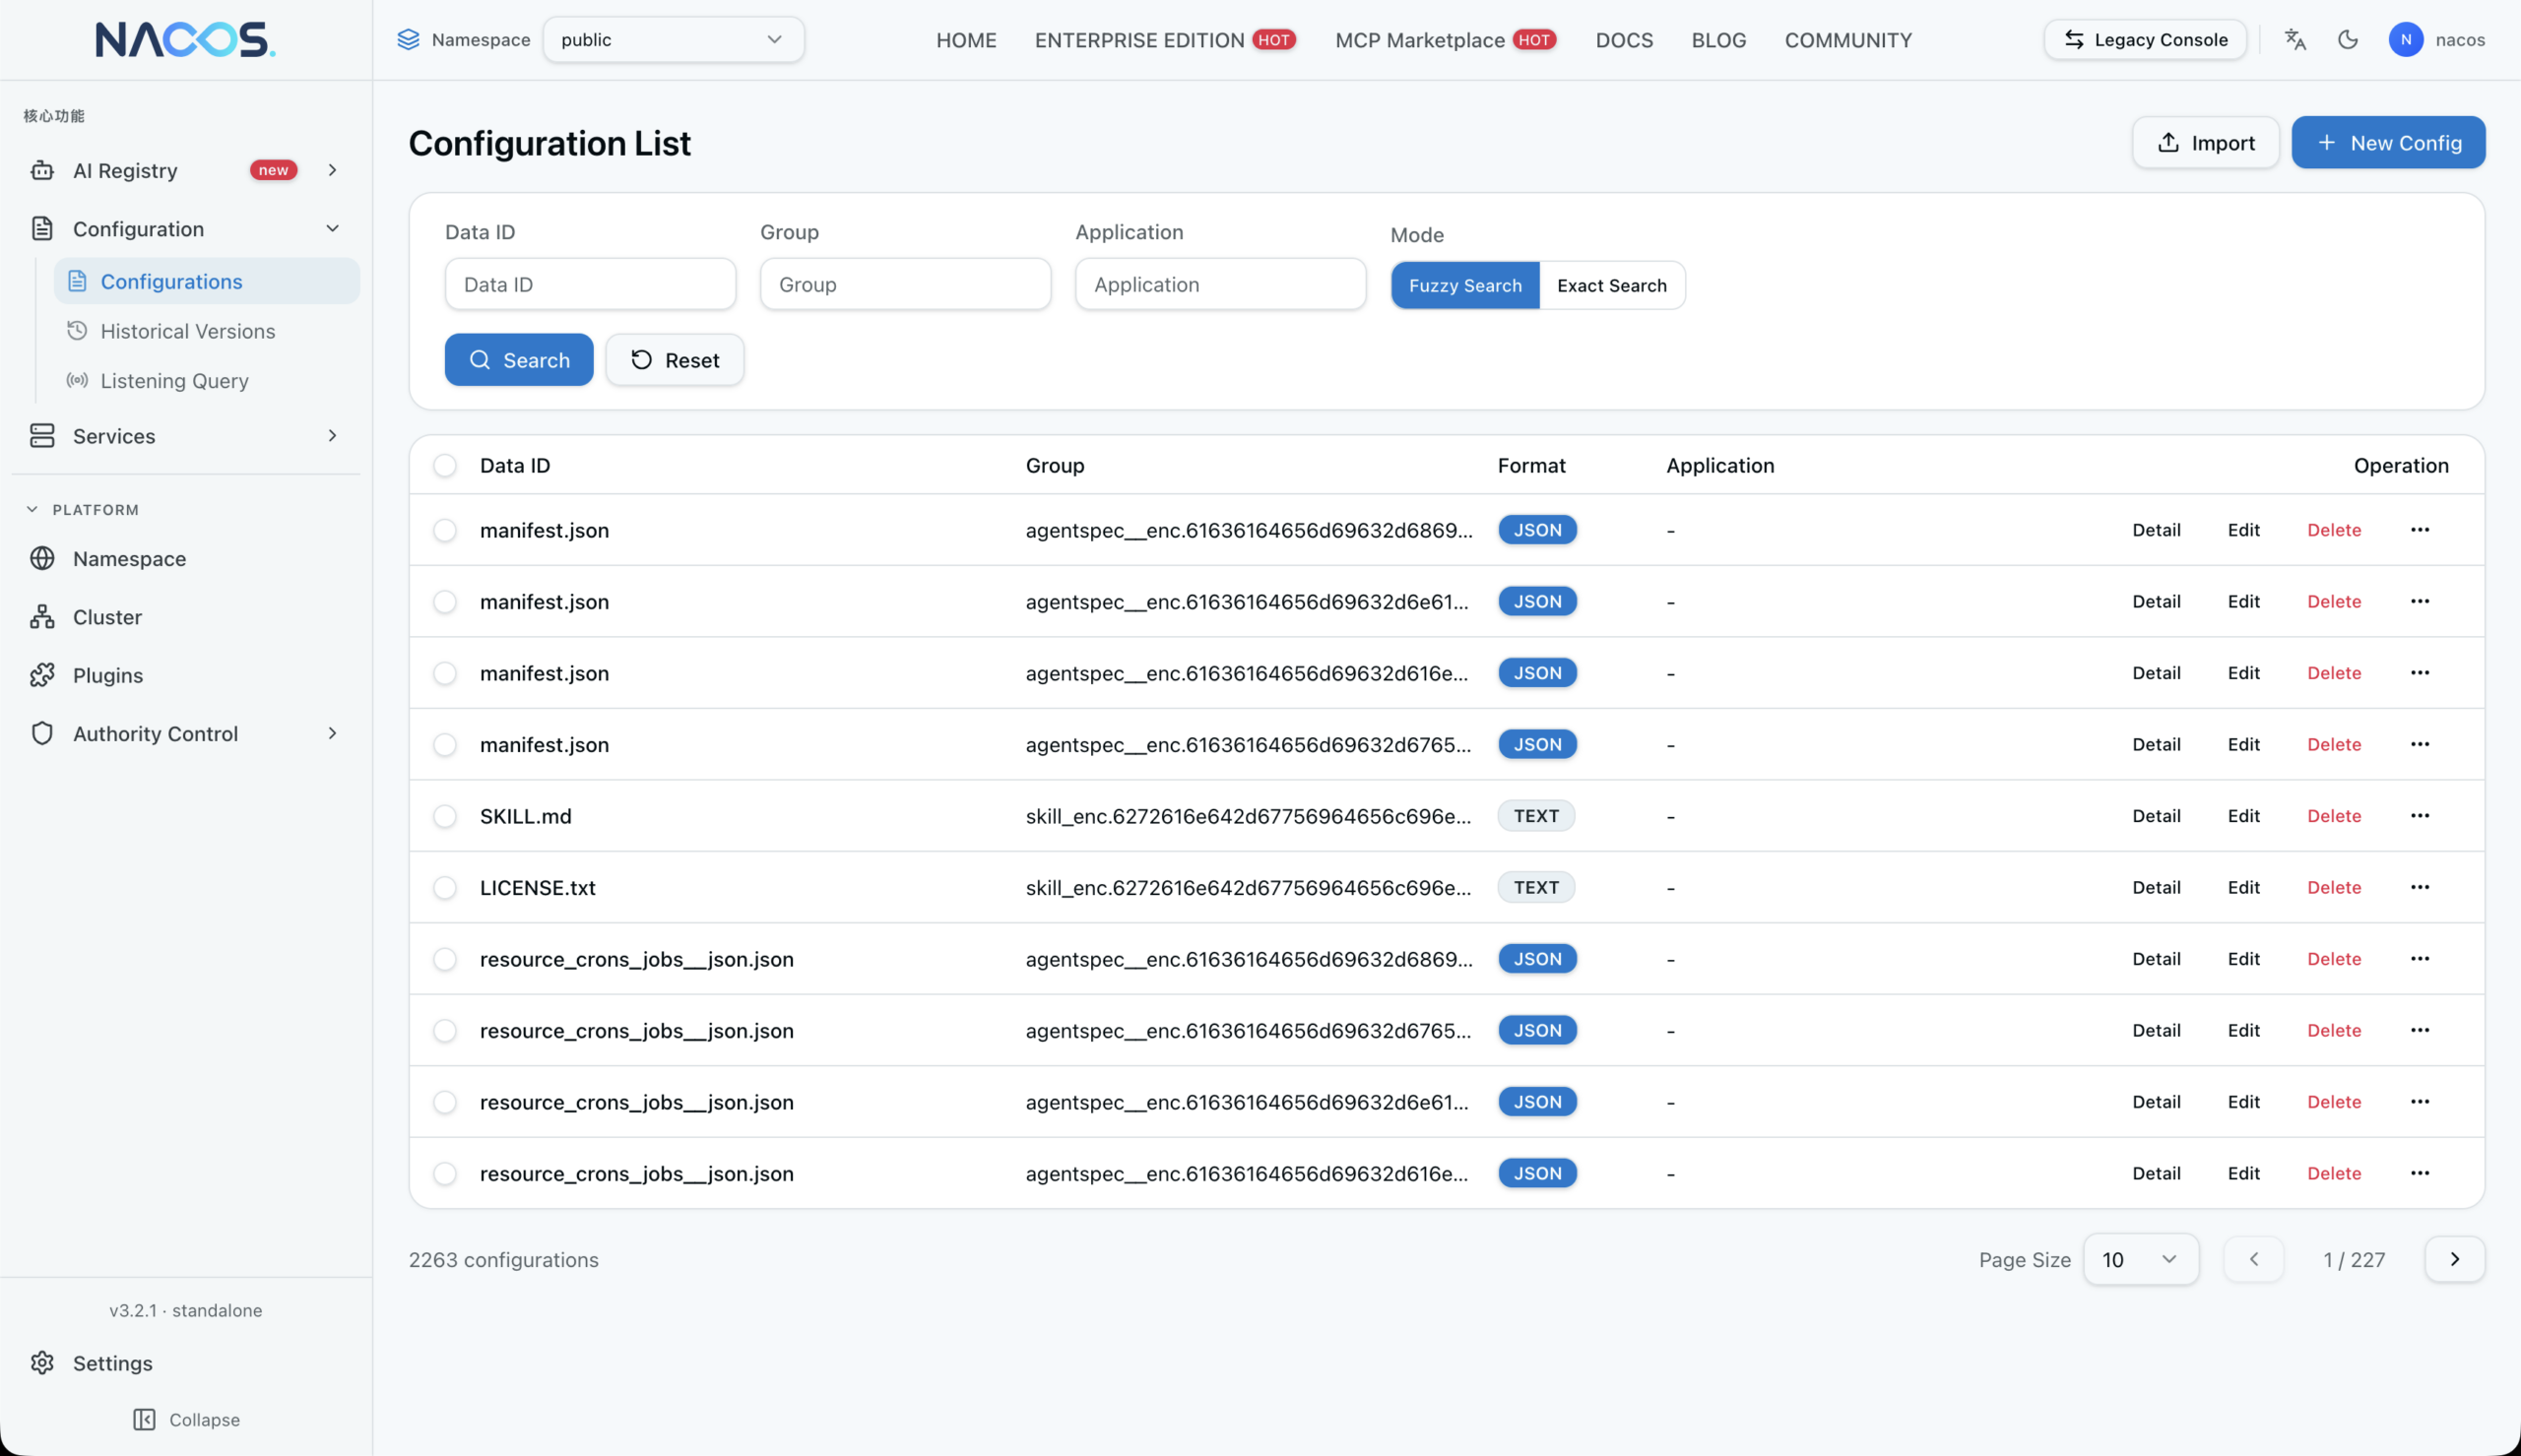
In particular, we can manage the configuration settings from within the management console by selecting the Configurations entry on the sidebar:
This section gives us a list of all the configuration entries that are currently in the system, as well as letting us add new ones.
New entries are added using the New Config button at the top:

From here, we enter values for each configuration element:
- Data ID: ID of the configuration entry, typically in the same format as a fully qualified class name
- Group: group the configuration entry belongs to, typically representing the product the configuration is for
- Format: format that the configuration entry is in, typically one of Text, JSON, XML, YAML, HTML, Properties, or TOML
- Content: actual configuration entry, in the specified format
In addition, we can specify description, application, and tags. However, these are only metadata about the entry and don’t influence its use at all.
Conveniently, we can see historical versions of configurations:
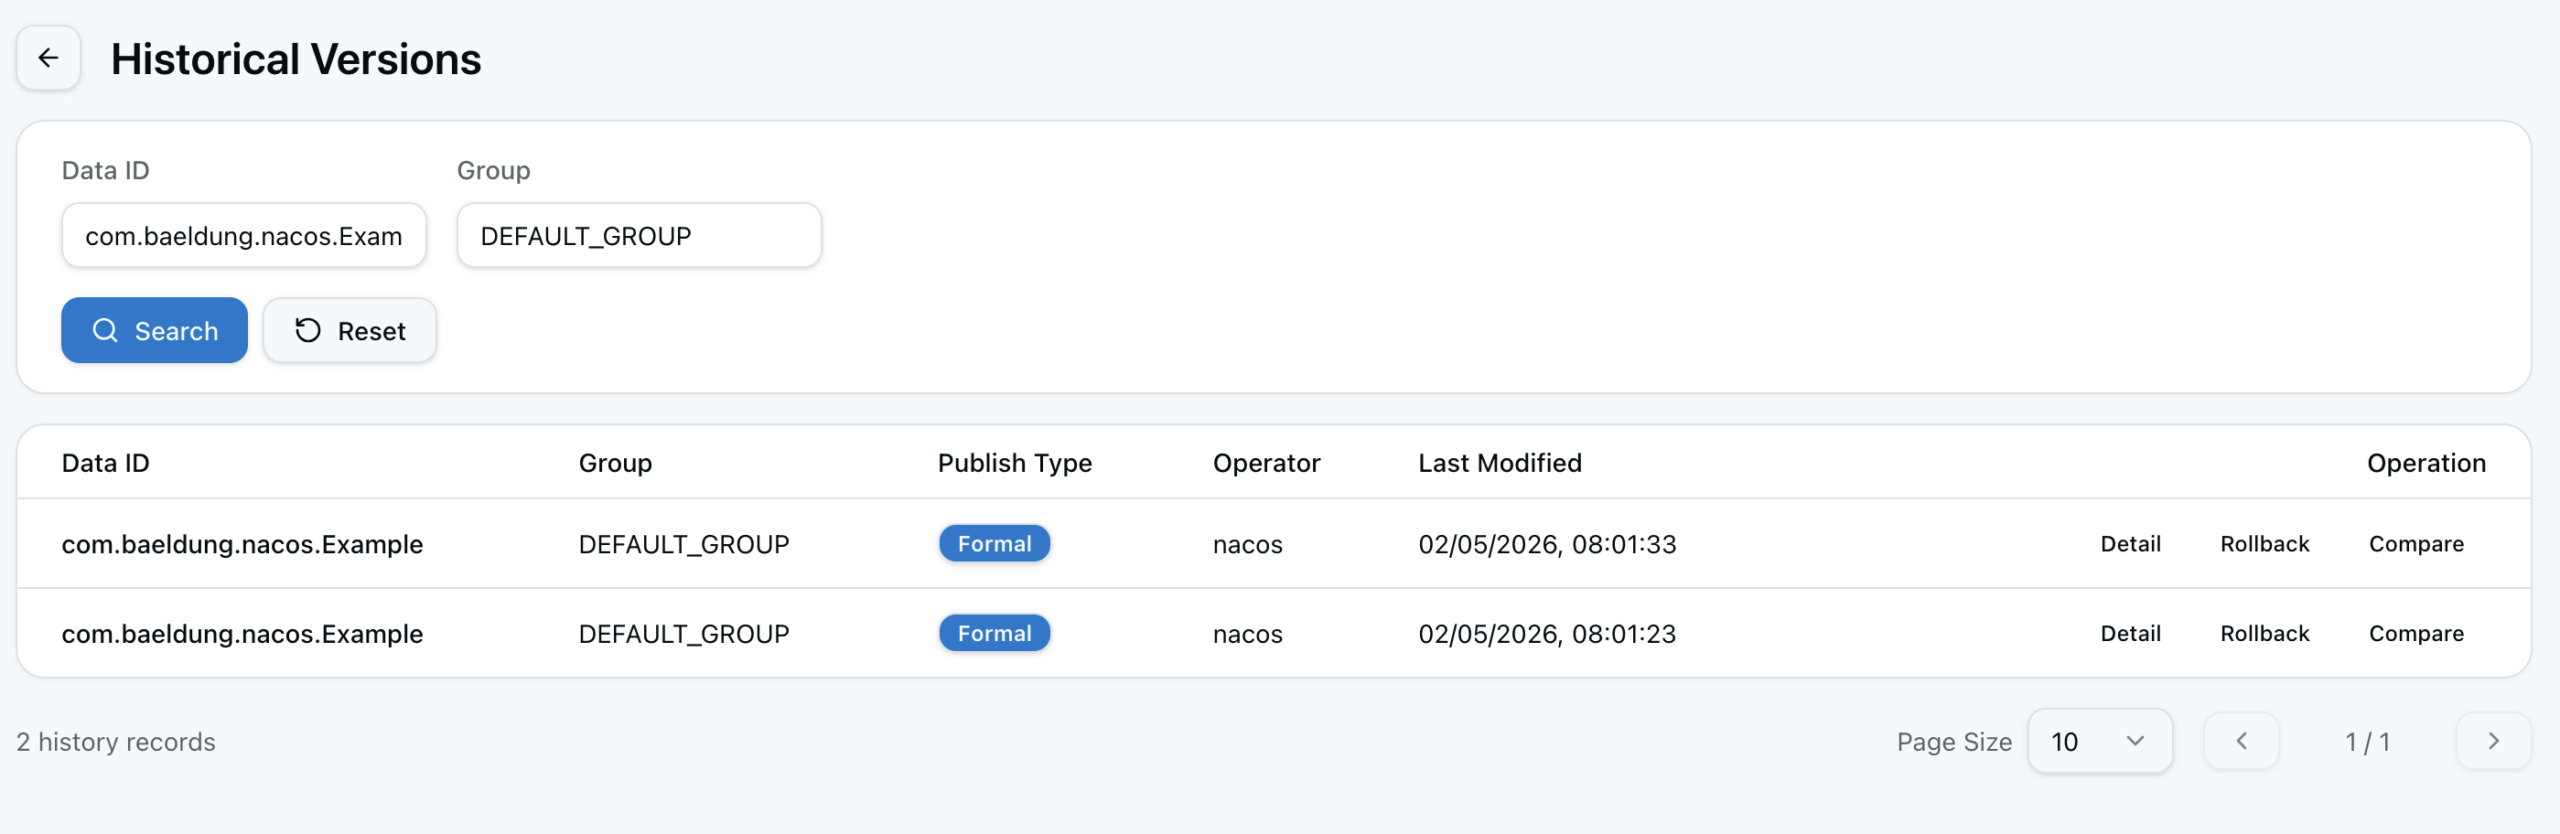
Thus, we have the ability to edit or delete configuration settings, as well as see the details of the entry and the history of all changes to it.
5.2. Fetching Configuration
Once we’ve got the configuration set up, we need to be able to use it. To that end, we set configurations via the ConfigService that we created earlier.
Specifically, perhaps the easiest way is to simply call getConfig() passing in the data ID and group, as well as a timeout in milliseconds:
String config = configService.getConfig("com.baeldung.nacos.Example", "DEFAULT_GROUP", 1000);This way, we immediately get the value of this configuration setting. In the event that the configuration doesn’t exist, or Nacos can’t be reached, we get null back instead.
However, this only gives us the raw value. Normally, we need to already know what type it is to know what to do with it. To avoid this, we can instead use getConfigWithResult() to get back a richer object that includes the type of config setting (text, JSON, or similar), so that we know how to handle that:
ConfigQueryResult config = configService.getConfigWithResult("com.baeldung.nacos.Example", "DEFAULT_GROUP", 1000);
String configType = config.getConfigType();
String configValue = config.getContent();
This way, we always get a result, even if the config setting doesn’t exist or the Nacos server is unreachable. In those cases, we get a valid ConfigQueryResult object that contains null for the content and config type.
5.3. Listening to Configuration Changes
As well as simply fetching the configuration value at a single point in time, we can register a callback for whenever the value changes. This way, we can be responsive to configuration changes without needing to manually poll the values ourselves.
In particular, let’s register a listener for a specific configuration setting using addListener():
configService.addListener("com.baeldung.nacos.Example", "DEFAULT_GROUP", new AbstractListener() {
    @Override
    public void receiveConfigInfo(String configInfo) {
        LOG.info("Received config info: {}", configInfo);
    }
});
This block runs every time the config setting changes, with the new value. Unfortunately, this only happens when the value changes, not immediately.
As an alternative, we can use getConfigAndSignListener() to retrieve the current configuration and immediately register a listener:
String config = configService.getConfigAndSignListener("com.baeldung.nacos.Example", "DEFAULT_GROUP", 1000, new AbstractListener() {
    @Override
    public void receiveConfigInfo(String configInfo) {
        LOG.info("Received config info: {}", configInfo);
    }
});
Thus, we get the current config for use right now, and to also respond whenever the configuration changes as needed. In a way, this is a shorthand for both getConfig() and addListener() in a single call.
6. Service Discovery
On top of configuration, Nacos also provides service discovery of distributed services. This works by services registering their address and port against a well-known name, and then enabling clients to look up these by name later on.
6.1. Registering a Service
To begin with, we register services using the NamingService that we constructed earlier. We do this using the registerInstance() method, passing in the service name and address:
namingService.registerInstance("BaeldungTest", "localhost", 8848);Alternatively, we can pass in an Instance class containing some more details about the service:
Instance instance = new Instance();
instance.setIp("localhost");
instance.setPort(8848);
instance.setEnabled(true);
instance.setHealthy(true);

Map<String, String> metadata = new HashMap<>();
metadata.put("Example", "value");
instance.setMetadata(metadata);

namingService.registerInstance("BaeldungTest", instance);
Notably, if we do this, we need to ensure that the enabled and healthy flags are set, since they default to false, and therefore the service won’t be available for discovery.
If we need to update the service registration – for example, to change whether the service is healthy – then we can simply re-register the same service name and address with the new details. Nacos detects that these are the same details and updates them instead of creating a new registration.
6.2. Unregistering a Service
Importantly, the NamingService client automatically unregisters any services that it registered when it closes down. This means that we don’t need to do anything special, and as soon as the service shuts down, Nacos should remove it automatically. Still, this depends on other factors such as heartbeat and ephemeral instances.
However, sometimes we need to do this ourselves without shutting down the entire service. To do so, we turn to deregisterInstance():
namingService.deregisterInstance("BaeldungTest", "localhost", 8848);This takes the service name and either the address and port, or the Instance class, as with registerInstance(). With that information, deregisterInstance() immediately removes this address from the Nacos server to prevent discovery.
6.3. Discovering Service Instances
Once services are registered, we need to be able to discover them to actually leverage what they offer. Nacos offers several ways that we can achieve this.
Perhaps the most useful way to service discovery is selectOneHealthyInstance(). The method takes the service name and randomly returns one healthy registered instance:
Instance baeldungTest = namingService.selectOneHealthyInstance("BaeldungTest");
String address = baeldungTest.getIp();
int port = baeldungTest.getPort();
If nothing is registered for the given service name, the code throws an IllegalStateException to indicate that fact, since this means there are no services that we can use right now.
Alternatively, selectInstances() and getAllInstances() are able to return every registered instance instead of just one of them:
List<Instance> allInstances = namingService.getAllInstances("BaeldungTest");
List<Instance> allHealthyInstances = namingService.selectInstances("BaeldungTest", true);
Notably, selectInstances() and selectOneHealthyInstance() only return services that are marked as enabled, and where the healthy flag is as expected. getAllInstances() returns every instance regardless of these flags.
6.4. Listening to Service Discovery Changes
In addition to selecting an instance when we need to, we can register a callback to be triggered whenever there’s a change to the instances for a given service name:
namingService.subscribe("BaeldungTest", (event) -> {
    NamingChangeEvent namingChangeEvent = (NamingChangeEvent) event;
    LOG.info("Added Instances: {}", namingChangeEvent.getAddedInstances());
    LOG.info("Removed Instances: {}", namingChangeEvent.getRemovedInstances());
    LOG.info("Modified Instances: {}", namingChangeEvent.getModifiedInstances());
});
We can then do whatever we want with this information – for example, we might want to maintain a local cache of instances so that we don’t need to make a call to Nacos every time we want to look one up.
7. Distributed Locks
Another important feature that Nacos has is support for distributed locking of resources. Specifically, Nacos enables access control to resources so that they can’t be accessed by different services or threads at the same time.
To obtain locks, we use the LockService that we created earlier and call the lock() method, providing a definition of the lock that we want:
Boolean result = lockService.lock(new NLock("Baeldung", 5000L));When obtaining a lock, we need to provide the identifier of the resource and a maximum time period for the lock, measured in milliseconds. Critically, we receive a result indicating whether we got the lock or not.
Locks release either after the provided time period or by explicitly unlocking them with the unlock() method:
lockService.unlock(new NLock("Baeldung", 5000L));Unlike with service registrations, locks aren’t automatically removed when the client disconnects, so we need to ensure that we manage this sensibly.
8. Summary
In this article, we took a quick look at Alibaba Nacos, we saw what it is and how we can use it in applications.
In summary, Nacos is a platform for managing distributed systems by providing service discovery, centralized configuration, and coordination capabilities.
As usual, all of the examples from this article are available over on GitHub.


