X.509 Authentication in Spring Security
Last updated: October 17, 2025


Mocking is an essential part of unit testing, and the Mockito library makes it easy to write clean and intuitive unit tests for your Java code.
Get started with mocking and improve your application tests using our Mockito guide:
Handling concurrency in an application can be a tricky process with many potential pitfalls. A solid grasp of the fundamentals will go a long way to help minimize these issues.
Get started with understanding multi-threaded applications with our Java Concurrency guide:
Spring 5 added support for reactive programming with the Spring WebFlux module, which has been improved upon ever since. Get started with the Reactor project basics and reactive programming in Spring Boot:
Since its introduction in Java 8, the Stream API has become a staple of Java development. The basic operations like iterating, filtering, mapping sequences of elements are deceptively simple to use.
But these can also be overused and fall into some common pitfalls.
To get a better understanding on how Streams work and how to combine them with other language features, check out our guide to Java Streams:
Explore Spring Boot 3 and Spring 6 in-depth through building a full REST API with the framework:
Yes, Spring Security can be complex, from the more advanced functionality within the Core to the deep OAuth support in the framework.
I built the security material as two full courses - Core and OAuth, to get practical with these more complex scenarios. We explore when and how to use each feature and code through it on the backing project.
You can explore the course here:
Spring Data JPA is a great way to handle the complexity of JPA with the powerful simplicity of Spring Boot.
Get started with Spring Data JPA through the guided reference course:
Refactor Java code safely — and automatically — with OpenRewrite.
Refactoring big codebases by hand is slow, risky, and easy to put off. That’s where OpenRewrite comes in. The open-source framework for large-scale, automated code transformations helps teams modernize safely and consistently.
Each month, the creators and maintainers of OpenRewrite at Moderne run live, hands-on training sessions — one for newcomers and one for experienced users. You’ll see how recipes work, how to apply them across projects, and how to modernize code with confidence.
Join the next session, bring your questions, and learn how to automate the kind of work that usually eats your sprint time.
If you're working on a Spring Security (and especially an OAuth) implementation, definitely have a look at the Learn Spring Security course:
>> LEARN SPRING SECURITY1. Overview
In this article, we’ll focus on the main use cases for X.509 certificate authentication – verifying the identity of a communication peer when using the HTTPS (HTTP over SSL) protocol.
Simply put – while a secure connection is established, the client verifies the server according to its certificate (issued by a trusted certificate authority).
But beyond that, X.509 in Spring Security can be used to verify the identity of a client by the server while connecting. This is called “mutual authentication”, and we’ll look at how that’s done here as well.
Finally, we’ll touch on when it makes sense to use this kind of authentication.
To demonstrate server verification, we’ll create a simple web application and install a custom certificate authority in a browser.
Moreover, for mutual authentication, we’ll create a client certificate and modify our server to allow only verified clients.
It’s highly recommended to follow the tutorial step by step and create the certificates, as well as the keystore and the truststore, yourself, according to the instructions presented in the following sections. However, all the ready to use files can be found in the GitHub repository.
2. Self Signed Root CA
To be able to sign our server-side and client-side certificates, we need to create our own self-signed root CA certificate first. This way we’ll act as our own certificate authority.
For this purpose we’ll use openssl library, so we need to have it installed prior to following the next step.
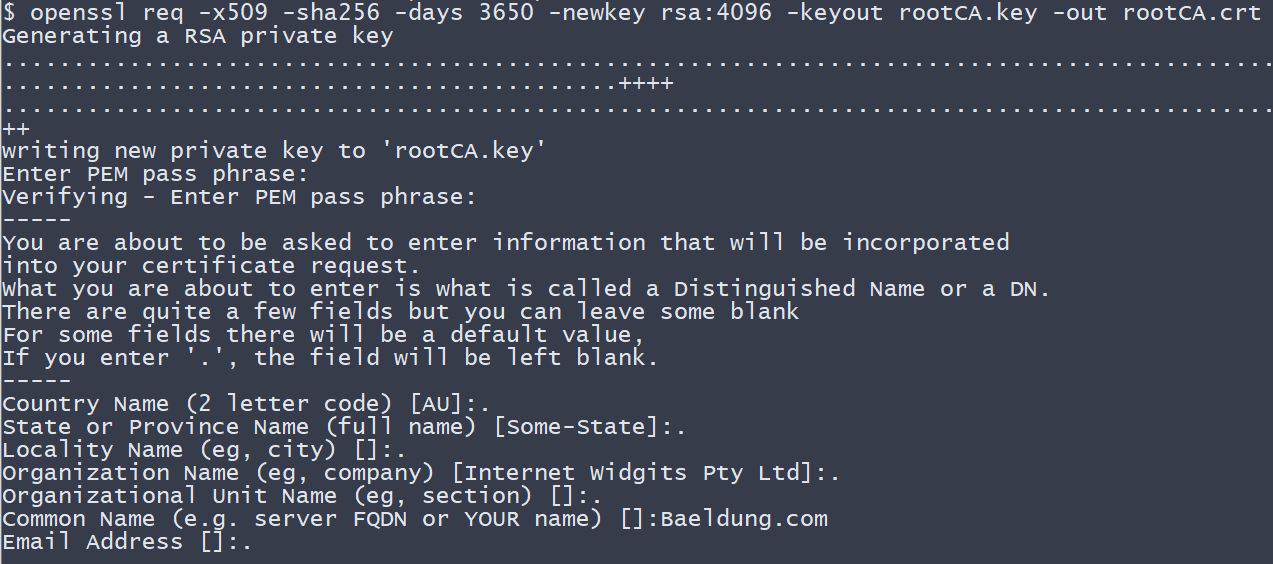
Let’s now create the CA certificate:
openssl req -x509 -sha256 -days 3650 -newkey rsa:4096 -keyout rootCA.key -out rootCA.crtWhen we execute the above command, we need to provide the password for our private key. For the purpose of this tutorial, we use changeit as a passphrase.
Additionally, we need to enter information that forms a so-called distinguished name. Here, we only provide the CN (Common Name) – Baeldung.com – and leave other parts empty.
3. Keystore
Optional Requirement: To use cryptographically strong keys together with encryption and decryption features we’ll need the “Java Cryptography Extension (JCE) Unlimited Strength Jurisdiction Policy Files” installed in our JVM.
These can be downloaded for example from Oracle (follow the installation instructions included in the download). Some Linux distributions also provide an installable package through their package managers.
A keystore is a repository that our Spring Boot application will use to hold our server’s private key and certificate. In other words, our application will use the keystore to serve the certificate to the clients during the SSL handshake.
In this tutorial, we use the Java Key-Store (JKS) format and a keytool command-line tool.
3.1. Server-side Certificate
To implement the server-side X.509 authentication in our Spring Boot application, we first need to create a server-side certificate.
Let’s start with creating a so-called certificate signing request (CSR):
openssl req -new -newkey rsa:4096 -keyout localhost.key -out localhost.csrSimilarly, as for the CA certificate, we have to provide the password for the private key. Additionally, let’s use localhost as a common name (CN).
Before we proceed, we need to create a configuration file – localhost.ext. It’ll store some additional parameters needed during signing the certificate.
authorityKeyIdentifier=keyid,issuer
basicConstraints=CA:FALSE
subjectAltName = @alt_names
[alt_names]
DNS.1 = localhost
A ready-to-use file is also available in the GitHub project.
Now, it’s time to sign the request with our rootCA.crt certificate and its private key:
openssl x509 -req -CA rootCA.crt -CAkey rootCA.key -in localhost.csr -out localhost.crt -days 365 -CAcreateserial -extfile localhost.extNote that we have to provide the same password we used when we created our CA certificate.
At this stage, we finally have a ready to use localhost.crt certificate signed by our own certificate authority.
To print our certificate’s details in a human-readable form we can use the following command:
openssl x509 -in localhost.crt -text3.2. Import to the Keystore
In this section, we’ll see how to import the signed certificate and the corresponding private key to the keystore.jks file.
We’ll use the PKCS 12 archive, to package our server’s private key together with the signed certificate. Then we’ll import it to the newly created keystore.jks.
We can use the following command to create a .p12 file:
openssl pkcs12 -export -out localhost.p12 -name "localhost" -inkey localhost.key -in localhost.crtSo we now have the localhost.key and the localhost.crt bundled in the single localhost.p12 file.
Let’s now use keytool to create a keystore.jks repository and import the localhost.p12 file with a single command:
keytool -importkeystore -srckeystore localhost.p12 -srcstoretype PKCS12 -destkeystore keystore.jks -deststoretype JKSAt this stage, we have everything in place for the server authentication part. Let’s proceed with our Spring Boot application configuration.
4. Example Application
Our SSL secured server project consists of a @SpringBootApplication annotated application class (which is a kind of @Configuration), an application.properties configuration file and a very simple MVC-style front-end.
All, the application has to do, is to present an HTML page with a “Hello {User}!” message. This way we can inspect the server certificate in a browser to make sure, that the connection is verified and secured.
4.1. Maven Dependencies
First, we create a new Maven project with three Spring Boot Starter bundles included:
<dependency>
    <groupId>org.springframework.boot</groupId>
    <artifactId>spring-boot-starter-security</artifactId>
</dependency>
<dependency>
    <groupId>org.springframework.boot</groupId>
    <artifactId>spring-boot-starter-web</artifactId>
</dependency>
<dependency>
    <groupId>org.springframework.boot</groupId>
    <artifactId>spring-boot-starter-thymeleaf</artifactId>
</dependency>
For reference: we can find the bundles on Maven Central (security, web, thymeleaf).
4.2. Spring Boot Application
As the next step, we create the main application class and the user-controller:
@SpringBootApplication
public class X509AuthenticationServer {
    public static void main(String[] args) {
        SpringApplication.run(X509AuthenticationServer.class, args);
    }
}

@Controller
public class UserController {
    @RequestMapping(value = "/user")
    public String user(Model model, Principal principal) {

        UserDetails currentUser
          = (UserDetails) ((Authentication) principal).getPrincipal();
        model.addAttribute("username", currentUser.getUsername());
        return "user";
    }
}
Now, we tell the application where to find our keystore.jks and how to access it. We set SSL to an “enabled” status and change the standard listening port to indicate a secured connection.
Additionally, we configure some user-details for accessing our server via Basic Authentication:
server.ssl.key-store=../store/keystore.jks
server.ssl.key-store-password=${PASSWORD}
server.ssl.key-alias=localhost
server.ssl.key-password=${PASSWORD}
server.ssl.enabled=true
server.port=8443
spring.security.user.name=Admin
spring.security.user.password=admin
This will be the HTML template, located at the resources/templates folder:
<!DOCTYPE html>
<html xmlns:th="http://www.thymeleaf.org">
<head>
    <title>X.509 Authentication Demo</title>
</head>
<body>
    <h2>Hello <span th:text="${username}"/>!</h2>
</body>
</html>
4.3. Root CA Installation
Before we finish this section and look at the site, we need to install our generated root certificate authority as a trusted certificate in a browser.
An exemplary installation of our certificate authority for Mozilla Firefox would look like follows:
- Type about:preferences in the address bar
- Open Advanced -> Certificates -> View Certificates -> Authorities
- Click on Import
- Locate the Baeldung tutorials folder and its subfolder spring-security-x509/keystore
- Select the rootCA.crt file and click OK
- Choose “Trust this CA to identify websites” and click OK
Note: If you don’t want to add our certificate authority to the list of trusted authorities, you’ll later have the option to make an exception and show the website tough, even when it is mentioned as insecure. But then you’ll see a ‘yellow exclamation mark’ symbol in the address bar, indicating the insecure connection!
Afterward, we will navigate to the spring-security-x509-basic-auth module and run:
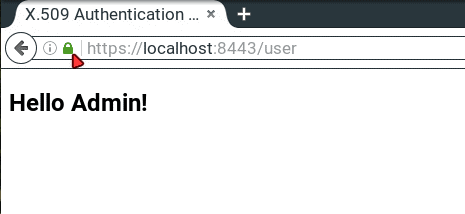
mvn spring-boot:runFinally, we hit https://localhost:8443/user, enter our user credentials from the application.properties and should see a “Hello Admin!” message. Now we’re able to inspect the connection status by clicking the “green lock” symbol in the address bar, and it should be a secured connection.
5. Mutual Authentication
In the previous section, we presented how to implement the most common SSL authentication schema – server-side authentication. This means, only a server authenticated itself to clients.
In this section, we’ll describe how to add the other part of the authentication – client-side authentication. This way, only clients with valid certificates signed by the authority that our server trusts, can access our secured website.
But before we continue, let’s see what are the pros and cons of using the mutual SSL authentication.
Pros:
- The private key of an X.509 client certificate is stronger than any user-defined password. But it has to be kept secret!
- With a certificate, the identity of a client is well-known and easy to verify.
- No more forgotten passwords!
Cons:
- We need to create a certificate for each new client.
- The client’s certificate has to be installed in a client application. In fact: X.509 client authentication is device-dependent, which makes it impossible to use this kind of authentication in public areas, for example in an internet-café.
- There must be a mechanism to revoke compromised client certificates.
- We must maintain the clients’ certificates. This can easily become costly.
5.1. Truststore
A trustsore in some way is the opposite of a keystore. It holds the certificates of the external entities that we trust.
In our case, it’s enough to keep the root CA certificate in the truststore.
Let’s see how to create a truststore.jks file and import the rootCA.crt using keytool:
keytool -import -trustcacerts -noprompt -alias ca -ext san=dns:localhost,ip:127.0.0.1 -file rootCA.crt -keystore truststore.jksNote, we need to provide the password for the newly created trusstore.jks. Here, we again used the changeit passphrase.
That’s it, we’ve imported our own CA certificate, and the truststore is ready to be used.
5.2. Spring Security Configuration
To continue, we are modifying our X509AuthenticationServer to configure HttpSecurity by creating a SecurityFilterChain Bean. Here we configure the x.509 mechanism to parse the Common Name (CN) field of a certificate for extracting usernames.
With this extracted usernames, Spring Security is looking up in a provided UserDetailsService for matching users. So we also implement this service interface containing one demo user.
Tip: In production environments, this UserDetailsService can load its users for example from a JDBC Datasource.
You have to notice that we annotate our class with @EnableWebSecurity and @EnableGlobalMethodSecurity with enabled pre-/post-authorization.
With the latter we can annotate our resources with @PreAuthorize and @PostAuthorize for fine-grained access control:
@SpringBootApplication
@EnableWebSecurity
@EnableGlobalMethodSecurity(prePostEnabled = true)
public class X509AuthenticationServer {
    ...

    @Bean
    public SecurityFilterChain filterChain(HttpSecurity http) throws Exception {
        http.authorizeRequests()
            .anyRequest()
            .authenticated()
            .and()
            .x509()
            .subjectPrincipalRegex("CN=(.*?)(?:,|$)")
            .userDetailsService(userDetailsService());
        return http.build();
    }

    @Bean
    public UserDetailsService userDetailsService() {
        return new UserDetailsService() {
            @Override
            public UserDetails loadUserByUsername(String username) throws UsernameNotFoundException {
                if (username.equals("Bob")) {
                    return new User(username, "",
                     AuthorityUtils.commaSeparatedStringToAuthorityList("ROLE_USER"));
                }
                throw new UsernameNotFoundException("User not found!");
            }
        };
    }
}
As said previously, we are now able to use Expression-Based Access Control in our controller. More specifically, our authorization annotations are respected because of the @EnableGlobalMethodSecurity annotation in our @Configuration:
@Controller
public class UserController {
    @PreAuthorize("hasAuthority('ROLE_USER')")
    @RequestMapping(value = "/user")
    public String user(Model model, Principal principal) {
        ...
    }
}
An overview of all possible authorization options can be found in the official documentation.
As a final modification step, we have to tell the application where our truststore is located and that SSL client authentication is necessary (server.ssl.client-auth=need).
So we put the following into our application.properties:
server.ssl.trust-store=store/truststore.jks
server.ssl.trust-store-password=${PASSWORD}
server.ssl.client-auth=need
Now, if we run the application and point our browser to https://localhost:8443/user, we become informed that the peer cannot be verified and it denies to open our website.
5.3. Client-side Certificate
Now it’s time to create the client-side certificate. The steps we need to take, are pretty much the same as for the server-side certificate we already created.
First, we have to create a certificate signing request:
openssl req -new -newkey rsa:4096 -nodes -keyout clientBob.key -out clientBob.csrWe’ll have to provide information that will be incorporated into the certificate. For this exercise, let’s only enter the common name (CN) – Bob. It’s important as we use this entry during the authorization and only Bob is recognized by our sample application.
Next, we need to sign the request with our CA:
openssl x509 -req -CA rootCA.crt -CAkey rootCA.key -in clientBob.csr -out clientBob.crt -days 365 -CAcreateserialThe last step we need to take is to package the signed certificate and the private key into the PKCS file:
openssl pkcs12 -export -out clientBob.p12 -name "clientBob" -inkey clientBob.key -in clientBob.crtFinally, we’re ready to install the client certificate in the browser.
Again, we’ll use Firefox:
- Type about:preferences in the address bar
- Open Advanced -> View Certificates -> Your Certificates
- Click on Import
- Locate the Baeldung tutorials folder and its subfolder spring-security-x509/store
- Select the clientBob.p12 file and click OK
- Input the password for your certificate and click OK
Now, when we refresh our website, we’ll be prompted to select the client certificate we’d like to use:
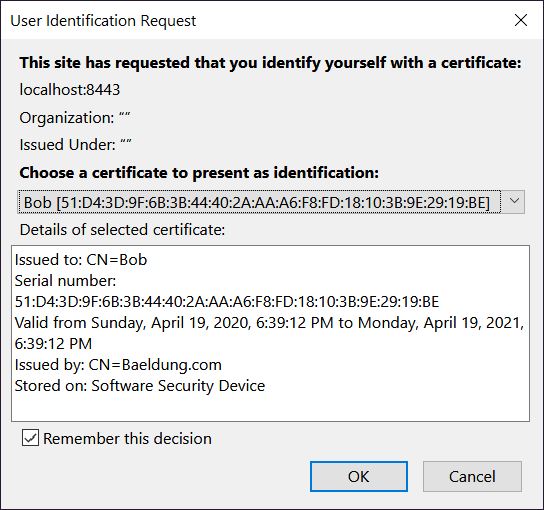
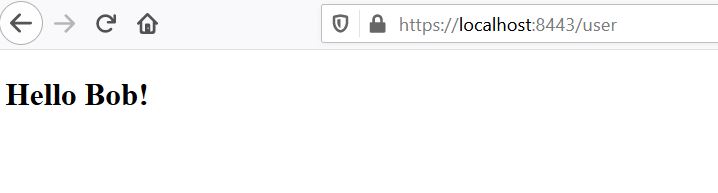
If we see a welcome message like “Hello Bob!”, that means everything works as expected!
6. Mutual Authentication With XML
Adding X.509 client authentication to an http security configuration in XML is also possible:
<http>
    ...
    <x509 subject-principal-regex="CN=(.*?)(?:,|$)"
      user-service-ref="userService"/>

    <authentication-manager>
        <authentication-provider>
            <user-service id="userService">
                <user name="Bob" password="" authorities="ROLE_USER"/>
            </user-service>
        </authentication-provider>
    </authentication-manager>
    ...
</http>
To configure an underlying Tomcat, we have to put our keystore and our truststore into its conf folder and edit the server.xml:
<Connector port="8443" protocol="HTTP/1.1" SSLEnabled="true" scheme="https" secure="true"
    clientAuth="true" sslProtocol="TLS"
    keystoreFile="${catalina.home}/conf/keystore.jks"
    keystoreType="JKS" keystorePass="changeit"
    truststoreFile="${catalina.home}/conf/truststore.jks"
    truststoreType="JKS" truststorePass="changeit"
/>
Tip: With clientAuth set to “want”, SSL is still enabled, even if the client doesn’t provide a valid certificate. But in this case, we have to use a second authentication mechanism, for example, a login-form, to access the secured resources.
7. Conclusion
In summary, we’ve learned how to create a self-signed CA certificate and how to use it to sign other certificates.
Additionally, we’ve created both, server-side and client-side certificates. Then we’ve presented how to import them into a keystore and a truststore accordingly.
Furthermore, you now should be able to package a certificate together with its private key into the PKCS12 format.
We’ve also discussed when it makes sense to use Spring Security X.509 client authentication, so it is up to you, to decide, whether to implement it into your web application, or not.


