1. Overview
When two browsers need to communicate, they typically need a server in between to coordinate the communication, passing messages between them. But having a server in the middle results in a delay in communication between the browsers.
In this tutorial, we’ll learn about WebRTC, an open-source project that enables browsers and mobile applications to communicate directly with each other in real-time. Then we’ll see it in action by writing a simple application that creates a peer-to-peer connection to share data between two HTML clients.
We’ll be using HTML, JavaScript, and the WebSocket library along with the built-in WebRTC support in the web browsers to build a client. And, we’ll be building a Signaling server with Spring Boot, using WebSocket as the communication protocol. Finally, we’ll see how to add video and audio streams to this connection.
2. Fundamentals and Concepts of WebRTC
Let’s see how two browsers communicate in a typical scenario without WebRTC.
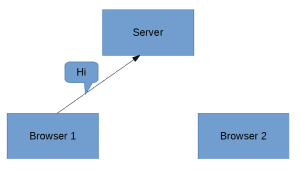
Suppose we have two browsers, and Browser 1 needs to send a message to Browser 2. Browser 1 first sends it to the Server:

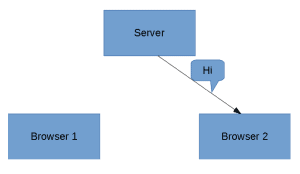
After the Server receives the message, it processes it, finds Browser 2, and sends it the message:

Since the server has to process the message before sending it to browser 2, communication takes place in near real-time. Of course, we’d like it to be at real-time.
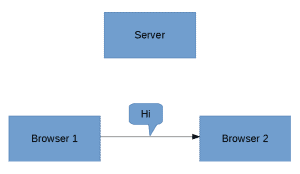
WebRTC solves this problem by creating a direct channel between the two browsers, eliminating the need for the server:

As a result, the time it takes to pass messages from one browser to another is reduced drastically as the messages now route directly from sender to receiver. It also takes away the heavy lifting and bandwidth incurred from the servers and causes it to be shared between the clients involved.
3. Support for WebRTC and Built-In Features
WebRTC is supported by major browsers like Chrome, Firefox, Opera, and Microsoft Edge, as well as platforms like Android and iOS.
WebRTC does not need any external plugins to be installed in our browser as the solution comes bundled out-of-the-box with the browser.
Furthermore, in a typical real-time application involving video and audio transmission, we have to depend heavily on C++ libraries, and we have to handle a lot of problems, including:
- Packet-loss concealment
- Echo cancellation
- Bandwidth adaptivity
- Dynamic jitter buffering
- Automatic gain control
- Noise reduction and suppression
- Image “cleaning”
But WebRTC handles all these concerns under the hood, making it simpler to make real-time communications between clients.
4. Peer-to-Peer Connection
Unlike a client-server communication, where there’s a known address for the server, and the client already knows the address of the server to communicate with, in a P2P (peer-to-peer) connection, none of the peers has a direct address to another peer.
To establish a peer-to-peer connection, there are few steps involved to allow clients to:
- make themselves available for communication
- identify each other and share network-related information
- share and agree on the format of the data, mode, and protocols involved
- share data
WebRTC defines a set of APIs and methodologies for performing these steps.
For the clients to discover each other, share the network details, and then share the format of the data, WebRTC uses a mechanism called signaling.
5. Signaling
Signaling refers to the processes involved in network discovery, creation of a session, managing the session, and exchanging the media-capability metadata.
This is essential as the clients need to know each other up front to initiate the communication.
To achieve all these, WebRTC does not specify a standard for signaling and leaves it to the developer’s implementation. So, this provides us the flexibility to use WebRTC on a range of devices with any technology and supporting protocol.
5.1. Building the Signaling Server
For the signaling server, we’ll build a WebSocket server using Spring Boot. We can begin with an empty Spring Boot project generated from Spring Initializr.
To use WebSocket for our implementation, let’s add the dependency to our pom.xml:
<dependency>
    <groupId>org.springframework.boot</groupId>
    <artifactId>spring-boot-starter-websocket</artifactId>
    <version>2.4.0</version>
</dependency>
We can always find the latest version to use from Maven Central.
The implementation of the signaling server is simple — we’ll create an endpoint that a client application can use to register as a WebSocket connection.
To do this in Spring Boot, let’s write a @Configuration class that extends the WebSocketConfigurer and overrides the registerWebSocketHandlers method:
@Configuration
@EnableWebSocket
public class WebSocketConfiguration implements WebSocketConfigurer {

    @Override
    public void registerWebSocketHandlers(WebSocketHandlerRegistry registry) {
        registry.addHandler(new SocketHandler(), "/socket")
          .setAllowedOrigins("*");
    }
}
Note that we’ve identified /socket as the URL that we’ll register from the client that we’ll be building in the next step. We also passed in a SocketHandler as an argument to the addHandler method — this is actually the message handler that we’ll create next.
5.2. Creating Message Handler in Signaling Server
The next step is to create a message handler to process the WebSocket messages that we’ll receive from multiple clients.
This is essential to aid the exchange of metadata between the different clients to establish a direct WebRTC connection.
Here, to keep things simple, when we receive the message from a client, we will send it to all other clients except to itself.
To do this, we can extend TextWebSocketHandler from the Spring WebSocket library and override both the handleTextMessage and afterConnectionEstablished methods:
@Component
public class SocketHandler extends TextWebSocketHandler {

    List<WebSocketSession>sessions = new CopyOnWriteArrayList<>();

    @Override
    public void handleTextMessage(WebSocketSession session, TextMessage message)
      throws InterruptedException, IOException {
        for (WebSocketSession webSocketSession : sessions) {
            if (webSocketSession.isOpen() && !session.getId().equals(webSocketSession.getId())) {
                webSocketSession.sendMessage(message);
            }
        }
    }

    @Override
    public void afterConnectionEstablished(WebSocketSession session) throws Exception {
        sessions.add(session);
    }
}
As we can see in the afterConnectionEstablished method, we add the received session to a list of sessions so that we can keep track of all the clients.
And when we receive a message from any of the clients, as can be seen in the handleTextMessage, we iterate over all the client sessions in the list and send the message to all other clients except the sender by comparing the session id of the sender and the sessions in the list.
In a P2P connection, the clients can be very different from each other. For example, Chrome on Android can connect to Mozilla on a Mac.
Hence, the media capabilities of these devices can vary widely. Therefore, it’s essential for a handshake between peers to agree upon the media types and codecs used for communication.
In this phase, WebRTC uses the SDP (Session Description Protocol) to agree on the metadata between the clients.
To achieve this, the initiating peer creates an offer that must be set as a remote descriptor by the other peer. In addition, the other peer then generates an answer that is accepted as a remote descriptor by the initiating peer.
The connection is established when this process is complete.
7. Setting Up the Client
Let’s create our WebRTC client such that it can act both as the initiating peer and the remote peer.
We’ll begin by creating an HTML file called index.html and a JavaScript file named client.js which index.html will use.
To connect to our signaling server, we create a WebSocket connection to it. Assuming that the Spring Boot signaling server that we built is running on http://localhost:8080, we can create the connection:
var conn = new WebSocket('ws://localhost:8080/socket');
To send a message to the signaling server, we’ll create a send method that will be used to pass the message in the upcoming steps:
function send(message) {
    conn.send(JSON.stringify(message));
}
8. Setting Up a Simple RTCDataChannel
After setting up the client in the client.js, we need to create an object for the RTCPeerConnection class:
configuration = null;
var peerConnection = new RTCPeerConnection(configuration);
In this example, the purpose of the configuration object is to pass in the STUN (Session Traversal Utilities for NAT) and TURN (Traversal Using Relays around NAT) servers and other configurations that we’ll be discussing in the latter part of this tutorial. For this example, it’s sufficient to pass in null.
Now, we can create a dataChannel to use for message passing:
var dataChannel = peerConnection.createDataChannel("dataChannel", { reliable: true });
Subsequently, we can create listeners for various events on the data channel:
dataChannel.onerror = function(error) {
    console.log("Error:", error);
};
dataChannel.onclose = function() {
    console.log("Data channel is closed");
};
9. Establishing a Connection With ICE
The next step in establishing a WebRTC connection involves the ICE (Interactive Connection Establishment) and SDP protocols, where the session descriptions of the peers are exchanged and accepted at both peers.
The signaling server is used to send this information between the peers. This involves a series of steps where the clients exchange connection metadata through the signaling server.
9.1. Creating an Offer
Firstly, we create an offer and set it as the local description of the peerConnection. We then send the offer to the other peer:
peerConnection.createOffer(function(offer) {
    send({
        event : "offer",
        data : offer
    });
    peerConnection.setLocalDescription(offer);
}, function(error) {
    // Handle error here
});
Here, the send method makes a call to the signaling server to pass the offer information.
Note that we are free to implement the logic of the send method with any server-side technology.
9.2. Handling ICE Candidates
Secondly, we need to handle the ICE candidates. WebRTC uses the ICE (Interactive Connection Establishment) protocol to discover the peers and establish the connection.
When we set the local description on the peerConnection, it triggers an icecandidate event.
This event should transmit the candidate to the remote peer so that the remote peer can add it to its set of remote candidates.
To do this, we create a listener for the onicecandidate event:
peerConnection.onicecandidate = function(event) {
    if (event.candidate) {
        send({
            event : "candidate",
            data : event.candidate
        });
    }
};
The icecandidate event triggers again with an empty candidate string when all the candidates are gathered.
We must pass this candidate object as well to the remote peer. We pass this empty candidate string to ensure that the remote peer knows that all the icecandidate objects are gathered.
Also, the same event is triggered again to indicate that the ICE candidate gathering is complete with the value of candidate object set to null on the event. This need not be passed on to the remote peer.
9.3. Receiving the ICE Candidate
Thirdly, we need to process the ICE candidate sent by the other peer.
The remote peer, upon receiving this candidate, should add it to its candidate pool:
peerConnection.addIceCandidate(new RTCIceCandidate(candidate));
9.4. Receiving the Offer
After that, when the other peer receives the offer, it must set it as the remote description. In addition, it must generate an answer, which is sent to the initiating peer:
peerConnection.setRemoteDescription(new RTCSessionDescription(offer));
peerConnection.createAnswer(function(answer) {
    peerConnection.setLocalDescription(answer);
        send({
            event : "answer",
            data : answer
        });
}, function(error) {
    // Handle error here
});
9.5. Receiving the Answer
Finally, the initiating peer receives the answer and sets it as the remote description:
handleAnswer(answer){
    peerConnection.setRemoteDescription(new RTCSessionDescription(answer));
}
With this, WebRTC establishes a successful connection.
Now, we can send and receive data between the two peers directly, without the signaling server.
10. Sending a Message
Now that we’ve established the connection, we can send messages between the peers using the send method of the dataChannel:
dataChannel.send(“message”);
Likewise, to receive the message on the other peer, let’s create a listener for the onmessage event:
dataChannel.onmessage = function(event) {
    console.log("Message:", event.data);
};
To receive the message on the data channel, we also have to add a callback on the peerConnection object:
peerConnection.ondatachannel = function (event) {
    dataChannel = event.channel;
};
With this step, we have created a fully functional WebRTC data channel. We can now send and receive data between the clients. Additionally, we can add video and audio channels to this.
11. Adding Video and Audio Channels
When WebRTC establishes a P2P connection, we can easily transfer audio and video streams directly.
Firstly, we need to obtain the media stream from the browser. WebRTC provides an API for this:
const constraints = {
    video: true,audio : true
};
navigator.mediaDevices.getUserMedia(constraints).
  then(function(stream) { /* use the stream */ })
    .catch(function(err) { /* handle the error */ });
We can specify the frame rate, width, and height of the video using the constraints object.
The constraint object also allows specifying the camera used in the case of mobile devices:
var constraints = {
    video : {
        frameRate : {
            ideal : 10,
            max : 15
        },
        width : 1280,
        height : 720,
        facingMode : "user"
    }
};
Also, the value of facingMode can be set to “environment” instead of “user” if we want to enable the back camera.
11.2. Sending the Stream
Secondly, we have to add the stream to the WebRTC peer connection object:
peerConnection.addStream(stream);
Adding the stream to the peer connection triggers the addstream event on the connected peers.
11.3. Receiving the Stream
Thirdly, to receive the stream on the remote peer, we can create a listener.
Let’s set this stream to an HTML video element:
peerConnection.onaddstream = function(event) {
    videoElement.srcObject = event.stream;
};
12. NAT Issues
In the real world, firewall and NAT (Network Address Traversal) devices connect our devices to the public Internet.
NAT provides the device an IP address for usage within the local network. So, this address is not accessible outside the local network. Without a public address, peers are unable to communicate with us.
To address this issue, WebRTC uses two mechanisms:
- STUN
- TURN
13. Using STUN
STUN is the simplest approach to this problem. Before sharing the network information to the peer, the client makes a request to a STUN server. The responsibility of the STUN server is to return the IP address from which it receives the request.
So, by querying the STUN server, we get our own public-facing IP address. We then share this IP and port information to the peer we want to connect to. The other peers can do the same to share their public-facing IPs.
To use a STUN server, we can simply pass the URL in the configuration object for creating the RTCPeerConnection object:
var configuration = {
    "iceServers" : [ {
        "url" : "stun:stun2.1.google.com:19302"
    } ]
};
14. Using TURN
In contrast, TURN is a fallback mechanism used when WebRTC is unable to establish a P2P connection. The role of the TURN server is to relay data directly between the peers. In this case, the actual stream of data flows through the TURN servers. Using the default implementations, TURN servers also act as STUN servers.
TURN servers are publicly available, and clients can access them even if they are behind a firewall or proxy.
But, using a TURN server is not truly a P2P connection, as an intermediate server is present.
Note: TURN is a last resort when we are unable to establish a P2P connection. As the data flows through the TURN server, it requires a lot of bandwidth, and we’re not using P2P in this case.
Similar to STUN, we can provide the TURN server URL in the same configuration object:
{
  'iceServers': [
    {
      'urls': 'stun:stun.l.google.com:19302'
    },
    {
      'urls': 'turn:10.158.29.39:3478?transport=udp',
      'credential': 'XXXXXXXXXXXXX',
      'username': 'XXXXXXXXXXXXXXX'
    },
    {
      'urls': 'turn:10.158.29.39:3478?transport=tcp',
      'credential': 'XXXXXXXXXXXXX',
      'username': 'XXXXXXXXXXXXXXX'
    }
  ]
}
15. Conclusion
In this tutorial, we discussed what the WebRTC project is and introduced its fundamental concepts. We then built a simple application to share data between two HTML clients.
We also discussed the steps involved in creating and establishing a WebRTC connection.
Furthermore, we looked into the use of STUN and TURN servers as a fallback mechanism when WebRTC fails.
The code backing this article is available on GitHub. Once you're
logged in as a Baeldung Pro Member, start learning and coding on the project.


