Spring WebSockets: Send Messages to a Specific User
Last updated: January 8, 2024


Mocking is an essential part of unit testing, and the Mockito library makes it easy to write clean and intuitive unit tests for your Java code.
Get started with mocking and improve your application tests using our Mockito guide:
Handling concurrency in an application can be a tricky process with many potential pitfalls. A solid grasp of the fundamentals will go a long way to help minimize these issues.
Get started with understanding multi-threaded applications with our Java Concurrency guide:
Spring 5 added support for reactive programming with the Spring WebFlux module, which has been improved upon ever since. Get started with the Reactor project basics and reactive programming in Spring Boot:
Since its introduction in Java 8, the Stream API has become a staple of Java development. The basic operations like iterating, filtering, mapping sequences of elements are deceptively simple to use.
But these can also be overused and fall into some common pitfalls.
To get a better understanding on how Streams work and how to combine them with other language features, check out our guide to Java Streams:
Explore Spring Boot 3 and Spring 6 in-depth through building a full REST API with the framework:
Yes, Spring Security can be complex, from the more advanced functionality within the Core to the deep OAuth support in the framework.
I built the security material as two full courses - Core and OAuth, to get practical with these more complex scenarios. We explore when and how to use each feature and code through it on the backing project.
You can explore the course here:
Spring Data JPA is a great way to handle the complexity of JPA with the powerful simplicity of Spring Boot.
Get started with Spring Data JPA through the guided reference course:
Refactor Java code safely — and automatically — with OpenRewrite.
Refactoring big codebases by hand is slow, risky, and easy to put off. That’s where OpenRewrite comes in. The open-source framework for large-scale, automated code transformations helps teams modernize safely and consistently.
Each month, the creators and maintainers of OpenRewrite at Moderne run live, hands-on training sessions — one for newcomers and one for experienced users. You’ll see how recipes work, how to apply them across projects, and how to modernize code with confidence.
Join the next session, bring your questions, and learn how to automate the kind of work that usually eats your sprint time.
Yes, we're now running our only Summer Sale. All Courses are 30% off until 20th July, 2026:
Yes, we're now running our only Summer Sale. All Courses are 30% off until 20th July, 2026:
1. Introduction
In this tutorial, we’ll describe how to use Spring WebSockets to send STOMP messages to a single user. That’s important because we sometimes don’t want to broadcast every message to every user. Besides that, we’ll demonstrate how to send these messages in a secure way.
For an introduction to WebSockets, check out this great tutorial for how to get up and running. And, for a deeper dive into security, check out this article to secure your WebSockets implementation.
2. Queues, Topics, and Endpoints
There are three main ways to say where messages are sent and how they are subscribed to using Spring WebSockets and STOMP:
- Topics – common conversations or chat topics open to any client or user
- Queues – reserved for specific users and their current sessions
- Endpoints – generic endpoints
Now, let’s take a quick look at an example context path for each:
- “/topic/movies”
- “/user/queue/specific-user”
- “/secured/chat”
It’s important to note that we must use queues to send messages to specific users, as topics and endpoints don’t support this functionality.
3. Configuration
Now, let’s learn how to configure our application so that we can send messages to a specific user:
public class SocketBrokerConfig extends
  WebSocketMessageBrokerConfigurer {

    @Override
    public void configureMessageBroker(MessageBrokerRegistry config) {
        config.enableSimpleBroker("/secured/history","/secured/user/queue/specific-user");
        config.setApplicationDestinationPrefixes("/spring-security-mvc-socket");
        config.setUserDestinationPrefix("/secured/user");
    }

    @Override
    public void registerStompEndpoints(StompEndpointRegistry registry) {
        registry.addEndpoint("/secured/room").withSockJS();
    }
}
Let’s make sure to include a user destination since that determines which endpoints are reserved for single users.
We also prefix all of our queues and user destinations with “/secured” to make them require authentication. For unprotected endpoints, we can drop the “/secured” prefix (as a result of our other security settings).
From a pom.xml standpoint, no additional dependencies are required.
4. URL Mappings
We want our client to subscribe to a queue using a URL mapping that conforms to the following pattern:
"/user/queue/updates"This mapping will be automatically transformed by UserDestinationMessageHandler into the user-session-specific address.
For example, if we have a user named “user123”, the corresponding address would be:
"/queue/updates-user123"Server-side, we’ll send our user-specific response using the following URL mapping pattern:
"/user/{username}/queue/updates"This too will be transformed into the correct URL mapping we already subscribed to client-side.
Thus, we see that the essential ingredients here are two-fold:
- Prepend our specified User Destination Prefix (configured in AbstractWebSocketMessageBrokerConfigurer).
- Use “/queue” somewhere within the mapping.
In the next section, we’ll take a look at exactly how to do this.
5. Invoking convertAndSendToUser()
We can non-statically invoke convertAndSendToUser() from SimpMessagingTemplate or SimpMessageSendingOperations:
@Autowired
private SimpMessagingTemplate simpMessagingTemplate;

@MessageMapping("/secured/room")
public void sendSpecific(
  @Payload Message msg,
  Principal user,
  @Header("simpSessionId") String sessionId) throws Exception {
    OutputMessage out = new OutputMessage(
      msg.getFrom(),
      msg.getText(),
      new SimpleDateFormat("HH:mm").format(new Date()));
    simpMessagingTemplate.convertAndSendToUser(
      msg.getTo(), "/secured/user/queue/specific-user", out);
}
You might have noticed:
@Header("simpSessionId") String sessionIdThe @Header annotation allows access to headers exposed by the inbound message. For example, we can grab the current sessionId without the need for complicated interceptors. Similarly, we can access the current user via Principal.
Importantly, the approach we take in this article provides greater customization over the @sendToUser annotation with respect to URL mappings. For more on that annotation, check out this great article.
Client-side, we’ll use connect() in JavaScript to initialize a SockJS instance and connect to our WebSocket server using STOMP:
var socket = new SockJS('/secured/room');
var stompClient = Stomp.over(socket);
var sessionId = "";

stompClient.connect({}, function (frame) {
    var url = stompClient.ws._transport.url;
    url = url.replace(
      "ws://localhost:8080/spring-security-mvc-socket/secured/room/",  "");
    url = url.replace("/websocket", "");
    url = url.replace(/^[0-9]+\//, "");
    console.log("Your current session is: " + url);
    sessionId = url;
}
We also access the supplied sessionId and append that to the “secured/room“ URL mapping. This gives us the ability to dynamically and manually supply a user-specific subscription queue:
stompClient.subscribe('secured/user/queue/specific-user'
  + '-user' + that.sessionId, function (msgOut) {
     //handle messages
}
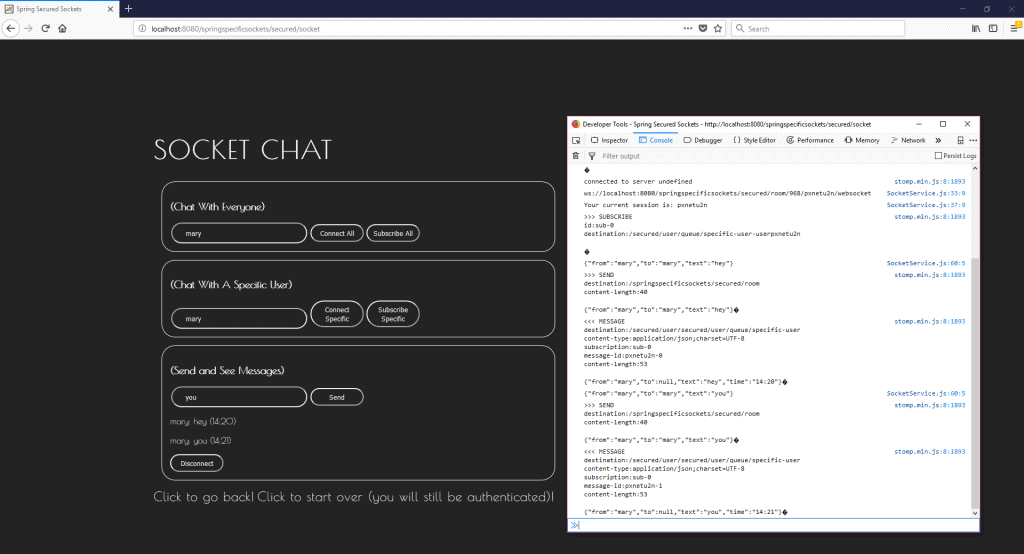
Once everything’s set up we should see:
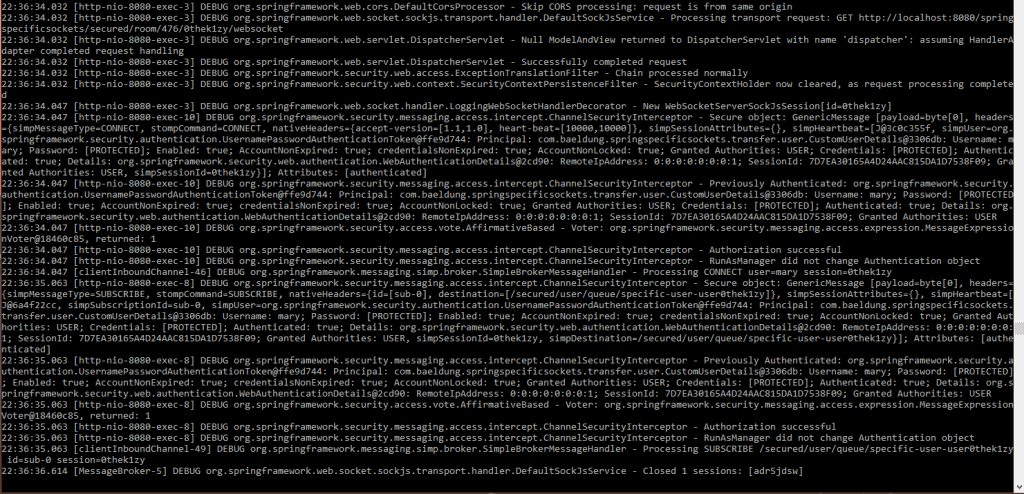
And in our server console:
6. Conclusion
Check out the official Spring blog and the official documentation for more information about this topic.


