

Mocking is an essential part of unit testing, and the Mockito library makes it easy to write clean and intuitive unit tests for your Java code.
Get started with mocking and improve your application tests using our Mockito guide:
Handling concurrency in an application can be a tricky process with many potential pitfalls. A solid grasp of the fundamentals will go a long way to help minimize these issues.
Get started with understanding multi-threaded applications with our Java Concurrency guide:
Spring 5 added support for reactive programming with the Spring WebFlux module, which has been improved upon ever since. Get started with the Reactor project basics and reactive programming in Spring Boot:
Since its introduction in Java 8, the Stream API has become a staple of Java development. The basic operations like iterating, filtering, mapping sequences of elements are deceptively simple to use.
But these can also be overused and fall into some common pitfalls.
To get a better understanding on how Streams work and how to combine them with other language features, check out our guide to Java Streams:
Explore Spring Boot 3 and Spring 6 in-depth through building a full REST API with the framework:
Yes, Spring Security can be complex, from the more advanced functionality within the Core to the deep OAuth support in the framework.
I built the security material as two full courses - Core and OAuth, to get practical with these more complex scenarios. We explore when and how to use each feature and code through it on the backing project.
You can explore the course here:
Spring Data JPA is a great way to handle the complexity of JPA with the powerful simplicity of Spring Boot.
Get started with Spring Data JPA through the guided reference course:
Refactor Java code safely — and automatically — with OpenRewrite.
Refactoring big codebases by hand is slow, risky, and easy to put off. That’s where OpenRewrite comes in. The open-source framework for large-scale, automated code transformations helps teams modernize safely and consistently.
Each month, the creators and maintainers of OpenRewrite at Moderne run live, hands-on training sessions — one for newcomers and one for experienced users. You’ll see how recipes work, how to apply them across projects, and how to modernize code with confidence.
Join the next session, bring your questions, and learn how to automate the kind of work that usually eats your sprint time.
1. Introduction
In this quick tutorial, we’re going to learn how to use CSS and JavaScript in our Thymeleaf templates.
First, we’ll go over the expected folder structure so we know where to put our files. After that, we’ll see what we need to do to access those files from a Thymeleaf template.
We’ll start by adding CSS styling to our page and then move on to adding some JavaScript functionality.
2. Setup
In order to use Thymeleaf in our application, let’s add the Spring Boot Starter for Thymeleaf to our Maven configuration:
<dependency>
    <groupId>org.springframework.boot</groupId>
    <artifactId>spring-boot-starter-thymeleaf</artifactId>
    <version>3.1.5</version>
</dependency>
3. Basic Example
3.1. Directory Structure
Now, as a reminder, Thymeleaf is a templating library that can be easily integrated with Spring Boot applications. By default, Thymeleaf expects us to place those templates in the src/main/resources/templates folder. We can create subfolders, so we’ll be using a subfolder called cssandjs for this example.
For CSS and JavaScript files, the default directory is src/main/resources/static. Let’s create static/styles/cssandjs and static/js/cssandjs folders for our CSS and JS files, respectively.
3.2. Adding CSS
Let’s create a simple CSS file named main.css in our static/styles/cssandjs folder and define some basic styling:
h2 {
    font-family: sans-serif;
    font-size: 1.5em;
    text-transform: uppercase;
}

strong {
    font-weight: 700;
    background-color: yellow;
}

p {
    font-family: sans-serif;
}
Next, let’s create a Thymeleaf template named styledPage.html in our templates/cssandjs folder to use these styles:
<!DOCTYPE html>
<html xmlns:th="http://www.thymeleaf.org">
<head>
    <meta charset="UTF-8">
    <title>Add CSS and JS to Thymeleaf</title>
    <link th:href="@{/styles/cssandjs/main.css}" rel="stylesheet" />
</head>
<body>
    <h2>Carefully Styled Heading</h2>
    <p>
        This is text on which we want to apply <strong>very special</strong> styling.
    </p>
</body>
</html>
We load the stylesheet using the link tag with Thymeleaf’s special th:href attribute. If we’ve used the expected directory structure, we only need to specify the path below src/main/resources/static. In this case, that’s /styles/cssandjs/main.css. The @{/styles/cssandjs/main.css} syntax is Thymeleaf’s way of doing URL linking.
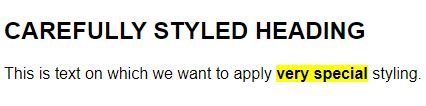
If we run our application, we’ll see that our styles have been applied:
3.3. Using JavaScript
Next, we’re going to learn how to add a JavaScript file to our Thymeleaf page.
Let’s begin by adding some JavaScript to a file in src/main/resources/static/js/cssandjs/actions.js:
function showAlert() {
    alert("The button was clicked!");
}
Then we hop back over to our Thymeleaf template and add a <script> tag that points to our JavaScript file:
<script type="text/javascript" th:src="@{/js/cssandjs/actions.js}"></script>Now, we call our method from our template:
<button type="button" th:onclick="showAlert()">Show Alert</button>When we run our application and click the Show Alert button, we’ll see the alert window.
Before we wrap things up, let’s build on this example a little bit by learning how to use data from our Spring controller in our JavaScript.
Let’s start by modifying our controller to provide a name to our page:
@GetMapping("/styled-page")
public String getStyledPage(Model model) {
    model.addAttribute("name", "Baeldung Reader");
    return "cssandjs/styledPage";
}
Next, let’s add a function to our actions.js file to use this name in an alert:
function showName(name) {
    alert("Here's the name: " + name);
}
Finally, in order to call our function with the data from our controller, we need to use script inlining. So let’s place the name value in a local JavaScript variable:
<script th:inline="javascript">
    var nameJs = /*[[${name}]]*/;
</script>
By doing this, we’ve created a local JavaScript variable that contains the name model value from our control that we can then use in our JavaScript on the rest of the page.
Now that we’ve done that, we can call our JavaScript function using the nameJs variable:
<button type="button" th:onclick="showName(nameJs);">Show Name</button>4. Conclusion
In this short tutorial, we learned how to apply CSS styling and external JavaScript functionality to our Thymeleaf pages. We started with the recommended directory structure and worked our way up to calling JavaScript with data provided in our Spring controller class.


