

1. Overview
Apache Cassandra is a scalable NoSQL database. It provides continuous availability with no single point of failure. In addition, Cassandra is able to handle large amounts of data with exceptional performance.
In this tutorial, we’ll look at connecting to Cassandra using Spring Data and Docker. Moreover, we’ll make use of the Spring Data repository abstraction to work with Cassandra’s data layer.
We’ll see how to save different Java date values in Cassandra. Finally, we’ll investigate how those date values are mapped to Cassandra types.
2. Spring Data for Cassandra
Spring Data for Apache Cassandra offers Spring developers a familiar interface for working with Cassandra. This project applies core Spring concepts to the development of solutions using Cassandra data storage.
Spring Data lets us create repositories based on common Spring interfaces. It also allows the use of QueryBuilders to eliminate the need to learn Cassandra Query Language (CQL). The project provides simple annotations that enable rich object mapping.
There are two important helper classes:
- CqlTemplate handles common data access operations
- CassandraTemplate provides object mapping
The project has noticeable similarities with Spring’s core JDBC support.
3. Setting Up a Test Environment
In order to get started, we’ll need to set up a connection to a Cassandra instance.
Note that we can also connect to an Astra DB database instead, which is a cloud-based database built on Apache Cassandra.
This guide will show you how to connect to a Datastax Astra DB.
3.1. Cassandra Container
Let’s configure and start Cassandra using the Testcontainers library. To begin with, we’ll define a Cassandra container and expose it to a specific port:
@Container
public static final CassandraContainer cassandra = (CassandraContainer) new CassandraContainer("cassandra:3.11.2")
    .withExposedPorts(9042);
Next, we’ll need to override test properties required for Spring Data to be able to establish a connection with the Cassandra container:
TestPropertyValues.of(
    "spring.data.cassandra.keyspace-name=" + KEYSPACE_NAME,
    "spring.data.cassandra.contact-points=" + cassandra.getContainerIpAddress(),
    "spring.data.cassandra.port=" + cassandra.getMappedPort(9042)
).applyTo(configurableApplicationContext.getEnvironment());
Finally, before creating any objects/tables, we’ll need to create a keyspace:
session.execute("CREATE KEYSPACE IF NOT EXISTS " + KEYSPACE_NAME + " WITH replication = {'class':'SimpleStrategy','replication_factor':'1'};");A keyspace is simply a data container in Cassandra. In fact, it is very similar to a database in an RDBMS.
3.2. Cassandra Repository
Spring Data’s repository support significantly eases implementing DAOs. Let’s start by creating a simple DAO.
The @Table annotation provided in the org.springframework.data.cassandra.core.mapping package enables domain object mapping:
@Table
public class Person {

    @PrimaryKey
    private UUID id;
    private String firstName;
    private String lastName;

    public Person(UUID id, String firstName, String lastName) {
        this.id = id;
        this.firstName = firstName;
        this.lastName = lastName;
    }

    //getters, setters, equals and hash code

}
Next, we’ll define a Spring Data repository for our DAO by extending the CassandraRepository interface:
@Repository
public interface PersonRepository extends CassandraRepository<Person, UUID> {}
Finally, we’ll need to define two additional properties before we can start writing integration tests:
spring.data.cassandra.schema-action=create_if_not_exists
spring.data.cassandra.local-datacenter=datacenter1
The first property will ensure that Spring Data automatically creates the annotated tables for us.
We should note that this setting is not recommended for production systems.
4. Using Date Values
In modern versions of Spring Data for Apache Cassandra, working with date values is quite straightforward. Spring Data will automatically ensure that Java date types are correctly mapped to and from an Apache Cassandra representation.
4.1. LocalDate Type
Let’s add a new field birthDate of type LocalDate to our Person DAO:
@Test
public void givenValidPersonUsingLocalDate_whenSavingIt_thenDataIsPersisted() {
    UUID personId = UUIDs.timeBased();
    Person newPerson = new Person(personId, "Luka", "Modric");
    newPerson.setBirthDate(LocalDate.of(1985, 9, 9));
    personRepository.save(newPerson);

    List<Person> savedPersons = personRepository.findAllById(List.of(personId));
    assertThat(savedPersons.get(0)).isEqualTo(newPerson);
}
Spring Data automatically converts Java’s LocalDate to Cassandra’s date type. The LocalDate value in the DAO is identical after saving and fetching the record from Cassandra.
4.2. LocalDateTime Type
Let’s add another field called lastVisitedDate of type LocalDateTime to our Person DAO:
@Test
public void givenValidPersonUsingLocalDateTime_whenSavingIt_thenDataIsPersisted() {
    UUID personId = UUIDs.timeBased();
    Person newPerson = new Person(personId, "Luka", "Modric");
    newPerson.setLastVisitedDate(LocalDateTime.of(2021, 7, 13, 11, 30));
    personRepository.save(newPerson);

    List<Person> savedPersons = personRepository.findAllById(List.of(personId));
    assertThat(savedPersons.get(0)).isEqualTo(newPerson);
}
Spring Data automatically converts Java’s LocalDateTime to Cassandra’s timestamp type. The LocalDateTime value in the DAO is identical after saving and fetching the record from Cassandra.
4.3. Legacy Date Type
Finally, let’s add a field called lastPurchasedDate of the legacy type Date to our Person DAO:
@Test
public void givenValidPersonUsingLegacyDate_whenSavingIt_thenDataIsPersisted() {
    UUID personId = UUIDs.timeBased();
    Person newPerson = new Person(personId, "Luka", "Modric");
    newPerson.setLastPurchasedDate(new Date(LocalDate.of(2021, 7, 13).toEpochDay()));
    personRepository.save(newPerson);

    List<Person> savedPersons = personRepository.findAllById(List.of(personId));
    assertThat(savedPersons.get(0)).isEqualTo(newPerson);
}
As with LocalDateTime, Spring Data converts Java’s java.util.Date to Cassandra’s timestamp type.
4.4. Mapped Cassandra Types
Let’s check the data that was saved in Cassandra by using CQLSH. It’s a command-line shell for interacting with Cassandra through CQL.
In order to check what data has been stored in the Cassandra container during test execution, we can simply put a breakpoint in our test. During the paused test execution, we can then connect to the Docker container CLI via the Docker Desktop application:
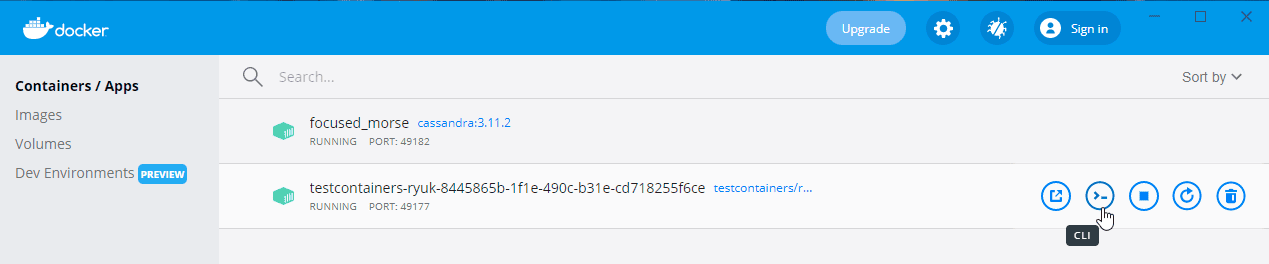
After connecting to the Docker container CLI, we should first select the keyspace and then the table:
# cqlsh
Connected to Test Cluster at 127.0.0.1:9042.
[cqlsh 5.0.1 | Cassandra 3.11.2 | CQL spec 3.4.4 | Native protocol v4]
Use HELP for help.
cqlsh> USE test;
cqlsh:test> select * from person;
As a result, CQLSH will display us a formatted output of the data saved in the table:
 id                                   | birthdate  | firstname | lastname | lastpurchaseddate | lastvisiteddate
--------------------------------------+------------+-----------+----------+-------------------+-----------------
 9abef910-e3fd-11eb-9829-c5149ac796de | 1985-09-09 |      Luka |   Modric |              null |            null
However, we would also like to check the data types used for the specific date columns:
cqlsh:test> DESC TABLE person;The output returns a CQL command used to create the table. Therefore, it contains all data types definitions:
CREATE TABLE test.person (
    id uuid PRIMARY KEY,
    birthdate date,
    firstname text,
    lastname text,
    lastpurchaseddate timestamp,
    lastvisiteddate timestamp
)
5. Conclusion
In this article, we explored working with different date values in Spring Data for Apache Cassandra.
In the examples, we covered working with LocalDate, LocalDateTime, and the legacy Date Java type. We saw how to connect to a Cassandra instance started using Testcontainers. Finally, we used the Spring Data repository abstraction to manipulate with data stored in Cassandra.
As always, the source code is available over on GitHub.