A Simple E-Commerce Implementation with Spring
Last updated: January 8, 2024


Mocking is an essential part of unit testing, and the Mockito library makes it easy to write clean and intuitive unit tests for your Java code.
Get started with mocking and improve your application tests using our Mockito guide:
Handling concurrency in an application can be a tricky process with many potential pitfalls. A solid grasp of the fundamentals will go a long way to help minimize these issues.
Get started with understanding multi-threaded applications with our Java Concurrency guide:
Spring 5 added support for reactive programming with the Spring WebFlux module, which has been improved upon ever since. Get started with the Reactor project basics and reactive programming in Spring Boot:
Since its introduction in Java 8, the Stream API has become a staple of Java development. The basic operations like iterating, filtering, mapping sequences of elements are deceptively simple to use.
But these can also be overused and fall into some common pitfalls.
To get a better understanding on how Streams work and how to combine them with other language features, check out our guide to Java Streams:
Explore Spring Boot 3 and Spring 6 in-depth through building a full REST API with the framework:
Yes, Spring Security can be complex, from the more advanced functionality within the Core to the deep OAuth support in the framework.
I built the security material as two full courses - Core and OAuth, to get practical with these more complex scenarios. We explore when and how to use each feature and code through it on the backing project.
You can explore the course here:
Spring Data JPA is a great way to handle the complexity of JPA with the powerful simplicity of Spring Boot.
Get started with Spring Data JPA through the guided reference course:
Refactor Java code safely — and automatically — with OpenRewrite.
Refactoring big codebases by hand is slow, risky, and easy to put off. That’s where OpenRewrite comes in. The open-source framework for large-scale, automated code transformations helps teams modernize safely and consistently.
Each month, the creators and maintainers of OpenRewrite at Moderne run live, hands-on training sessions — one for newcomers and one for experienced users. You’ll see how recipes work, how to apply them across projects, and how to modernize code with confidence.
Join the next session, bring your questions, and learn how to automate the kind of work that usually eats your sprint time.
Yes, we're now running our only Summer Sale. All Courses are 30% off until 20th July, 2026:
Yes, we're now running our only Summer Sale. All Courses are 30% off until 20th July, 2026:
1. Overview of Our E-commerce Application
In this tutorial, we’ll implement a simple e-commerce application. We’ll develop an API using Spring Boot and a client application that will consume the API using Angular.
Basically, the user will be able to add/remove products from a product list to/from a shopping cart and to place an order.
2. Backend Part
To develop the API, we’ll use the latest version of Spring Boot. We also use JPA and H2 database for the persistence side of things.
To learn more about Spring Boot, you could check out our Spring Boot series of articles and if you’d like to get familiar with building a REST API, please check out another series.
2.1. Maven Dependencies
Let’s prepare our project and import the required dependencies into our pom.xml.
We’ll need some core Spring Boot dependencies:
<dependency>
    <groupId>org.springframework.boot</groupId>
    <artifactId>spring-boot-starter-data-jpa</artifactId>
    <version>3.1.5</version>
</dependency>
<dependency>
    <groupId>org.springframework.boot</groupId>
    <artifactId>spring-boot-starter-web</artifactId>
    <version>3.1.5</version>
</dependency>
Then, the H2 database:
<dependency>
    <groupId>com.h2database</groupId>
    <artifactId>h2</artifactId>
    <version>2.1.214</version>
    <scope>runtime</scope>
</dependency>
And finally – the Jackson library:
<dependency>
    <groupId>com.fasterxml.jackson.datatype</groupId>
    <artifactId>jackson-datatype-jsr310</artifactId>
    <version>2.9.6</version>
</dependency>
We’ve used Spring Initializr to set up the project with needed dependencies quickly.
2.2. Setting Up the Database
Although we could use the in-memory H2 database out of the box with Spring Boot, we’ll still make some adjustments before we start developing our API.
We’ll enable H2 console in our application.properties file so we can actually check the state of our database and see if everything is going as we’d expect.
Also, it could be useful to log SQL queries to the console while developing:
spring.datasource.name=ecommercedb
spring.jpa.show-sql=true

#H2 settings
spring.h2.console.enabled=true
spring.h2.console.path=/h2-console
After adding these settings, we’ll be able to access the database at http://localhost:8080/h2-console using jdbc:h2:mem:ecommercedb as JDBC URL and user sa with no password.
2.3. The Project Structure
The project will be organized into several standard packages, with Angular application put in frontend folder:
├───pom.xml
├───src
    ├───main
    │   ├───frontend
    │   ├───java
    │   │   └───com
    │   │       └───baeldung
    │   │           └───ecommerce
    │   │               │   EcommerceApplication.java
    │   │               ├───controller
    │   │               ├───dto
    │   │               ├───exception
    │   │               ├───model
    │   │               ├───repository
    │   │               └───service
    │   │
    │   └───resources
    │       │   application.properties
    │       ├───static
    │       └───templates
    └───test
        └───java
            └───com
                └───baeldung
                    └───ecommerce
                            EcommerceApplicationIntegrationTest.java
We should note that all interfaces in repository package are simple and extend Spring Data’s CrudRepository, so we’ll omit to display them here.
2.4. Exception Handling
We’ll need an exception handler for our API in order to properly deal with eventual exceptions.
You can find more details about the topic in our Error Handling for REST with Spring and Custom Error Message Handling for REST API articles.
Here, we keep a focus on ConstraintViolationException and our custom ResourceNotFoundException:
@RestControllerAdvice
public class ApiExceptionHandler {

    @SuppressWarnings("rawtypes")
    @ExceptionHandler(ConstraintViolationException.class)
    public ResponseEntity<ErrorResponse> handle(ConstraintViolationException e) {
        ErrorResponse errors = new ErrorResponse();
        for (ConstraintViolation violation : e.getConstraintViolations()) {
            ErrorItem error = new ErrorItem();
            error.setCode(violation.getMessageTemplate());
            error.setMessage(violation.getMessage());
            errors.addError(error);
        }
        return new ResponseEntity<>(errors, HttpStatus.BAD_REQUEST);
    }

    @SuppressWarnings("rawtypes")
    @ExceptionHandler(ResourceNotFoundException.class)
    public ResponseEntity<ErrorItem> handle(ResourceNotFoundException e) {
        ErrorItem error = new ErrorItem();
        error.setMessage(e.getMessage());

        return new ResponseEntity<>(error, HttpStatus.NOT_FOUND);
    }
}
2.5. Products
If you need more knowledge about persistence in Spring, there is a lot of useful articles in Spring Persistence series.
Our application will support only reading products from the database, so we need to add some first.
Let’s create a simple Product class:
@Entity
public class Product {

    @Id
    @GeneratedValue(strategy = GenerationType.IDENTITY)
    private Long id;

    @NotNull(message = "Product name is required.")
    @Basic(optional = false)
    private String name;

    private Double price;

    private String pictureUrl;

    // all arguments contructor
    // standard getters and setters
}
Although the user won’t have the opportunity to add products through the application, we’ll support saving a product in the database in order to prepopulate the product list.
A simple service will be sufficient for our needs:
@Service
@Transactional
public class ProductServiceImpl implements ProductService {

    // productRepository constructor injection

    @Override
    public Iterable<Product> getAllProducts() {
        return productRepository.findAll();
    }

    @Override
    public Product getProduct(long id) {
        return productRepository
          .findById(id)
          .orElseThrow(() -> new ResourceNotFoundException("Product not found"));
    }

    @Override
    public Product save(Product product) {
        return productRepository.save(product);
    }
}
A simple controller will handle requests for retrieving the list of products:
@RestController
@RequestMapping("/api/products")
public class ProductController {

    // productService constructor injection

    @GetMapping(value = { "", "/" })
    public @NotNull Iterable<Product> getProducts() {
        return productService.getAllProducts();
    }
}
All we need now in order to expose the product list to the user – is to actually put some products in the database. Therefore, we’ll make a use of CommandLineRunner class to make a Bean in our main application class.
This way, we’ll insert products into the database during the application startup:
@Bean
CommandLineRunner runner(ProductService productService) {
    return args -> {
        productService.save(...);
        // more products
}
If we now start our application, we could retrieve product list via http://localhost:8080/api/products. Also, if we go to http://localhost:8080/h2-console and log in, we’ll see that there is a table named PRODUCT with the products we’ve just added.
2.6. Orders
On the API side, we need to enable POST requests to save the orders that the end-user will make.
Let’s first create the model:
@Entity
@Table(name = "orders")
public class Order {

    @Id
    @GeneratedValue(strategy = GenerationType.IDENTITY)
    private Long id;

    @JsonFormat(pattern = "dd/MM/yyyy")
    private LocalDate dateCreated;

    private String status;

    @JsonManagedReference
    @OneToMany(mappedBy = "pk.order")
    @Valid
    private List<OrderProduct> orderProducts = new ArrayList<>();

    @Transient
    public Double getTotalOrderPrice() {
        double sum = 0D;
        List<OrderProduct> orderProducts = getOrderProducts();
        for (OrderProduct op : orderProducts) {
            sum += op.getTotalPrice();
        }
        return sum;
    }

    @Transient
    public int getNumberOfProducts() {
        return this.orderProducts.size();
    }

    // standard getters and setters
}
We should note a few things here. Certainly one of the most noteworthy things is to remember to change the default name of our table. Since we named the class Order, by default the table named ORDER should be created. But because that is a reserved SQL word, we added @Table(name = “orders”) to avoid conflicts.
Furthermore, we have two @Transient methods that will return a total amount for that order and the number of products in it. Both represent calculated data, so there is no need to store it in the database.
Finally, we have a @OneToMany relation representing the order’s details. For that we need another entity class:
@Entity
public class OrderProduct {

    @EmbeddedId
    @JsonIgnore
    private OrderProductPK pk;

    @Column(nullable = false)
	private Integer quantity;

    // default constructor

    public OrderProduct(Order order, Product product, Integer quantity) {
        pk = new OrderProductPK();
        pk.setOrder(order);
        pk.setProduct(product);
        this.quantity = quantity;
    }

    @Transient
    public Product getProduct() {
        return this.pk.getProduct();
    }

    @Transient
    public Double getTotalPrice() {
        return getProduct().getPrice() * getQuantity();
    }

    // standard getters and setters

    // hashcode() and equals() methods
}
We have a composite primary key here:
@Embeddable
public class OrderProductPK implements Serializable {

    @JsonBackReference
    @ManyToOne(optional = false, fetch = FetchType.LAZY)
    @JoinColumn(name = "order_id")
    private Order order;

    @ManyToOne(optional = false, fetch = FetchType.LAZY)
    @JoinColumn(name = "product_id")
    private Product product;

    // standard getters and setters

    // hashcode() and equals() methods
}
Those classes are nothing too complicated, but we should note that in OrderProduct class we put @JsonIgnore on the primary key. That’s because we don’t want to serialize Order part of the primary key since it’d be redundant.
We only need the Product to be displayed to the user, so that’s why we have transient getProduct() method.
Next what we need is a simple service implementation:
@Service
@Transactional
public class OrderServiceImpl implements OrderService {

    // orderRepository constructor injection

    @Override
    public Iterable<Order> getAllOrders() {
        return this.orderRepository.findAll();
    }

    @Override
    public Order create(Order order) {
        order.setDateCreated(LocalDate.now());
        return this.orderRepository.save(order);
    }

    @Override
    public void update(Order order) {
        this.orderRepository.save(order);
    }
}
And a controller mapped to /api/orders to handle Order requests.
Most important is the create() method:
@PostMapping
public ResponseEntity<Order> create(@RequestBody OrderForm form) {
    List<OrderProductDto> formDtos = form.getProductOrders();
    validateProductsExistence(formDtos);
    // create order logic
    // populate order with products

    order.setOrderProducts(orderProducts);
    this.orderService.update(order);

    String uri = ServletUriComponentsBuilder
      .fromCurrentServletMapping()
      .path("/orders/{id}")
      .buildAndExpand(order.getId())
      .toString();
    HttpHeaders headers = new HttpHeaders();
    headers.add("Location", uri);

    return new ResponseEntity<>(order, headers, HttpStatus.CREATED);
}
First of all, we accept a list of products with their corresponding quantities. After that, we check if all products exist in the database and then create and save a new order. We’re keeping a reference to the newly created object so we can add order details to it.
Finally, we create a “Location” header.
The detailed implementation is in the repository – the link to it is mentioned at the end of this article.
3. Frontend
Now that we have our Spring Boot application built up, it’s time to move the Angular part of the project. To do so, we’ll first have to install Node.js with NPM and, after that, an Angular CLI, a command line interface for Angular.
It’s really easy to install both of those as we could see in the official documentation.
3.1. Setting Up the Angular Project
As we mentioned, we’ll use Angular CLI to create our application. To keep things simple and have all in one place, we’ll keep our Angular application inside the /src/main/frontend folder.
To create it, we need to open a terminal (or command prompt) in the /src/main folder and run:
ng new frontendThis will create all the files and folders we need for our Angular application. In the file pakage.json, we can check which versions of our dependencies are installed. This tutorial is based on Angular v6.0.3, but older versions should do the job, at least versions 4.3 and newer (HttpClient that we use here was introduced in Angular 4.3).
We should note that we’ll run all our commands from the /frontend folder unless stated differently.
This setup is enough to start the Angular application by running ng serve command. By default, it runs on http://localhost:4200 and if we now go there we’ll see base Angular application loaded.
3.2. Adding Bootstrap
Before we proceed with creating our own components, let’s first add Bootstrap to our project so we can make our pages look nice.
We need just a few things to achieve this. First, we need to run a command to install it:
npm install --save bootstrapand then to say to Angular to actually use it. For this, we need to open a file src/main/frontend/angular.json and add node_modules/bootstrap/dist/css/bootstrap.min.css under “styles” property. And that’s it.
3.3. Components and Models
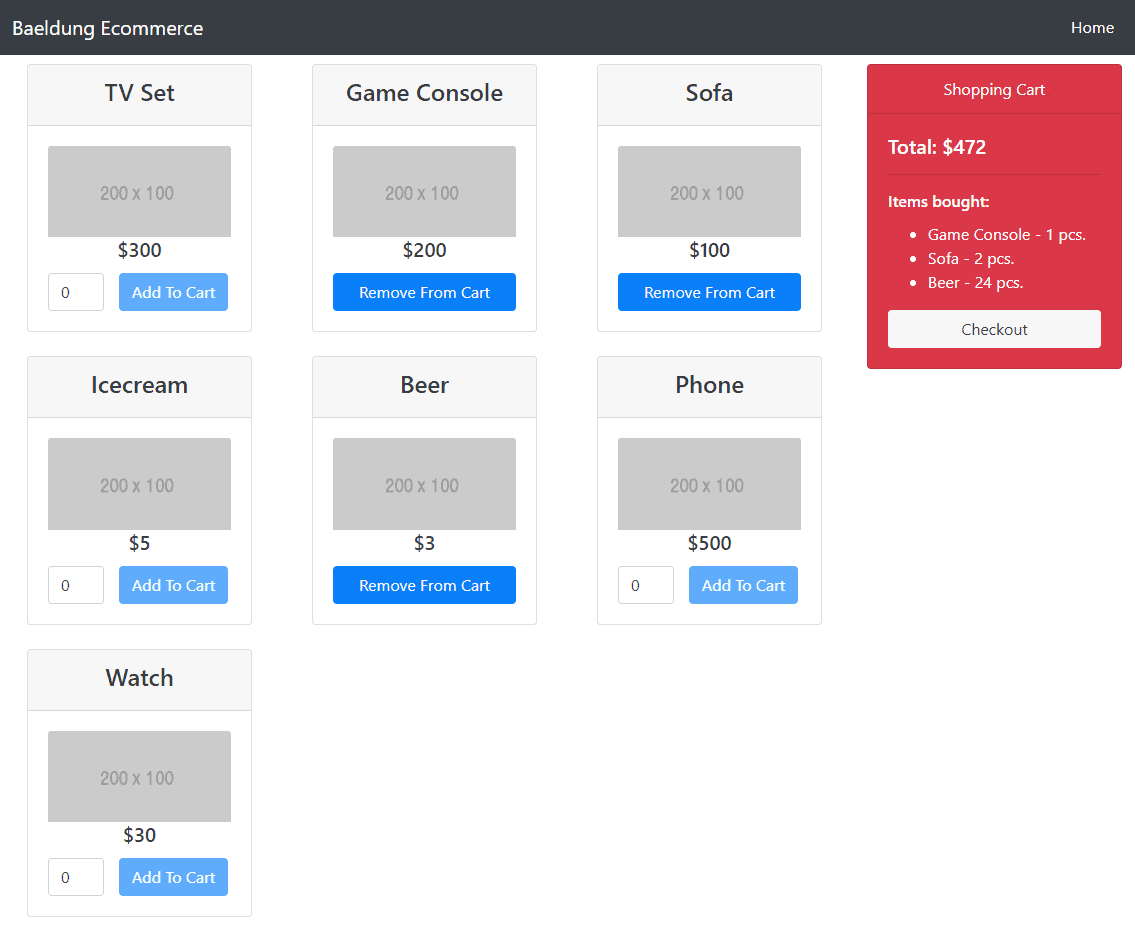
Before we start creating the components for our application, let’s first check out how our app will actually look like:
Now, we’ll create a base component, named ecommerce:
ng g c ecommerceThis will create our component inside the /frontend/src/app folder. To load it at application startup, we’ll include it into the app.component.html:
<div class="container">
    <app-ecommerce></app-ecommerce>
</div>
Next, we’ll create other components inside this base component:
ng g c /ecommerce/products
ng g c /ecommerce/orders
ng g c /ecommerce/shopping-cart
Certainly, we could’ve created all those folders and files manually if preferred, but in that case, we’d need to remember to register those components in our AppModule.
We’ll also need some models to easily manipulate our data:
export class Product {
    id: number;
    name: string;
    price: number;
    pictureUrl: string;

    // all arguments constructor
}
export class ProductOrder {
product: Product;
quantity: number;
// all arguments constructor
}export class ProductOrders {
productOrders: ProductOrder[] = [];
}The last model mentioned matches our OrderForm on the backend.
3.4. Base Component
At the top of our ecommerce component, we’ll put a navbar with the Home link on the right:
<nav class="navbar navbar-expand-lg navbar-dark bg-dark fixed-top">
    <div class="container">
        <a class="navbar-brand" href="#">Baeldung Ecommerce</a>
        <button class="navbar-toggler" type="button" data-toggle="collapse"
          data-target="#navbarResponsive" aria-controls="navbarResponsive"
          aria-expanded="false" aria-label="Toggle navigation"
          (click)="toggleCollapsed()">
            <span class="navbar-toggler-icon"></span>
        </button>
        <div id="navbarResponsive"
            [ngClass]="{'collapse': collapsed, 'navbar-collapse': true}">
            <ul class="navbar-nav ml-auto">
                <li class="nav-item active">
                    <a class="nav-link" href="#" (click)="reset()">Home
                        <span class="sr-only">(current)</span>
                    </a>
                </li>
            </ul>
        </div>
    </div>
</nav>
We’ll also load other components from here:
<div class="row">
    <div class="col-md-9">
        <app-products #productsC [hidden]="orderFinished"></app-products>
    </div>
    <div class="col-md-3">
        <app-shopping-cart (onOrderFinished)=finishOrder($event) #shoppingCartC
          [hidden]="orderFinished"></app-shopping-cart>
    </div>
    <div class="col-md-6 offset-3">
        <app-orders #ordersC [hidden]="!orderFinished"></app-orders>
    </div>
</div>
We should keep in mind that, in order to see the content from our components, since we are using the navbar class, we need to add some CSS to the app.component.css:
.container {
    padding-top: 65px;
}
Let’s check out the .ts file before we comment most important parts:
@Component({
    selector: 'app-ecommerce',
    templateUrl: './ecommerce.component.html',
    styleUrls: ['./ecommerce.component.css']
})
export class EcommerceComponent implements OnInit {
    private collapsed = true;
    orderFinished = false;

    @ViewChild('productsC')
    productsC: ProductsComponent;

    @ViewChild('shoppingCartC')
    shoppingCartC: ShoppingCartComponent;

    @ViewChild('ordersC')
    ordersC: OrdersComponent;

    toggleCollapsed(): void {
        this.collapsed = !this.collapsed;
    }

    finishOrder(orderFinished: boolean) {
        this.orderFinished = orderFinished;
    }

    reset() {
        this.orderFinished = false;
        this.productsC.reset();
        this.shoppingCartC.reset();
        this.ordersC.paid = false;
    }
}
As we can see, clicking on the Home link will reset child components. We need to access methods and a field inside child components from the parent, so that’s why we are keeping references to the children and use those inside the reset() method.
3.5. The Service
In order for siblings components to communicate with each other and to retrieve/send data from/to our API, we’ll need to create a service:
@Injectable()
export class EcommerceService {
    private productsUrl = "/api/products";
    private ordersUrl = "/api/orders";

    private productOrder: ProductOrder;
    private orders: ProductOrders = new ProductOrders();

    private productOrderSubject = new Subject();
    private ordersSubject = new Subject();
    private totalSubject = new Subject();

    private total: number;

    ProductOrderChanged = this.productOrderSubject.asObservable();
    OrdersChanged = this.ordersSubject.asObservable();
    TotalChanged = this.totalSubject.asObservable();

    constructor(private http: HttpClient) {
    }

    getAllProducts() {
        return this.http.get(this.productsUrl);
    }

    saveOrder(order: ProductOrders) {
        return this.http.post(this.ordersUrl, order);
    }

    // getters and setters for shared fields
}
Relatively simple things are in here, as we could notice. We’re making a GET and a POST requests to communicate with the API. Also, we make data we need to share between components observable so we can subscribe to it later on.
Nevertheless, we need to point out one thing regarding the communication with the API. If we run the application now, we would receive 404 and retrieve no data. The reason for this is that, since we are using relative URLs, Angular by default will try to make a call to http://localhost:4200/api/products and our backend application is running on localhost:8080.
We could hardcode the URLs to localhost:8080, of course, but that’s not something we want to do. Instead, when working with different domains, we should create a file named proxy-conf.json in our /frontend folder:
{
    "/api": {
        "target": "http://localhost:8080",
        "secure": false
    }
}
And then we need to open package.json and change scripts.start property to match:
"scripts": {
    ...
    "start": "ng serve --proxy-config proxy-conf.json",
    ...
  }
And now we just should keep in mind to start the application with npm start instead ng serve.
3.6. Products
In our ProductsComponent, we’ll inject the service we made earlier and load the product list from the API and transform it into the list of ProductOrders since we want to append a quantity field to every product:
export class ProductsComponent implements OnInit {
    productOrders: ProductOrder[] = [];
    products: Product[] = [];
    selectedProductOrder: ProductOrder;
    private shoppingCartOrders: ProductOrders;
    sub: Subscription;
    productSelected: boolean = false;

    constructor(private ecommerceService: EcommerceService) {}

    ngOnInit() {
        this.productOrders = [];
        this.loadProducts();
        this.loadOrders();
    }

    loadProducts() {
        this.ecommerceService.getAllProducts()
            .subscribe(
                (products: any[]) => {
                    this.products = products;
                    this.products.forEach(product => {
                        this.productOrders.push(new ProductOrder(product, 0));
                    })
                },
                (error) => console.log(error)
            );
    }

    loadOrders() {
        this.sub = this.ecommerceService.OrdersChanged.subscribe(() => {
            this.shoppingCartOrders = this.ecommerceService.ProductOrders;
        });
    }
}
We also need an option to add the product to the shopping cart or to remove one from it:
addToCart(order: ProductOrder) {
    this.ecommerceService.SelectedProductOrder = order;
    this.selectedProductOrder = this.ecommerceService.SelectedProductOrder;
    this.productSelected = true;
}

removeFromCart(productOrder: ProductOrder) {
    let index = this.getProductIndex(productOrder.product);
    if (index > -1) {
        this.shoppingCartOrders.productOrders.splice(
            this.getProductIndex(productOrder.product), 1);
    }
    this.ecommerceService.ProductOrders = this.shoppingCartOrders;
    this.shoppingCartOrders = this.ecommerceService.ProductOrders;
    this.productSelected = false;
}
Finally, we’ll create a reset() method we mentioned in Section 3.4:
reset() {
    this.productOrders = [];
    this.loadProducts();
    this.ecommerceService.ProductOrders.productOrders = [];
    this.loadOrders();
    this.productSelected = false;
}
We’ll iterate through the product list in our HTML file and display it to the user:
<div class="row card-deck">
    <div class="col-lg-4 col-md-6 mb-4" *ngFor="let order of productOrders">
        <div class="card text-center">
            <div class="card-header">
                <h4>{{order.product.name}}</h4>
            </div>
            <div class="card-body">
                <a href="#"><img class="card-img-top" src={{order.product.pictureUrl}}
                    alt=""></a>
                <h5 class="card-title">${{order.product.price}}</h5>
                <div class="row">
                    <div class="col-4 padding-0" *ngIf="!isProductSelected(order.product)">
                        <input type="number" min="0" class="form-control"
                            [(ngModel)]=order.quantity>
                    </div>
                    <div class="col-4 padding-0" *ngIf="!isProductSelected(order.product)">
                        <button class="btn btn-primary" (click)="addToCart(order)"
                                [disabled]="order.quantity <= 0">Add To Cart
                        </button>
                    </div>
                    <div class="col-12" *ngIf="isProductSelected(order.product)">
                        <button class="btn btn-primary btn-block"
                                (click)="removeFromCart(order)">Remove From Cart
                        </button>
                    </div>
                </div>
            </div>
        </div>
    </div>
</div>
We’ll also add a simple class to corresponding CSS file so everything could fit nicely:
.padding-0 {
    padding-right: 0;
    padding-left: 1;
}
3.7. Shopping Cart
In the ShoppingCart component, we’ll also inject the service. We’ll use it to subscribe to the changes in the ProductsComponent (to notice when the product is selected to be put in the shopping cart) and then update the content of the cart and recalculate the total cost accordingly:
export class ShoppingCartComponent implements OnInit, OnDestroy {
    orderFinished: boolean;
    orders: ProductOrders;
    total: number;
    sub: Subscription;

    @Output() onOrderFinished: EventEmitter<boolean>;

    constructor(private ecommerceService: EcommerceService) {
        this.total = 0;
        this.orderFinished = false;
        this.onOrderFinished = new EventEmitter<boolean>();
    }

    ngOnInit() {
        this.orders = new ProductOrders();
        this.loadCart();
        this.loadTotal();
    }

    loadTotal() {
        this.sub = this.ecommerceService.OrdersChanged.subscribe(() => {
            this.total = this.calculateTotal(this.orders.productOrders);
        });
    }

    loadCart() {
        this.sub = this.ecommerceService.ProductOrderChanged.subscribe(() => {
            let productOrder = this.ecommerceService.SelectedProductOrder;
            if (productOrder) {
                this.orders.productOrders.push(new ProductOrder(
                    productOrder.product, productOrder.quantity));
            }
            this.ecommerceService.ProductOrders = this.orders;
            this.orders = this.ecommerceService.ProductOrders;
            this.total = this.calculateTotal(this.orders.productOrders);
        });
    }

    ngOnDestroy() {
        this.sub.unsubscribe();
    }
}
We are sending an event to the parent component from here when the order is finished and we need to go to the checkout. There is the reset() method in here also:
finishOrder() {
    this.orderFinished = true;
    this.ecommerceService.Total = this.total;
    this.onOrderFinished.emit(this.orderFinished);
}

reset() {
    this.orderFinished = false;
    this.orders = new ProductOrders();
    this.orders.productOrders = []
    this.loadTotal();
    this.total = 0;
}
HTML file is simple:
<div class="card text-white bg-danger mb-3" style="max-width: 18rem;">
    <div class="card-header text-center">Shopping Cart</div>
    <div class="card-body">
        <h5 class="card-title">Total: ${{total}}</h5>
        <hr>
        <h6 class="card-title">Items bought:</h6>

        <ul>
            <li *ngFor="let order of orders.productOrders">
                {{ order.product.name }} - {{ order.quantity}} pcs.
            </li>
        </ul>

        <button class="btn btn-light btn-block" (click)="finishOrder()"
             [disabled]="orders.productOrders.length == 0">Checkout
        </button>
    </div>
</div>
3.8. Orders
We’ll keep things as simple as we can and in the OrdersComponent simulate paying by setting the property to true and saving the order in the database. We can check that the orders are saved either via h2-console or by hitting http://localhost:8080/api/orders.
We need the EcommerceService here as well in order to retrieve the product list from the shopping cart and the total amount for our order:
export class OrdersComponent implements OnInit {
    orders: ProductOrders;
    total: number;
    paid: boolean;
    sub: Subscription;

    constructor(private ecommerceService: EcommerceService) {
        this.orders = this.ecommerceService.ProductOrders;
    }

    ngOnInit() {
        this.paid = false;
        this.sub = this.ecommerceService.OrdersChanged.subscribe(() => {
            this.orders = this.ecommerceService.ProductOrders;
        });
        this.loadTotal();
    }

    pay() {
        this.paid = true;
        this.ecommerceService.saveOrder(this.orders).subscribe();
    }
}
And finally we need to display info to the user:
<h2 class="text-center">ORDER</h2>
<ul>
    <li *ngFor="let order of orders.productOrders">
        {{ order.product.name }} - ${{ order.product.price }} x {{ order.quantity}} pcs.
    </li>
</ul>
<h3 class="text-right">Total amount: ${{ total }}</h3>

<button class="btn btn-primary btn-block" (click)="pay()" *ngIf="!paid">Pay</button>
<div class="alert alert-success" role="alert" *ngIf="paid">
    <strong>Congratulation!</strong> You successfully made the order.
</div>
4. Merging Spring Boot and Angular Applications
We finished development of both our applications and it is probably easier to develop it separately as we did. But, in production, it would be much more convenient to have a single application so let’s now merge those two.
What we want to do here is to build the Angular app which calls Webpack to bundle up all the assets and push them into the /resources/static directory of the Spring Boot app. That way, we can just run the Spring Boot application and test our application and pack all this and deploy as one app.
To make this possible, we need to open ‘package.json‘ again add some new scripts after scripts.build:
"postbuild": "npm run deploy",
"predeploy": "rimraf ../resources/static/ && mkdirp ../resources/static",
"deploy": "copyfiles -f dist/** ../resources/static",
We’re using some packages that we don’t have installed, so let’s install them:
npm install --save-dev rimraf
npm install --save-dev mkdirp
npm install --save-dev copyfiles
The rimraf command is gonna look at the directory and make a new directory (cleaning it up actually), while copyfiles copies the files from the distribution folder (where Angular places everything) into our static folder.
Now we just need to run npm run build command and this should run all those commands and the ultimate output will be our packaged application in the static folder.
Then we run our Spring Boot application at the port 8080, access it there and use the Angular application.
5. Conclusion
In this article, we created a simple e-commerce application. We created an API on the backend using Spring Boot and then we consumed it in our frontend application made in Angular. We demonstrated how to make the components we need, make them communicate with each other and retrieve/send data from/to the API.
Finally, we showed how to merge both applications into one, packaged web app inside the static folder.


