

Mocking is an essential part of unit testing, and the Mockito library makes it easy to write clean and intuitive unit tests for your Java code.
Get started with mocking and improve your application tests using our Mockito guide:
Handling concurrency in an application can be a tricky process with many potential pitfalls. A solid grasp of the fundamentals will go a long way to help minimize these issues.
Get started with understanding multi-threaded applications with our Java Concurrency guide:
Spring 5 added support for reactive programming with the Spring WebFlux module, which has been improved upon ever since. Get started with the Reactor project basics and reactive programming in Spring Boot:
Since its introduction in Java 8, the Stream API has become a staple of Java development. The basic operations like iterating, filtering, mapping sequences of elements are deceptively simple to use.
But these can also be overused and fall into some common pitfalls.
To get a better understanding on how Streams work and how to combine them with other language features, check out our guide to Java Streams:
Explore Spring Boot 3 and Spring 6 in-depth through building a full REST API with the framework:
Yes, Spring Security can be complex, from the more advanced functionality within the Core to the deep OAuth support in the framework.
I built the security material as two full courses - Core and OAuth, to get practical with these more complex scenarios. We explore when and how to use each feature and code through it on the backing project.
You can explore the course here:
Spring Data JPA is a great way to handle the complexity of JPA with the powerful simplicity of Spring Boot.
Get started with Spring Data JPA through the guided reference course:
Refactor Java code safely — and automatically — with OpenRewrite.
Refactoring big codebases by hand is slow, risky, and easy to put off. That’s where OpenRewrite comes in. The open-source framework for large-scale, automated code transformations helps teams modernize safely and consistently.
Each month, the creators and maintainers of OpenRewrite at Moderne run live, hands-on training sessions — one for newcomers and one for experienced users. You’ll see how recipes work, how to apply them across projects, and how to modernize code with confidence.
Join the next session, bring your questions, and learn how to automate the kind of work that usually eats your sprint time.
If you're working on a Spring Security (and especially an OAuth) implementation, definitely have a look at the Learn Spring Security course:
>> LEARN SPRING SECURITY1. Overview
Model Context Protocol (MCP) allows AI models to access business data through secure APIs. When we build MCP servers that handle sensitive information, we need proper authorization to control who can access what data.
OAuth2 provides token-based security that works well with MCP systems. Instead of building custom authentication, we can use OAuth2 standards to protect our MCP servers and manage client access.
In this article, we’ll see how to secure MCP servers and clients using Spring AI and OAuth2. We’ll build a complete example with three components: an authorization server, a protected MCP server with calculator tools, and a client that handles both user and system requests.
2. MCP Security Architecture
In order to secure MCP servers, it’s important to understand how we’ll integrate an authorization server before the MCP server.
Our system includes an Authorization Server for issuing JWT tokens with proper permissions, a MCP Server for validating tokens and controlling access to calculator tools. Additionally, there’s an MCP Client that gets tokens and manages authentication for different request types:
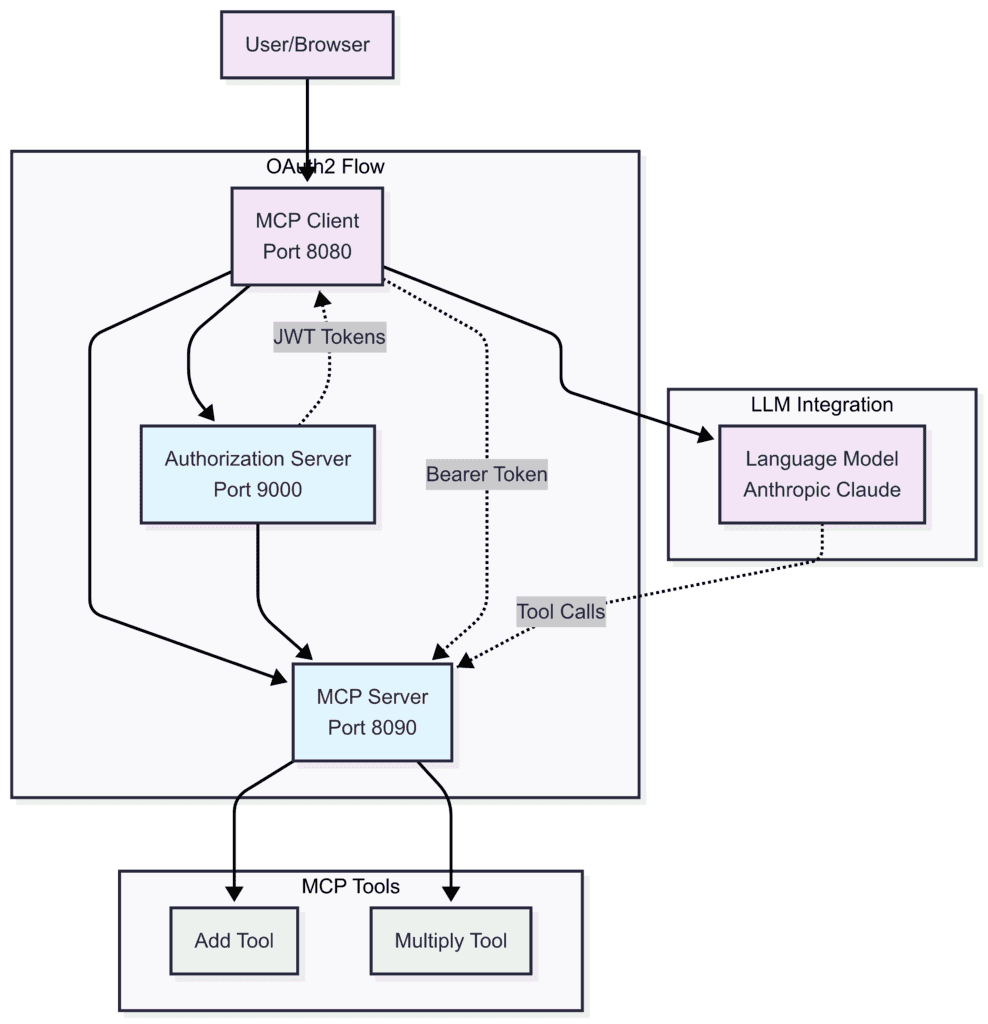
MCP servers act as OAuth2 Resource Servers. They check JWT tokens in request headers before processing any operations. This separates security concerns from business logic. Clients get access tokens from an OAuth2 authorization server. Then, clients include these tokens in MCP requests. Finally, MCP servers validate tokens before allowing operations. This is how our components will work:
3. Building the Authorization Server
We’ll start with the authorization server since other components depend on it.
3.1. Adding Dependencies
We need to add the OAuth2 authorization server dependency to use it:
<dependency>
    <groupId>org.springframework.boot</groupId>
    <artifactId>spring-boot-starter-oauth2-authorization-server</artifactId>
</dependency>
<dependency>
    <groupId>org.springframework.boot</groupId>
    <artifactId>spring-boot-starter-web</artifactId>
</dependency>
3.2. Configuring the Authorization Server
Let’s configure the server in application.yml:
server:
  port: 9000

spring:
  security:
    user:
      name: user
      password: password
    oauth2:
      authorizationserver:
        client:
          oidc-client:
            registration:
              client-id: "mcp-client"
              client-secret: "{noop}mcp-secret"
              client-authentication-methods:
                - "client_secret_basic"
              authorization-grant-types:
                - "authorization_code"
                - "client_credentials"
                - "refresh_token"
              redirect-uris:
                - "http://localhost:8080/authorize/oauth2/code/authserver"
              scopes:
                - "openid"
                - "profile"
                - "calc.read"
                - "calc.write"
This sets up an authorization server on port 9000 with a client that supports both authorization code flow (for users) and client credentials flow (for systems).
4. Securing the MCP Server
Now we’ll create an MCP server that requires OAuth2 tokens and provides calculator tools.
4.1. Configuring Dependencies for MCP Server
Now, let’s add the OAuth2 resource server support:
<dependency>
    <groupId>org.springframework.ai</groupId>
    <artifactId>spring-ai-starter-mcp-server-webmvc</artifactId>
    <version>1.0.0-M7</version>
</dependency>

<dependency>
    <groupId>org.springframework.boot</groupId>
    <artifactId>spring-boot-starter-oauth2-resource-server</artifactId>
</dependency>
4.2. Server Configuration
Let’s configure the MCP server as an OAuth2 resource server:
server.port=8090

spring.security.oauth2.resourceserver.jwt.issuer-uri=http://localhost:9000

spring.ai.mcp.server.enabled=true
spring.ai.mcp.server.name=mcp-calculator-server
spring.ai.mcp.server.version=1.0.0
spring.ai.mcp.server.stdio=false
Spring Boot automatically handles JWT validation when we set the issuer URI. Every request to our MCP server now requires a valid JWT token in the Authorization header.
4.3. Creating MCP Tools
LLMs are generally bad at math. Hence, we need to give them access to tools that can compute the results based on the request:
@Tool(description = "Add two numbers")
public CalculationResult add(
  @ToolParam(description = "First number") double a,
  @ToolParam(description = "Second number") double b) {
      double result = a + b;
      return new CalculationResult("addition", a, b, result);
}

@Tool(description = "Multiply two numbers")
public CalculationResult multiply(
  @ToolParam(description = "First number") double a,
  @ToolParam(description = "Second number") double b) {
      double result = a * b;
      return new CalculationResult("multiplication", a, b, result);
}
The security configuration automatically protects all MCP tools. Requests without valid tokens are rejected. These tools are added to the context and given to the LLM on each user query. Then the LLM decides which tool to use for the user query to respond.
5. Building the MCP Client
Now, we need the client to handle the most complex part since it needs to handle both user requests and system initialization.
5.1. Dependencies for the Client
We begin by adding the mcp-client and oauth2-client dependencies:
<dependency>
    <groupId>org.springframework.ai</groupId>
    <artifactId>spring-ai-starter-mcp-client-webflux</artifactId>
</dependency>
<dependency>
    <groupId>org.springframework.boot</groupId>
    <artifactId>spring-boot-starter-oauth2-client</artifactId>
</dependency>
5.2. Client Configuration
Now, we need to configure two OAuth2 client registrations in the application.properties:
server.port=8080

spring.ai.mcp.client.sse.connections.server1.url=http://localhost:8090
spring.ai.mcp.client.type=SYNC

spring.security.oauth2.client.provider.authserver.issuer-uri=http://localhost:9000

# OAuth2 Client for User-Initiated Requests (Authorization Code Grant)
spring.security.oauth2.client.registration.authserver.client-id=mcp-client
spring.security.oauth2.client.registration.authserver.client-secret=mcp-secret
spring.security.oauth2.client.registration.authserver.authorization-grant-type=authorization_code
spring.security.oauth2.client.registration.authserver.provider=authserver
spring.security.oauth2.client.registration.authserver.scope=openid,profile,mcp.read,mcp.write
spring.security.oauth2.client.registration.authserver.redirect-uri={baseUrl}/authorize/oauth2/code/{registrationId}

# OAuth2 Client for Machine-to-Machine Requests (Client Credentials Grant)
spring.security.oauth2.client.registration.authserver-client-credentials.client-id=mcp-client
spring.security.oauth2.client.registration.authserver-client-credentials.client-secret=mcp-secret
spring.security.oauth2.client.registration.authserver-client-credentials.authorization-grant-type=client_credentials
spring.security.oauth2.client.registration.authserver-client-credentials.provider=authserver
spring.security.oauth2.client.registration.authserver-client-credentials.scope=mcp.read,mcp.write

spring.ai.anthropic.api-key=${ANTHROPIC_API_KEY}
We need two registrations for different authentication flows. The authserver registration uses authorization code flow for user-initiated requests. The authserver-client-credentials registration uses client credentials flow for system startup.
5.3. Security Configuration
Now let’s set up Spring Security to handle OAuth2:
@Bean
WebClient.Builder webClientBuilder(McpSyncClientExchangeFilterFunction filterFunction) {
    return WebClient.builder()
      .apply(filterFunction.configuration());
}

@Bean
SecurityFilterChain securityFilterChain(HttpSecurity http) throws Exception {
    return http.authorizeHttpRequests(auth -> auth.anyRequest().permitAll())
      .oauth2Client(Customizer.withDefaults())
      .csrf(CsrfConfigurer::disable)
      .build();
}
5.4. Selecting the Right Token
The entire challenge here is about choosing the right token for each request. We need a custom ExchangeFilterFunction implementation that detects the request context:
@Component
public class McpSyncClientExchangeFilterFunction implements ExchangeFilterFunction {

    private final ClientCredentialsOAuth2AuthorizedClientProvider clientCredentialTokenProvider = new ClientCredentialsOAuth2AuthorizedClientProvider();
    private final ServletOAuth2AuthorizedClientExchangeFilterFunction delegate;
    private final ClientRegistrationRepository clientRegistrationRepository;
    private static final String AUTHORIZATION_CODE_CLIENT_REGISTRATION_ID = "authserver";
    private static final String CLIENT_CREDENTIALS_CLIENT_REGISTRATION_ID = "authserver-client-credentials";

    public McpSyncClientExchangeFilterFunction(OAuth2AuthorizedClientManager clientManager,
        ClientRegistrationRepository clientRegistrationRepository) {
        this.delegate = new ServletOAuth2AuthorizedClientExchangeFilterFunction(clientManager);
        this.delegate.setDefaultClientRegistrationId(AUTHORIZATION_CODE_CLIENT_REGISTRATION_ID);
        this.clientRegistrationRepository = clientRegistrationRepository;
    }

    @Override
    public Mono<ClientResponse> filter(ClientRequest request, ExchangeFunction next) {
        if (RequestContextHolder.getRequestAttributes() instanceof ServletRequestAttributes) {
            return this.delegate.filter(request, next);
        }
        else {
            var accessToken = getClientCredentialsAccessToken();
            var requestWithToken = ClientRequest.from(request)
              .headers(headers -> headers.setBearerAuth(accessToken))
              .build();
            return next.exchange(requestWithToken);
        }
    }

    private String getClientCredentialsAccessToken() {
        var clientRegistration = this.clientRegistrationRepository
          .findByRegistrationId(CLIENT_CREDENTIALS_CLIENT_REGISTRATION_ID);

        var authRequest = OAuth2AuthorizationContext.withClientRegistration(clientRegistration)
          .principal(new AnonymousAuthenticationToken("client-credentials-client", "client-credentials-client",
             AuthorityUtils.createAuthorityList("ROLE_ANONYMOUS")))
          .build();
        return this.clientCredentialTokenProvider.authorize(authRequest).getAccessToken().getTokenValue();
    }

    public Consumer<WebClient.Builder> configuration() {
        return builder -> builder.defaultRequest(this.delegate.defaultRequest()).filter(this);
    }
}
The filter checks if there’s an active web request. If yes, it uses the user’s authorization code token. If no (like during app startup), it uses client credentials.
6. Using the Secured MCP System
Now that we have all the components covered, let’s see how we can use the secured MCP system effectively.
6.1. Creating a ChatClient
Let’s wire everything together with a ChatClient:
@Bean
ChatClient chatClient(ChatClient.Builder chatClientBuilder, List<McpSyncClient> mcpClients) {
    return chatClientBuilder.defaultToolCallbacks(new SyncMcpToolCallbackProvider(mcpClients))
      .build();
}
6.2. Making Requests
Now we can use the ChatClient normally. The security happens automatically:
@GetMapping("/calculate")
public String calculate(@RequestParam String expression, @RegisteredOAuth2AuthorizedClient("authserver") OAuth2AuthorizedClient authorizedClient) {
    String prompt = String.format("Please calculate the following mathematical expression using the available calculator tools: %s", expression);

    return chatClient.prompt()
      .user(prompt)
      .call()
      .content();
}
During startup, the MCP client initialization uses client credentials tokens. When users make requests through the web interface, it uses their authorization code tokens.
7. Verifying the Setup
In order to understand how the application works, we need to look into the results it produces. Before starting any application, we must set up the required environment variables for the LLM. Post the setup, we start the Authorization server on port 9000 first. This will be important since all other modules depend on the authorization server. Then we start the MCP server on port 8090, followed by the MCP client on port 8080.
Testing the complete flow becomes straightforward. We need to visit the MCP client endpoint and then try this out:
http://{base_url}:8080/calculate?expression=15+25The client will get a token from the authorization server, call the MCP server with the token, and return the calculation result. We’ve to ensure that we’re logging in to the authorization server with the credentials we specified in the configuration files.
8. Conclusion
In this tutorial, we explored how OAuth2 provides strong security for MCP systems through standard token-based authorization. Spring Security’s OAuth2 support enables good protection with minimal configuration. By separating the authorization server, the MCP server, and the MCP client, we created an architecture where each component focuses on its own responsibility, thereby giving flexibility.


