

Yes, we're now running our only Summer Sale. All Courses are 30% off until 20th July, 2026:
Learn through the super-clean Baeldung Pro experience:
>> Membership and Baeldung Pro.
No ads, dark-mode and 6 months free of IntelliJ Idea Ultimate to start with.
1. Overview
In this tutorial, we’ll learn the steps needed to run TestNG tests on Jenkins.
We’ll focus on integrating with a GitHub repository that uses the TestNG framework for writing tests, setting up Jenkins on our local machine, running these tests on Jenkins, and analyzing the test report.
2. Setup
Let’s start by adding the Maven dependency for TestNG to our pom.xml file:
<dependency>
    <groupId>org.testng</groupId>
    <artifactId>testng</artifactId>
    <version>7.6.1</version>
    <scope>test</scope>
</dependency>
If we’re using Eclipse, we can install the TestNG plugin from the Eclipse Marketplace.
3. Writing a Test Using TestNG
Let’s add a unit test using the @Test annotation, imported from org.testng.annotations.Test:
@Test
public void givenNumber_whenEven_thenTrue() {
    assertTrue(number % 2 == 0);
}
We’ll also add an XML file in the /test/resources folder to run the TestNG suite by specifying the test classes:
<suite name="suite">
    <test name="test suite">
        <classes>
            <class name="com.baeldung.SimpleLongRunningUnitTest" />
        </classes>
    </test>
</suite>
We can then specify the name of this XML file itself in the plugin section of our pom.xml:
<plugin>
    <groupId>org.apache.maven.plugins</groupId>
    <artifactId>maven-surefire-plugin</artifactId>
    <configuration>
        <suiteXmlFiles>
            <suiteXmlFile>
                src\test\resources\test_suite.xml
            </suiteXmlFile>
        </suiteXmlFiles>
    </configuration>
</plugin>
4. Running the TestNG Test
Let’s use the mvn clean install command to build and test our project:
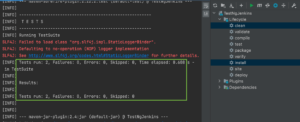
We can also run a specific profile for our Maven build by specifying the profile as a parameter, as in mvn clean test install -Pdefault-second.
We can see that our tests have passed successfully, along with the number of tests that have run, and the number of failed or skipped tests.
5. Setting up Jenkins on the Local Machine
As we know, Jenkins is an open-source server that helps in automating multiple parts of the software development cycle such as building, testing, and deployment, as well as facilitating continuous delivery or continuous integration.
We’ll use Jenkins to run our TestNG tests in an automated manner. In order to run these tests, we’ll first set up Jenkins on our local machine. Once it’s set up, we’ll run our test via a job and analyze the results through the logs and a test trend visualizer.
Let’s now go through the process of setting this up.
5.1. Downloading and Installing Jenkins
We can simply follow the detailed instructions for Linux or Windows if we’re using one of those operating sytems, or we can use brew install jenkins to set up Jenkins on macOS.
5.2. Setting up Jenkins Admin Dashboard
Let’s look at the command to run Jenkins:
$ /usr/local/opt/jenkins/bin/jenkins --httpListenAddress=127.0.0.1 --httpPort=8080Here, /usr/local/opt/jenkins/bin/jenkins denotes the location of the Jenkins installation, while the parameters httpListenAddress and httpPort specify the address and the port where we can access the Jenkins UI.
Through the setup process, we’ll see a log message “hudson.lifecycle.Lifecycle#onReady: Jenkins is fully up and running”, specifying that the Jenkins UI is up and running.
After this, we can access the Jenkins dashboard through http://127.0.0.1:8080/. The initial password to proceed with the installation can be seen as a log on the same screen:
After entering the password, we’re prompted to install the plugins that Jenkins needs. At this point, we can choose specific plugins to install or go ahead with the custom selection. The plugin installation phase kicks in and attempts to install the relevant plugins:
The green ticks mark the plugins for which the installation process has been completed, while the ones in progress are marked along with the installation logs on the right-side panel.
Once the plugins are installed, we are directed to a screen where we can set up the username and password of our choice, or skip to continue with the initial password. We can also choose to modify the Jenkins URL or proceed with the initial URL of http://127.0.0.1:8080/
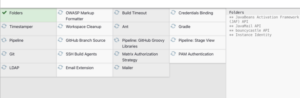
5.3. Setting up Maven and GitHub-Specific Plugins
We’ll now set up the Maven and GitHub plugins that we’ll use to build our project in Jenkins. For this, we can choose the Manage Jenkins option in the Dashboard:

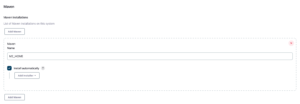
In the next screen, we click on the Global Tool Configuration option and add a Maven installation by checking the Install automatically checkbox:
Once we’ve set up our Maven installation config, we click on the Manage Jenkins option on Dashboard, and it opens a window where we see an option titled Manage Plugins. In the subsequent window, we click on the Available plugins option and search for the GitHub Integration and the Maven Integration plugins:
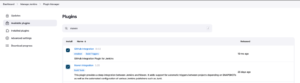
We can select these plugins and click on Install without restarting.
5.4. Setting up Jenkins Job to Run the Tests From a GitHub Project
We’ll now set up a Jenkins job to run the TestNG tests from a module in a GitHub project. For this, we select the New Item option on the left side panel, enter a name for our job, and select the Maven Project option. After this, we can link our GitHub repository from the Configure window.
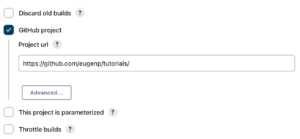
First, let’s check the GitHub project checkbox and then mention the project URL:
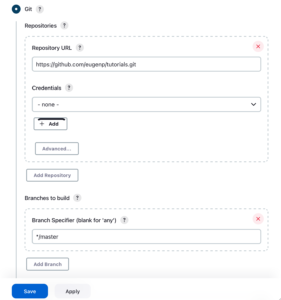
Next, we select Git in the Source Code Management section and then enter the .git repository URL. Additionally, we also mention the branch under the Branch Specifier section:
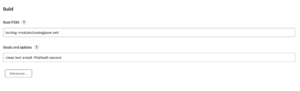
After this, let’s navigate to the Build section and mention the path to the pom.xml file. A key point here is that the path is relative to the project. As a next step, we also specify the Maven command clean test install -Pdefault-second (here, -P is used to denote the profile to be used for the build) in the Goals and options section:
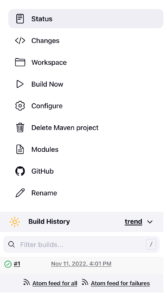
We can now save these configurations and return to our job and click on Build Now in the left panel. It gives us the build number with a link to the build job. Clicking on the link leads us to a screen where we can select to view the console output:
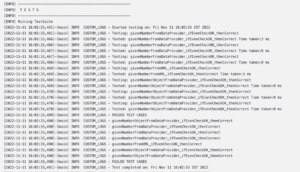
Upon clicking on the console output, we can see the running logs for the test and the success or failure event of the test, along with the status of the build in the Console output:
We can also set up custom test reports for TestNG tests.
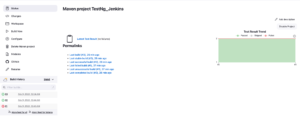
When we return to the main page for our TestNG Jenkins job, we can also see the test result trends as a visualizer:
We can also run Jenkins in a distributed mode to scale our Jenkins setup.
6. Conclusion
In this article, we had a quick look at how to set up Jenkins to run TestNG tests from a GitHub repository by configuring a job on the Jenkins dashboard, executing simple test cases, and viewing the execution report for the test cases on the dashboard.
As always, the implementation of all the code snippets can be found over on GitHub.