Learn through the super-clean Baeldung Pro experience:
>> Membership and Baeldung Pro.
No ads, dark-mode and 6 months free of IntelliJ Idea Ultimate to start with.
Last updated: August 25, 2024

Learn through the super-clean Baeldung Pro experience:
>> Membership and Baeldung Pro.
No ads, dark-mode and 6 months free of IntelliJ Idea Ultimate to start with.
The Jenkins automation server presents many ways to modify job parameters, execution conditions, and similar options.
In this tutorial, we’ll cover various methods of scheduling jobs. We’ll begin by scheduling a job that performs something as simple as printing a plain text message. Later, this will evolve into scheduling a job that gets automatically triggered by changes in an SCM repository such as GitHub, Bitbucket, and others. Finally, we’ll consider timezones as part of job creation.
Notably, this article makes several assumptions.
First, we assume that JDK and Maven are present in Global Tool Configuration with specific names: JDK9.0.1 and Maven3.5.2. Naturally, if that isn’t the case, we can make respective changes to the example code snippets.
Another prerequisite is that we’ve got access to an SCM repository such as Bitbucket with a Maven project properly set up.
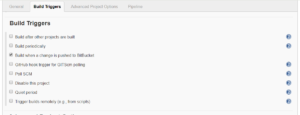
On the job configuration page, let’s scroll down to the Build Triggers section. Since we intend to create a straightforward job, let’s select the checkbox marked Build periodically. Once we select this checkbox, a Schedule text box appears.
In the Schedule text box, we provide a value in a cron-compliant format. In case of difficulties, information is available on the page if we click the question mark next to the box.
For this example, let’s type */2 * * * *, which represents an interval of two minutes:
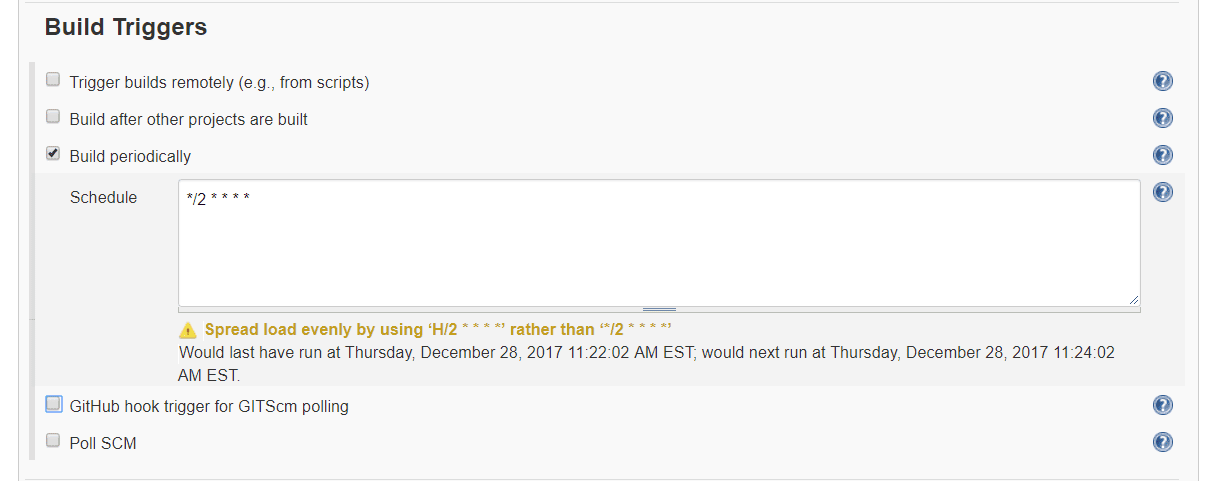
Upon tabbing out of the text box, we can see information beneath the box. It tells us about when the job should run next.
About two minutes after saving the configuration, we should see the status of the first execution of the job:
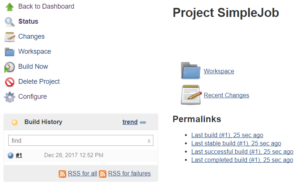
Since we’ve configured the job to run every two minutes, we should see multiple build numbers when we go back to the job dashboard after waiting for some time.
Let’s move one step forward and create a job that pulls source code from an SCM repository such as Bitbucket and performs a build.
Specifically, we create a new job as explained in the previous section, with a few modifications.
In the Build Triggers section, instead of selecting Build Periodically as we did earlier, let’s select Poll SCM. As soon as we do that, we should again see a Schedule text box.
Here, we type */5 * * * *:
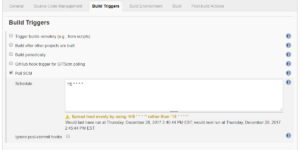
This time, we set the poll interval to 5 minutes instead of running the job every 2 minutes.
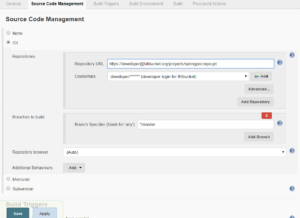
Let’s scroll up to the Source Code Management section. Upon selecting the radio button next to Git, a new Repositories section appears.
This is where we configure the details of the SCM repository. Let’s type the URL of the SCM repository in the Repository URL text field:
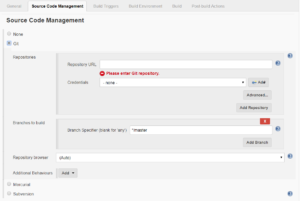
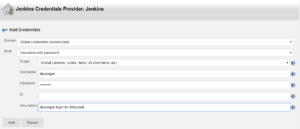
We also provide user credentials so that Jenkins can access the repository. Let’s click the Add button next to Credentials, so we can configure the user credentials.
Next, we select the Kind as Username with Password. We’ll have to type the username and password in the designated text fields:
Upon clicking the Add button, we’re taken back to the Source Code Management section.
Let’s select the new user credentials in the drop-down next to Credentials:
Now, the last thing we need to do is to set up the build script.
Let’s scroll down to the Build section, click Add build step, and select Execute Shell. Since we’re working on a Maven project in the SCM repository, we type mvn clean install, which performs a basic Maven build.
Thus, we’ve created a job that polls every 5 minutes. In particular, the job pulls source code from the master branch of the given Bitbucket repository using the provided user credentials.
After pulling the source code, the job executes the provided script that includes a simple Maven command.
Now, if we save and wait approximately five minutes, we should see the build execution in Build History section on the job dashboard.
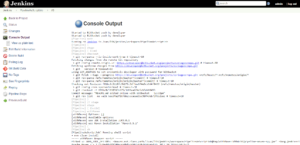
The Console Output should show the output of the Maven build. We can see that the job extracts the source code from Bitbucket and the mvn clean install runs:
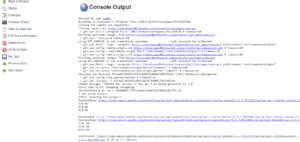
Since this is a Maven build, the console output might be very long depending on the number of Maven dependencies we download.
Still, at the end of the output, we should see BUILD SUCCESS message.
So far, we’ve seen how to create jobs that execute at a predefined scheduled time or interval.
Now, let’s create a job that isn’t bound to any particular schedule. Instead, we configure this new job to automatically trigger whenever there’s a new commit in an SCM repository.
Going back to Jenkins dashboard, let’s click New Item. This time, instead of Freestyle project, we select Pipeline. Let’s name this job PipelineAsScriptJob.
Upon clicking the OK button, we see the pipeline configuration page. This page has several sections:
Let’s scroll down to Build Triggers section.
In the Build Triggers section, we select the checkbox next to Build when a change is pushed to Bitbucket. This option is available if we’ve installed the Bitbucket Plugin:
Next, we scroll down to Pipeline section.
In the Pipeline section, we select Pipeline Script from the drop-down next to Definition.
The text box just below this drop-down should contain the script. There are two ways of populating it.
We can either type or paste in the whole script directly, or we can make use of a utility provided by Jenkins, which is known as Pipeline Syntax.
Let’s go with the latter option:

After clicking Pipeline Syntax, a new tab opens up in the browser. It should contain a handy utility where we can specify the operation that we wish to perform. Consequently, the tool generates the script for that operation in Groovy. We can then copy the script and paste it into the pipeline configuration.
Now, we generate scripts for different actions and save them to populate the pipeline configuration.
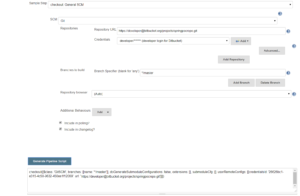
To begin with, let’s select checkout: General SCM in the Sample Step drop-down. After providing the SCM Repo URL and user credentials, we click the Generate Pipeline Script button.
This generates the script in the text box:
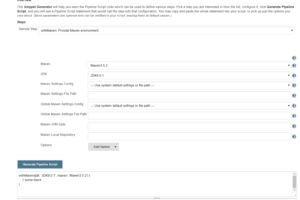
On the same page, let’s scroll up and select withMaven: Provide Maven environment in the Sample Step drop-down. Notably, this option is available if the Pipeline Maven Integration Plugin is installed.
Next, we select the names of Maven and JDK installations next to the corresponding drop-downs. Lastly, we click the Generate Pipeline Script button to produce the script:
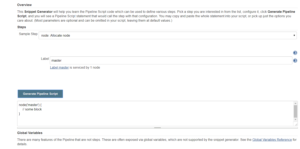
After that, we select node: Allocate node in the Sample Step drop-down, type master in the Label text field, and click Generate Pipeline Script:
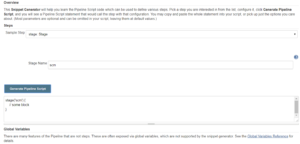
Let’s select stage: Stage in the Sample Step drop-down, type scm in the Stage Name text field, and click Generate Pipeline Script:
It’s time to collate all the scripts generated so far and stitch them together:
node('master') {
    stage('scm') {
        checkout([$class: 'GitSCM',
          branches: [[name: '*/master']],
          doGenerateSubmoduleConfigurations: false,
          extensions: [],
          submoduleCfg: [],
          userRemoteConfigs: [[credentialsId: 'e50f564f-fbb7-4660-9c95-52dc93fa26f7',
          url: 'https://[email protected]/projects/springpocrepo.git']]])
    }

    stage('build') {
        withMaven(jdk: 'JDK9.0.1', maven: 'Maven3.5.2') {
            sh 'mvn clean install'
        }
    }
}
The first statement, node(‘master’) in the script above, indicates that the job runs on a node named master, which is the default node on the Jenkins server.
Let’s copy the above script to the text box in the Pipeline section:

Next, we save this configuration.
Finally, we configure a Webhook in Bitbucket. The Webhook is responsible for sending out a push notification to the Jenkins server whenever a particular event takes place in Bitbucket.
To configure it, we log in to Bitbucket and select a repository. We should see a Settings option on the left-hand side column. Let’s click it, and we should see the Webhooks option in the WORKFLOW section.
There, we create a new Webhook. For that, we first specify a name in the Title field. Then, we provide a URL for the webhook in the URL field. The webhook URL should point to one particular REST API Endpoint provided by Jenkins, and that endpoint is bitbucket-hook.
Notably, the URL must end with a trailing slash:
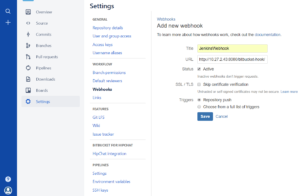
While configuring the Webhook above, we’ve selected the Repository push option. This means Bitbucket sends a notification to the Jenkins server whenever a push happens. This behavior can be modified and there are several different options to choose from. For now, let’s go with the default option, i.e., Repository Push.
We can set up a webhook in Github, too; here‘s some helpful information on how to configure that.
In summary, we’ve created a pipeline script in the Groovy language that should pull the source code from the master branch of the provided SCM repository (using the provided user credentials) whenever there’s a push in the repository and then execute mvn clean install command on the Jenkins server.
Notably, the job isn’t going to run at any particular time. Instead, it should wait until there’s a push in the master branch of the SCM repository. As soon as there’s a new push event, we expect to see a new execution in the Build History section on the Jenkins job dashboard. In particular, the new build should have the pending status next to it.
In a few seconds, the build starts running and we can see the complete log in Console Output.
The first statement in the console output is Started by Bitbucket push by. This confirms that the build was triggered automatically when a push took place in Bitbucket:
If all goes well, the build should complete successfully.
It’s possible not to write any script in the Jenkins pipeline and still achieve build execution triggered by a Bitbucket Webhook.
For that, we create a new file in Bitbucket and name it Jenkinsfile. The pipeline script then goes into this new Jenkinsfile with a slight modification.
To begin with, we create a new pipeline in Jenkins and name it PipelineWithJenkinsfile.
On the pipeline configuration page, we select Pipeline script from SCM next to Definition in the Pipeline section. We should see a drop-down with different options next to SCM. Let’s choose Git from the drop-down.
We then provide the URL of the Bitbucket repository along with the user credentials.
Let’s ensure that the text field next to Script Path contains the default value, i.e., Jenkinsfile:

As far as Jenkins is concerned, that’s all we need to configure.
However, we should also have the Jenkinsfile in the repository. So, let’s create a new file, name it Jenkinsfile, and fill it with a simple Groovy script:
node('master') {
    stage('scm') {
        checkout scm
    }
    stage('build') {
        withMaven(jdk: 'JDK9.0.1', maven: 'Maven3.5.2') {
            sh 'mvn clean install'
        }
    }
}
This script is almost the same as the pipeline script that we created in the earlier section, with just one modification. The statement in stage(‘scm’) doesn’t need the URL and user credentials information as that’s already provided in the configuration. Instead, all it needs is checkout scm.
The moment we commit this file into Bitbucket, it should trigger the build in Jenkins. Consequently, we see the build being triggered in the Build History.
The only difference between this section and the earlier one is that we defined the pipeline script in the Bitbucket repository.
So, the build script is part of the source code of the project that needs to be built. This means that we don’t maintain the script in Jenkins itself.
Instead, Jenkins has knowledge of the SCM repository details and the script file. Whenever there’s a push to this repository, the script in Jenkinsfile gets executed on the Jenkins server.
Since scheduling inherently involves time, considering the timezone when creating a job in Jenkins is critical.
To that end, jobs can be configured with the cron syntax for timezones in a way similar to solutions like Kubernetes. Notably, the feature wasn’t available before version 2.60.2 of Jenkins, where timezone specifications in cron patterns were added, explicitly mentioning the example of SCM polling.
When using older Jenkins versions, we can use cron as a polling mechanism and call an external URL that considers the current timezone.
Yet, when using version 2.60.2 or above, we can directly specify a timezone when creating a job by modifying the Schedule text box as mentioned earlier. In particular, let’s see an example with the Sofia (Bulgaria) timezone:
TZ=Europe/Sofia
0 3 * * 0
In this case, we set the job to run at 03:00 every Monday (0). Effectively, we just need to set the TZ option to the correct name.
One fairly simple way to obtain a list of timezones involves the /usr/share/zoneinfo/ path of most Linux distributions:
$ tree /usr/share/zoneinfo/
/usr/share/zoneinfo/
├── Africa
│   ├── Abidjan
│   ├── Accra
│   ├── Addis_Ababa
...
├── Europe
│   ├── Amsterdam
│   ├── Andorra
│   ├── Astrakhan
│   ├── Athens
│   ├── Belfast -> London
│   ├── Belgrade
│   ├── Berlin
...
This way, we can check equivalent settings and consider locations.
In this article, we’ve seen how jobs can be configured and scheduled in Jenkins using various strategies.
We’ve also seen how to configure a job in Jenkins so that it’s automatically triggered, based on certain actions performed in an SCM repository such as Bitbucket. Lastly, we also considered how to change the timezone when scheduling a job.