


Learn through the super-clean Baeldung Pro experience:
>> Membership and Baeldung Pro.
No ads, dark-mode and 6 months free of IntelliJ Idea Ultimate to start with.
Learn through the super-clean Baeldung Pro experience:
>> Membership and Baeldung Pro.
No ads, dark-mode and 6 months free of IntelliJ Idea Ultimate to start with.
Automation is essential for delivering high-quality applications. Jenkins is one of the most popular open-source automation servers, widely used for continuous integration and continuous delivery (CI/CD) pipelines. When paired with Kubernetes, an open-source platform for container orchestration, Jenkins becomes even more powerful, offering scalability, resilience, and ease of deployment.
In this tutorial, we’ll walk through the process of setting up Jenkins on a Kubernetes cluster, covering everything from installation to running a sample pipeline. This step-by-step approach will help ensure smooth integration and efficient use of these two technologies.
Jenkins is an open-source automation server that helps automate the various stages of software development, from building to testing to deploying applications. By providing an extensive range of plugins, Jenkins supports various technologies, making it a versatile tool for developers.
Kubernetes, often referred to as K8s, is a powerful platform for managing containerized applications. Hosting Jenkins on Kubernetes offers several advantages:
Before starting the setup, ensure the following:
Efficiently deploying Jenkins on Kubernetes involves several key considerations, from setting up namespaces to managing persistent storage. These steps are essential for ensuring scalability, resilience, and optimal performance in CI/CD pipelines.
The first step in setting up Jenkins is creating a dedicated namespace. A namespace helps isolate resources in Kubernetes, making them easier to manage.
$ kubectl create namespace jenkinsThis command creates a namespace called jenkins, ensuring that all resources associated with Jenkins are contained within it.
Next, we define a YAML file that contains the deployment configuration for Jenkins. This file specifies the Jenkins image, the number of replicas, and the necessary ports.
Here’s an example YAML file for deploying Jenkins:
apiVersion: apps/v1
kind: Deployment
metadata:
  name: jenkins
  namespace: jenkins
spec:
  replicas: 1
  selector:
    matchLabels:
      app: jenkins
  template:
    metadata:
      labels:
        app: jenkins
    spec:
      containers:
      - name: jenkins
        image: jenkins/jenkins:lts
        ports:
        - name: http
          containerPort: 8080
        - name: jnlp
          containerPort: 50000
We can apply the deployment using kubectl:
$ kubectl apply -f jenkins-deployment.yamlTo access Jenkins from outside the Kubernetes cluster, we’ll expose the service. This can be done by creating a NodePort service.
So, let’s next create a file called jenkins-service.yaml with the following configuration:
apiVersion: v1
kind: Service
metadata:
  name: jenkins
  namespace: jenkins
spec:
  type: NodePort
  ports:
  - port: 8080
    targetPort: 8080
    nodePort: 30000
  selector:
    app: jenkins
and then apply it:
$ kubectl apply -f jenkins-service.yamlThis service exposes Jenkins on port 30000, making it accessible via the node’s external IP.
Ensuring data persistence in Jenkins is critical for maintaining build history and configuration across pod restarts. Kubernetes pods are ephemeral by default, meaning that any data stored in them will be lost if the pod is restarted. To address this, we can configure persistent storage using Persistent Volumes (PV) and Persistent Volume Claims (PVC).
Here’s an example configuration for creating a persistent volume and a persistent volume claim:
apiVersion: v1
kind: PersistentVolume
metadata:
  name: jenkins-pv
spec:
  capacity:
    storage: 10Gi
  accessModes:
    - ReadWriteOnce
  hostPath:
    path: "/mnt/data"
---
apiVersion: v1
kind: PersistentVolumeClaim
metadata:
  name: jenkins-pvc
  namespace: jenkins
spec:
  accessModes:
    - ReadWriteOnce
  resources:
    requests:
      storage: 10Gi
Let’s apply this configuration with kubectl to ensure Jenkins can store its configuration and job history persistently:
$ kubectl apply -f jenkins-pv.yamlThis guarantees that Jenkins will retain essential data, even during pod restarts or failures
With Jenkins now deployed and exposed, we access the Jenkins UI.
We’ll start by retrieving the external IP of our Kubernetes node:
$ kubectl get nodes -o wideWe then navigate to http://<node-external-ip>:30000 in our browser. Jenkins will prompt for an admin password, which we can find in the Jenkins pod logs:
$ kubectl logs <jenkins-pod-name> -n jenkinsWe use this password to unlock Jenkins and complete the setup.
After entering the admin password, we reach the Jenkins customization screen. At this point, we can either install the suggested plugins or manually select the plugins we need. Here’s what the screen looks like:

Once Jenkins is set up, we can run a sample pipeline to verify that everything is working as expected.
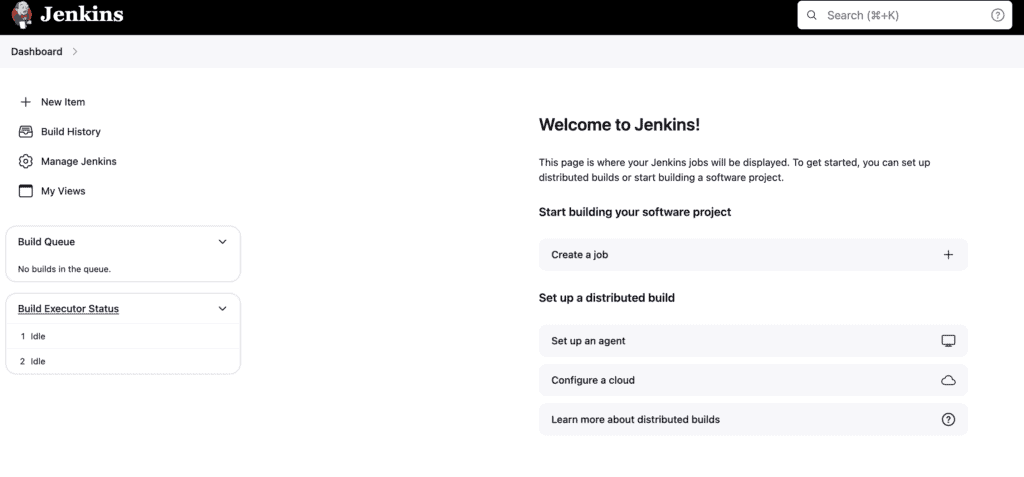
To do this, let’s navigate to the Jenkins dashboard and choose “New Item”.
From there, we select “Pipeline” and name it “Sample Pipeline”.
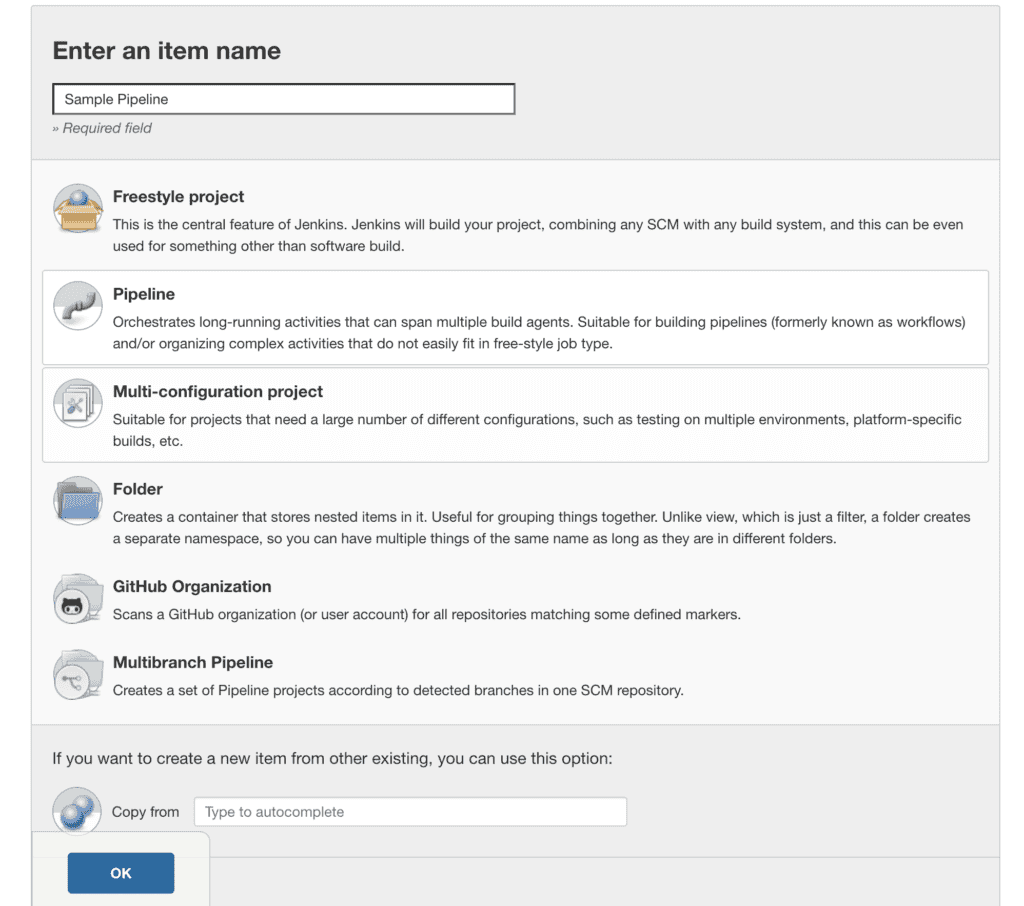
Once we’ve created the pipeline, we’ll see the configuration page where we can paste the pipeline script.

In the pipeline configuration section, we should paste the following script to define our pipeline:
pipeline {
    agent any
    stages {
        stage('Hello') {
            steps {
                echo 'Hello World'
            }
        }
    }
}
After saving the configuration, clicking “Build Now” triggers the build:

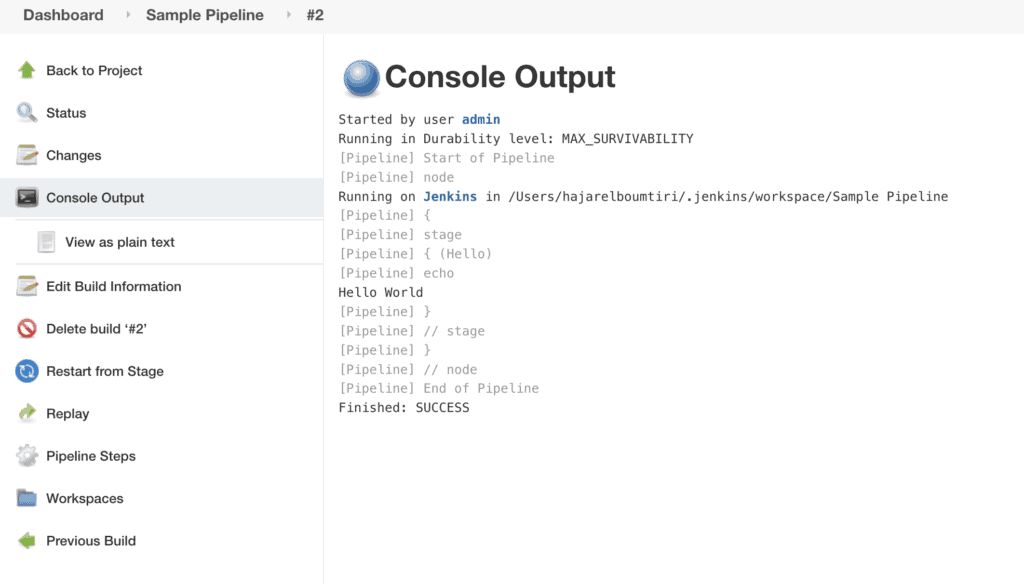
Jenkins will execute the pipeline, and we can check the output in the “Console Output” section.
Helm simplifies managing complex applications like Jenkins on Kubernetes. Instead of manually writing YAML files for the deployment, service, and persistent storage (as described in Sections 5.2, 5.3, and 6), Helm charts provide reusable and customizable templates to automate the process.
We begin by adding the Jenkins Helm repository:
$ helm repo add jenkinsci https://charts.jenkins.io
$ helm repo updateNext, we install Jenkins using Helm:
$ helm install jenkins -n jenkins jenkinsci/jenkinsHelm will automatically set up Jenkins with default configurations, but we can customize it by modifying the Helm values file to suit our needs.
To ensure Jenkins can handle higher workloads and remain available during failures, we configure it for high availability. This includes setting up multiple replicas of Jenkins agents, ensuring Jenkins can distribute the load across multiple nodes.
Kubernetes provides built-in health checks to monitor the status of Jenkins pods. By configuring liveness and readiness probes, we can monitor the availability of Jenkins and be alerted to any issues affecting its functionality.
Here’s a sample configuration for adding health probes to the Jenkins deployment:
livenessProbe:
  httpGet:
    path: "/login"
    port: 8080
  initialDelaySeconds: 120
  periodSeconds: 30
readinessProbe:
  httpGet:
    path: "/login"
    port: 8080
  initialDelaySeconds: 60
  periodSeconds: 30
By setting up these probes, we can track when Jenkins becomes ready to serve traffic and detect if it encounters any issues during runtime.
To secure Jenkins and prevent unauthorized access, we should take a few important steps:
These measures help protect Jenkins in a Kubernetes environment, ensuring only authorized users can access the system.
Deploying Jenkins on Kubernetes offers a robust, scalable solution for automating CI/CD pipelines, enabling seamless integration and delivery across software projects.
By carefully following the steps outlined in this article, we ensure that Jenkins is efficiently installed, configured, and optimized for production use in a Kubernetes environment.
Leveraging features like persistent storage, monitoring, and high availability not only safeguards critical data but also enhances the resilience and performance of Jenkins. This combination makes Jenkins a critical asset for any development team aiming for reliability, scalability, and efficiency in their software delivery process.