

Yes, we're now running our only Summer Sale. All Courses are 30% off until 20th July, 2026:
Learn through the super-clean Baeldung Pro experience:
>> Membership and Baeldung Pro.
No ads, dark-mode and 6 months free of IntelliJ Idea Ultimate to start with.
1. Introduction
In this tutorial, we’ll explore how to deploy a serverless workload on the Kubernetes platform. We’ll use Knative as the framework to perform this task. In the process, we’ll also learn the benefits of using Knative a the framework for our serverless applications.
2. Kubernetes and Knative
Developing a serverless application without tools to help us is no fun! Remember how the combination of Docker and Kubernetes transformed managing cloud-native applications build with microservices architecture. Certainly, we can benefits from frameworks and tools in the serverless space as well. Well, no reason why Kubernetes can not help us here.
2.1. Kubernetes for Serverless
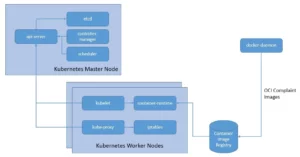
Kubernetes, as a CNCF graduated project, has come to be one of the front runners in the space of orchestrating containerized workloads. It allows us to automate the deployment, scaling, and management of applications packaged as OCI images with popular tools like Docker or Buildah:
The obvious benefits include optimal resource utilization. But, is it not the same objective we had with serverless as well?
Well, of course, there are a number of overlaps in terms of what we intend to achieve with a container orchestration service and a serverless service. But, while Kubernetes provide us with a wonderful tool for automating a lot of stuff, we are still responsible for configuring and managing it. Serverless aims to get rid of even that.
But, we can certainly leverage the Kubernetes platform to run a serverless environment. There are a number of benefits to this. First, it helps us get away from vendor-specific SDKs and APIs locking us to a particular cloud vendor. The underlying Kubernetes platform helps us to port our serverless application from one cloud vendor to another with relative ease.
Moreover, we get to benefit from a standard serverless framework for building our applications. Remember the benefits of Ruby on Rails and off late, Spring Boot! One of the earliest such frameworks came out of AWS and became famous as serverless. It’s an open-source web framework written in Node.js that can help us deploy our serverless application on several FaaS service providers.
2.2. Introduction to Knative
Knative is basically an open-source project which adds components for deploying, running, and managing serverless applications on Kubernetes. We can package our services or functions as a container image and hand it over to Knative. Knative then runs the container for a specific service only when it needs to.
The core architecture of Knative comprises two broad components, Serving, and Eventing that run over an underlying Kubernetes infrastructure.
Knative Serving allows us to deploy containers that can scale automatically as required. It builds on top of Kubernetes and Istio by deploying a set of objects as Custom Resource Definitions (CRDs):
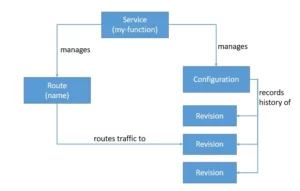
Knative Serving primarily consists of four such objects, Service, Route, Configuration, and Revision. The Service object manages the whole lifecycle of our workload and automatically created other objects like Route and Configuration. Each time we update the Service, a new Revision is created. We can define the Service to route the traffic to the latest or any other Revision.
Knative Eventing provides an infrastructure for consuming and producing events for an application. This helps in combining event-driven architecture with a serverless application:
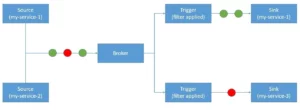
Knative Eventing works with custom resources like Source, Broker, Trigger, and Sink. We can then filter and forward events to a subscriber using Trigger. Service is the component that emits events to the Broker. The Broker here acts as the hub for the events. We can filter these events based on any attribute using a Trigger and route then to a Sink.
Knative Eventing uses HTTP POST requests to send and receive events conforming to the CloudEvents. CloudEvents is basically a specification for describing event data in a standard way. The objective is to simplify event declaration and delivery across services and platforms. This is a project under the CNCF Serverless Working Group.
3. Installation and Setup
As we’ve seen earlier, Knative is basically a set of components like Serving and Eventing that runs over a service mesh like Istio and a workload orchestration cluster like Kubernetes. Then there are command-line utilities that we’ve to install for ease of operation. Hence, there are few dependencies that we need to ensure before we can proceed with the installation of Knative.
3.1. Installing Prerequisites
There are several options to install Kubernetes and this tutorial will not go into the details of them. For instance, Docker Desktop comes with the possibility to enable a very simple Kubernetes cluster that serves most of the purpose. However, one of the simple approaches is to use Kubernetes in Docker (kind) to run a local Kubernetes cluster with Docker container nodes.
On Windows-based machines, the simplest way to install kind is to use the Chocolatey package:
choco install kindOne of the convenient ways to work with a Kubernetes cluster is to use the command-line tool kubectl. Again, we can install kubectl using the Chocolaty package:
choco install kubernetes-cliLastly, Knative also comes with a command-line tool called kn. The Knative CLI provides a quick and easy interface for creating Knative resources. It also helps in complex tasks like autoscaling and traffic splitting.
The easiest way to install the Knative CLI on a Windows machine is to download the compatible binary from their official release page. Then we can simply start using the binary from the command line.
3.2. Installing Knative
Once we’ve all the prerequisites in place, we can proceed to install the Knative components. We have already seen earlier that Knative components are nothing but a bunch of CRDs that we deploy on an underlying Kubernetes cluster. This may be a little complicated to do individually, even with a command-line utility.
Fortunately, for the development environment, we’ve got a quickstart plugin available. This plugin can install a local Knative cluster on Kind using the Knative client. As before, the simplest way to install this quickstart plugin on a Windows machine is to download the binary from their official release page.
The quickstart plugin does a few things to get us ready to roll! First, it ensures that we’ve Kind installed. Then it creates a cluster called knative. Further, it installs Knative Serving with Kourier as the default networking layer and nio.io as the DNS. Lastly, it installs Knative Eventing and creates an in-memory Broker and Channel implementation.
Finally, to ensure that the quickstart plugin was installed properly, we can query the Kind clusters and ensure that we’ve got a cluster called knative there.
4. Hands-on with Knative
Now, we’ve gone through enough theory to try some of the features provided by Knative in practice. To begin with we need a containerized workload to play with. Creating a simple Spring Boot application in Java and containerizing that using Docker is something that has become quite trivial. We will not go into the details of this.
Interestingly Knative does not restrict us as to how we develop our application. So, we can use any of our favorite web frameworks as before. Moreover, we can deploy various types of workload on Knative, right from a full-size application to a small function. Of course, the benefit of serverless lies in creating smaller autonomous functions.
Once we’ve our containerized workload, we can primarily use two approaches to deploy this on Knative. Since all workload is finally deployed as a Kubernetes resource, we can simply create a YAML file with the resource definition and use kubectl to deploy this resource. Alternatively, we can use the Knative CLI to deploy our workload without having to go into these details.
4.1. Deployment with Knative Serving
First, we’ll begin with Knative Serving. We will understand how to deploy our workload in a serverless environment provided by Knative Serving. As we’ve seen earlier, Service is the Knative Serving object that is responsible for managing the whole lifecycle of our application. Hence, we’ll begin by describing this object as a YAML file for our application:
apiVersion: serving.knative.dev/v1
kind: Service
metadata:
  name: my-service
spec:
  template:
    metadata:
      name: my-service-v1
    spec:
      containers:
        - image: <location_of_container_image_in_a_registry>
          ports:
            - containerPort: 8080
This is a fairly simple resource definition that mentions the location of the container image of our application available in an accessible registry. The only important thing to note here is the value we’ve provided for spec.template.metadata.name. This is basically used to name the revision which can come in handy in identifying it later.
Deploying this resource is quite easy using the Kubernetes CLI. We can use the following command assuming we’ve named our YAML file as my-service.yaml:
kubectl apply -f my-service.yamlWhen we deploy this resource, Knative does a number of steps on our behalf to manage our application. To begin with, it creates a new immutable revision for this version of the application. Then it performs network programming to create a Route, ingress, Service, and load balancer for the application. Finally, it scales the application pods up and down as per the demand.
If creating the YAML file seems a bit clumsy, we can also use the Knative CLI to achieve the same result:
kn service create hello \
  --image <location_of_container_image_in_a_registry> \
  --port 8080 \
  --revision-name=my-service-v1
This is a much simpler approach and results in the same resource being deployed for our application. Moreover, Knative takes the same necessary steps to make our application available as per the demand.
4.2. Traffic Splitting Using Knative Serving
Scaling a serverless workload up and down automatically is not the only benefit of using Kantive Serving. It comes with a lot of other power-packed features that make the management of serverless applications even easier. It’s not possible to cover this thoroughly in the limited scope of this tutorial. However, one of such features is traffic splitting that we’ll focus on in this section.
If we recall the concept of Revision in Knative Serving, it’s worth noting that by default Knative directs all the traffic to the latest Revision. But since we still have all the previous Revisions available, it’s quite possible to direct certain or all traffic to an older Revision.
All we need to do to achieve this is to modify the same YAML file that had the description of our Service:
apiVersion: serving.knative.dev/v1
kind: Service
metadata:
  name: my-service
spec:
  template:
    metadata:
      name: my-service-v2
    spec:
      containers:
        - image: <location_of_container_image_in_a_registry>
          ports:
            - containerPort: 8080
  traffic:
  - latestRevision: true
    percent: 50
  - revisionName: my-service-v1
    percent: 50
As we can see, we’ve added a new section that describes the division of traffic between the Revisions. We are asking Knative to send half the traffic to the new Revision while the other to the previous Revision. After we deploy this resource, we can verify the split by listing all the Revisions:
kn revisions listWhile Knative makes it quite easy to achieve traffic splitting, what can we really use it for? Well, there can be several use cases for this feature. For instance, if we want to adopt a deployment model like blue-green or canary, traffic splitting in Knative can come in very handy. If we want to adopt a confidence-building measure like A/B testing, again we can rely on this feature.
4.3. Event-Driven Application with Knative Eventing
Next, let’s explore Knative Eventing. As we’ve seen earlier Knative Eventing helps us blend event-driven programming into the serverless architecture. But why should we care about event-driven architecture? Basically, event-driven architecture is a software architecture paradigm that promotes the production, detection, consumption of, and reaction to events.
Typically, an event is any significant change in the state. For instance, when an order becomes shipped from accepted. Here, the producers and consumers of the events are completely decoupled. Now, decoupled components in any architecture have several benefits. For instance, it largely simplifies horizontal scaling in distributed computing models.
The first step to use Knative Eventing is to ensure we’ve got a Broker available. Now, typically as part of the standard installation, we should have an in-memory Broker available for us in the cluster. We can quickly verify this by listing all available brokers:
kn broker listNow, an event-driven architecture is quite flexible and can be as simple as a single service to a complex mesh of hundreds of services. Knative Eventing provides the underlying infrastructure without imposing any restrictions on how we architect our applications.
For the sake of this tutorial, let’s assume we’ve got a single service that both produces and consumes the events. First, we’ve to define the Source for our events. We can extend the same definition of service that we used earlier to transform it into a Source:
apiVersion: serving.knative.dev/v1
kind: Service
metadata:
  name: my-service
spec:
  template:
    metadata:
      annotations:
        autoscaling.knative.dev/minScale: "1"
    spec:
      containers:
        - image: <location_of_container_image_in_a_registry>
          env:
            - name: BROKER_URL
              value: <broker_url_as_provided_by_borker_list_command>
The only significant change here is that we are providing the broker URL as an environment variable. Now, as before we can use kubectl to deploy this resource or alternatively use Knative CLI directly.
Since Knative Eventing sends and receives events conforming to CloudEvents using HTTP POST, it’s quite easy to use this in our application. We can simply create our event payload using CloudEvents and use any HTTP client library to send it to the Broker.
4.4. Filter and Subscribe to Events Using Knative Eventing
So far we’ve sent our events to the Broker, but what happens after that? Now, what interests us is to be able to filter and send these events to specific targets. For this, we’ve to define a Trigger. Basically, Brokers use Triggers to forward events to the correct consumers. Now, in the process, we can also filter the events we want to send based on any of the event attributes.
As before, we can simply create a YAML file describing our Trigger:
apiVersion: eventing.knative.dev/v1
kind: Trigger
metadata:
  name: my-trigger
  annotations:
    knative-eventing-injection: enabled
spec:
  broker: <name_of_the_broker_as_provided_by_borker_list_command>
  filter:
    attributes:
      type: <my_event_type>
  subscriber:
    ref:
      apiVersion: serving.knative.dev/v1
      kind: Service
      name: my-service
This is a quite simple Trigger that defines the same Service that we used as the Source as the Sink of the events as well. Interestingly, we are using a filter in this trigger to only send events of a particular type to the subscriber. We can create much more complex filters.
Now, as before, we can deploy this resource using kubectl or use the Knative CLI to create this directly. We can also create as many Triggers as we want to send events to different subscribers. Once we’ve created this Trigger, our service would be able to produce any type of event, and out of those consume a certain specific type of events!
In Knative Eventing, a Sink can be an Addressable or a Callable resource. Addressable resources receive and acknowledge an event delivered over HTTP. Callable resources are able to receive an event delivered over HTTP and transform the event, optionally returning an event in the HTTP response. Apart from Services, that we’ve seen now, Channels and Brokers can also be Sinks.
5. Conclusion
In this tutorial, we discussed how we can leverage Kubernetes as the underlying infrastructure to host a serverless environment using Knative. We went through the basic architecture and components of Knative, that is Knative Serving and Knative Eventing. This gave us the opportunity to understand the benefits of using a framework like Knaitive to build our serverless application.