

Learn through the super-clean Baeldung Pro experience:
>> Membership and Baeldung Pro.
No ads, dark-mode and 6 months free of IntelliJ Idea Ultimate to start with.
Last updated: February 6, 2024
Learn through the super-clean Baeldung Pro experience:
>> Membership and Baeldung Pro.
No ads, dark-mode and 6 months free of IntelliJ Idea Ultimate to start with.
In this article, we’ll create a Jenkins job that builds a Git project. Then, we’ll see how to select the branch we want to build. For this purpose, we’ll use the Active Choices plugin.
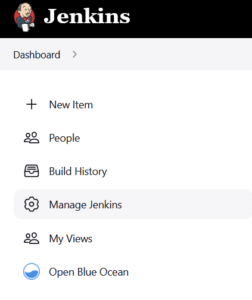
First, we’ll install the Active Choices plugin. In Jenkins’ left panel, let’s click on Manage Jenkins:
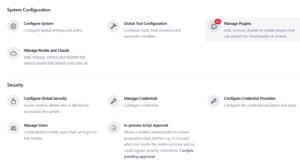
Then, in the System Configuration panel, let’s choose Manage Plugins:
Lastly, we go to the Available section, type Active Choices in the filter input, and tick the box:
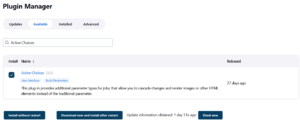
We can now click the Install without restart button, and the installation will proceed!
Let’s now create our job and configure the branch selection.
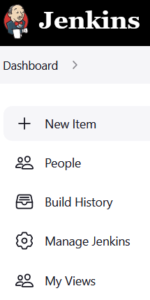
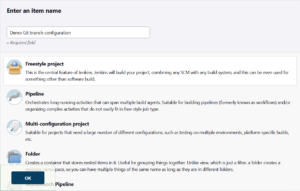
To create a job, in Jenkins’ left panel, let’s click New Item:
The interface for item creation appears. Let’s call our Freestyle project Demo Git branch configuration:
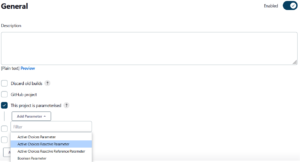
We’re now on the configuration page for the job. In the General section, let’s tick the This project is parameterized checkbox. Then, we’ll open the Add Parameter dropdown and choose Active Choices Reactive Parameter:
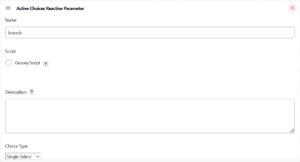
After clicking, the interface for parameter configuration pops in.
We can now configure our reactive parameter. We’ll call it branch and keep it as a Single Select:
Let’s now tick Groovy Script and fill in the Script section that appears with the following script:
def gitUrl = "https://github.com/eugenp/tutorials.git"
def gitBranches = "git ls-remote --heads ${gitUrl}".execute().text.readLines().collect { it.split()[1].replaceAll("refs/heads/", "") }.sort().reverse()
First, we defined the URL of the GitHub repository to checkout. Then we used the git ls-remote command to retrieve information about the remote branches of this repository. We converted this information into a collection of lines of text: every line refers to a distinct branch. The branch name is the second element in every line. Additionally, we removed the refs/heads prefix from each branch name for clarity. Eventually, we sorted the list in alphabetical order to make it user-friendly.
Let’s now move to the Source Code Management subsection. To end up with the job’s configuration, we need to tick Git instead of None. An interface to configure the Git Repository will show up. We’ll fill in the Repository URL: it is the same as the one we put inside the Groovy script. We also need to specify the branch to build. Since we called our reactive parameter branch, we’ll put ${branch} in this field:

We can now click the Save button at the bottom of the page, and we’re done creating the job!
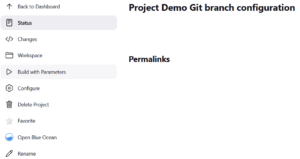
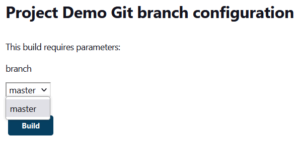
We’ve now landed on the root page for the Demo Git branch configuration project. In the left panel, let’s click Build with Parameters:
We’re now asked to choose the branch to build. Our example repository has a unique master branch. Thus it is the only available option:
In this tutorial, we’ve installed the Active Choices plugin. It helped us to create a parameterized job. Our parameter contains a list of all the branches of our GitHub repository, fetched thanks to a Groovy script. This all led us to be able to choose the branch to build when running our job.