Yes, we're now running our only Summer Sale. All Courses are 30% off until 20th July, 2026:
Git for Beginners: The Definitive Practical Guide
Last updated: May 23, 2025

Learn through the super-clean Baeldung Pro experience:
>> Membership and Baeldung Pro.
No ads, dark-mode and 6 months free of IntelliJ Idea Ultimate to start with.
1. Overview
In this tutorial, we’ll discuss the commands that we most frequently use when working with Git.
We’ll start with installation and configuration and then create our first local repository. Next, we’ll learn how to commit changes and synchronize them with a remote repository.
Additionally, we’ll discuss branching and also learn some advanced techniques like amending commits and manipulating the commit history.
2. What Is Git?
Git is a version control system (VCS) that allows saving and tracking changes to files over time without overwriting previous snapshots. It helps developers collaborate on projects together.
Unlike its main competitor – SVN, Git also implements a distributed workflow system. It means that every developer working with Git has a local copy of the entire repository. Git also allows working asynchronously without a constant connection to the central repository.
3. Git Installation
We can install Git on the most common operating systems like Windows, Mac, and Linux. In fact, on most Mac and Linux machines, Git comes installed by default.
To see if we already have Git installed, let’s open up a terminal and execute:
$ git version
git version 2.24.3 (Apple Git-128)
Moreover, Git comes with built-in GUI tools for committing (git-gui) and browsing (gitk). There are also plenty of third-party tools or IDE plugins that enhance the experience.
4. git help – A Handy Manual
Before we create our first repository, let’s run the git help command. It displays useful information about Git itself:
$ git help
usage: git [--version] [--help] [-C <path>] [-c <name>=<value>]
           [--exec-path[=<path>]] [--html-path] [--man-path] [--info-path]
           [-p | --paginate | -P | --no-pager] [--no-replace-objects] [--bare]
           [--git-dir=<path>] [--work-tree=<path>] [--namespace=<name>]
           <command> [<args>]
...
We can also check the manual for a specific command in multiple ways:
$ git --help init
$ git help init
$ git init --help
All the three variants above return identical output.
With the -g option, we can also access the list of internal guides to develop our skills:
$ git help -g
The common Git guides are:
   attributes          Defining attributes per path
   cli                 Git command-line interface and conventions
   core-tutorial       A Git core tutorial for developers
...
$ git help core-tutorial
To print the tutorial, we need to provide its name as a parameter.
5. git config – Configuring Git
Once we have Git installed, we can easily configure it with the gitconfig command, which allows managing options.
Git supports options at different levels like system, global, local, worktree, or file.
While the system settings are system-wide and are applied to every user and all of their repositories on the system, the global level refers to user-specific settings.
The local configuration is specific to the single repository, and it is the default level that Git uses when we don’t pass any option to the git config command.
The worktree and file levels are more advanced configuration levels, which can be applied to a single branch or file in the repository.
Further, Git resolves the effective value of an option by checking the local level first and then goes until the system level if the option isn’t set.
As an example, let’s configure our username used in the commit history:
$ git config --global user.name "Baeldung User"We’ve just set our name globally.
To override an option for a single repository, we can use the –local flag in its directory.
To print the list of effective options, we use:
$ git config -l
user.name=Baeldung User
We can execute the git –help config command to get details about all the available options.
6. Creating a Repository
Next, we need to create a repository. For this, we have two alternatives – a new repository can be either created locally from scratch, or an existing one can be cloned.
6.1. git init – Initialize a New Repository
If we decide to initialize a new repository, we need to use the git init command. It turns the current directory into a Git repository and starts tracking its content:
$ mkdir simple-repo; cd simple-repo; git init
Initialized empty Git repository in /simple-repo/.git/
Git also creates a hidden directory called .git in it. This directory stores all the objects and refs that Git creates and uses as part of our project’s history. Those files are created during commits and point to specific revisions of our files.
After that, in most cases, we want to connect our already created repository with a remote one. We use the git remote command to manage remote links for the current repository:
$ git remote add origin https://github.com/eugenp/tutorials.gitWe’ve just added a new remote called origin and connected it to the official Baeldung GitHub repository.
6.2. git clone – Clone an External Repository
Sometimes we want to contribute to an existing repository. First, we need to download the existing repository locally.
The git clone command clones the repository into a new directory:
$ git clone https://github.com/eugenp/tutorials.git
Cloning into 'repo'...
When it finishes, the new directory created contains all the project’s files, branches, and history.
Additionally, the cloned repository is already configured and connected with the external source:
$ cd tutorials
$ git remote -v
origin	https://github.com/eugenp/tutorials.git (fetch)
origin	https://github.com/eugenp/tutorials.git (push)
Git will use those origin links to manage any further changes.
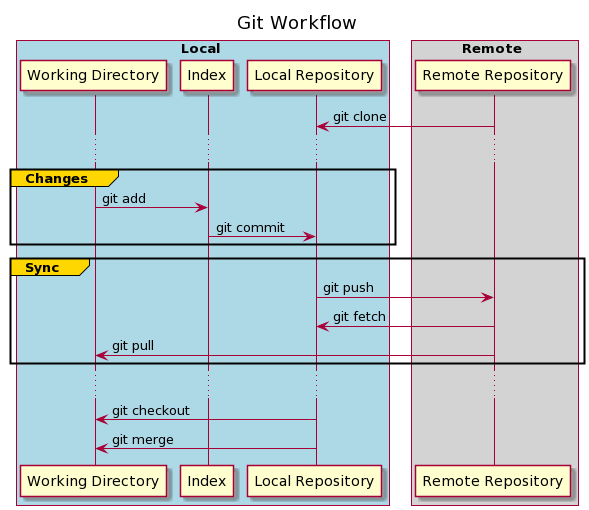
7. Git Workflow
After we have configured our local repository, we are ready to apply the first changes. But before we do that, let’s check how Git tracks those changes.
Our local repository consists of three different trees maintained by Git.
The first one is the Working Directory, which holds the actual version of files.
After making our changes to the files, we can move the files into Index, which acts as a staging area. We do this using the git add command. Files in Index begin to be tracked by Git.
Finally, we can apply and save our changes into the Local Repository using the git commit command. Committing the changes updates the repository’s HEAD, which always points to the last commit we’ve made.
Those three steps are used to maintain the local changes. But as we know, the repository may also contain an external source. The last step is to synchronize both repositories and publish our changes.
 8. Making Changes

Now that we know how Git’s tracking system works, we’re ready to apply our first changes to our repository.
8.1. git status – Show Current Changes
Let’s create a simple file and add it to our repository. Afterward, we execute the git status command and analyze its output:
$ "Hello World" >> myfile.txt
$ git status
On branch master
Your branch is up to date with 'origin/master'.

Untracked files:
  (use "git add <file>..." to include in what will be committed)
	myfile.txt

nothing added to commit but untracked files present (use "git add" to track)
The command prints the current detailed status of our changes. The first part shows if the local and remote branches are synchronized.
Next, the output shows the status of the working tree – the list of currently modified files with their maintenance status. As we see, the myfile.txt file is currently in the Working Directory area and not tracked by Git.
8.2. git add – Track the Changes
To start tracking the changes, we need to move them to the Index by using the git add command:
$ git add myfile.txt
$ git stage *
We can specify multiple files at once by separating them with a space. We can also specify all files using the asterisk sign.
Alternatively, we can also use the git stage command, which is a synonym for the git add command.
Let’s now verify the status:
$ git status
On branch master
Your branch is up to date with 'origin/master'.

Changes to be committed:
  (use "git restore --staged <file>..." to unstage)
	new file:   myfile.txt
As we can see, Git has started tracking our files.
8.3. git restore & gitignore – Untrack the Changes
Git allows removing files from the Index. If we moved our changes into it by mistake and want to temporarily disable tracking them, we use git restore:
$ git restore -S myfile.txt
$ git status
On branch master
Your branch is up to date with 'origin/master'.

Untracked files:
  (use "git add <file>..." to include in what will be committed)
	myfile.txt
We’ve just moved our file once again to the Working Area and excluded it from further commits until we stage it again. The -S (–staged) flag tells Git to restore only the repository’s Index.
We can also permanently exclude files and disable tracking them. To do this, we need to create a .gitignore file. This file contains filename patterns and is applied to all the files in the current directory and its child directories. Any further add actions will ignore files matching those patterns.
8.4. git commit – Save the Changes
Let’s revert the last changes and move our file once again to the Staging Area:
$ git add myfile.txtNow, it’s time to save our work, so we need to do a commit.
The commit is a Git object, which is like a snapshot of our repository at a specific time.
To commit changes, let’s use the git commit command:
$ git commit -m "My first commit"
[master 8451901] My first commit
 1 file changed, 1 insertion(+)
 create mode 100644 myfile.txt
We’ve just created our first commit locally.
The git commit command contains many additional options to perform more complex operations, which we can inspect with the git commit –help command.
The most useful is the -m flag, which specifies a commit message describing changes done in the current snapshot.
Finally, let’s check the status:
$ git status
On branch master
Your branch is ahead of 'origin/master' by 1 commit.
  (use "git push" to publish your local commits)

nothing to commit, working tree clean
Now, our working tree doesn’t contain any additional changes, but the local repository contains more commits than its external source. Therefore, to publish our changes, we should synchronize local changes with the origin.
8.5. git log & git show – Inspect Commits
Once we’ve created the commit, we can check its details. Commits include lots of additional metadata, like the author, timestamp, and more.
To print the list of commits of the current branch, we use the git log command:
$ git log
commit 845190154ed7a491a6143669c4ce88058fb93f8a (HEAD -> master)
Author: ...
Date: ...

    My first commit

commit 9a1e11ec981b41e4b4b9c245a7a96cd6707f4705 (origin/master, origin/HEAD)
...
The list shows the commit history of the current branch in reverse chronological order by default.
Each entry contains the general metadata like the commit’s id (a unique SHA-1 checksum), author, date, and given message.
When we want to go deeper into a single commit, we print its details using the git show command followed by the requested commit id:
$ git show 845190154ed7a491a6143669c4ce88058fb93f8a
commit 845190154ed7a491a6143669c4ce88058fb93f8a (HEAD -> master)
Author: ...
Date:...

    My first commit

diff --git a/myfile.txt b/myfile.txt
new file mode 100644
index 0000000..557db03
--- /dev/null
+++ b/myfile.txt
@@ -0,0 +1 @@
+Hello World
This time, the output also displays the differences done by the commit versus the previous snapshot using the git diff command.
8.6. git stash – Shelve the Changes
The git stash command temporarily shelves changes we’ve made, reverting the Working Directory to match the HEAD commit. This allows us to quickly switch context and start working on something else.
Let’s create another file and add it to the Staging Area. After that, let’s execute the git stash:
$ touch myfile-2.txt; git add *
$ git stash push
Saved working directory and index state WIP on master: 8451901 My first commit
Now, let’s try to list the file:
$ ls myfile-2.txt
ls: myfile-2.txt: No such file or directory
We can see that now the file isn’t present. This is because all pending changes have been removed from the Working Directory and saved in the stash.
We can print all the stashed away modifications using the list option:
$ git stash list
stash@{0}: WIP on master: 8451901 My first commit
Since we didn’t provide its description, the stash is by default listed as WIP on… . We can change the default value into a more descriptive message using the -m flag on the command line.
To inspect its details, we use the show option:
$ git stash show
 myfile-2.txt | 0
 1 file changed, 0 insertions(+), 0 deletions(-)
The output prints information about changes stored in the latest stash.
Finally, if we want to restore the changes, we use the pop option:
$ git stash pop
...
$ ls myfile-2.txt
myfile-2.txt
We’ve just removed a single stashed state from the stash list and applied it on top of the current state.
9. Manipulating the Commit History
Now that we’ve learned how to save changes in the repository, let’s modify previously saved commits. In the following sections, we’ll cover the most common use cases.
9.1. git commit –amend – Add Additional Changes to the Commit
Suppose we forgot to include a file when committing a change. Of course, we can create another commit on top of the last one, but it might make the changes history messy.
In such cases, we may want Git to rewrite our last commit and include the file we forgot using the amend option.
Let’s review the last commit:
$ git show --summary
commit 845190154ed7a491a6143669c4ce88058fb93f8a (HEAD -> master)
Author: ...
Date: ...

    My first commit

 create mode 100644 myfile.txt
Having our my-file2.txt popped from the stash, let’s commit it using the amend option:
$ git commit --amend
[master 0ed9f03] My first commit
 2 files changed, 1 insertion(+)
 create mode 100644 myfile-2.txt
 create mode 100644 myfile.txt
We can notice that Git added the file to our last commit combining the changes.
9.2. git rebase – Reapply Commits
A more advanced technique for modifying commits is through the git rebase command. It reapplies commits from the history on top of another base, allowing us to change them on the fly.
Let’s create another commit in our repository:
$ touch myfile-3.txt
$ git add *
$ git commit -m "My second commit"
Now, we should have two single commits – My first commit and My second commit.
Let’s start to rebase both commits in an interactive mode:
git rebase -i HEAD~2This opens an editor, where we can manipulate the history using commands:
pick 82d8635 My first commit
pick 6d58108 My second commit

# Rebase 9a1e11e..82d8635 onto 9a1e11e (2 commands)
#
# Commands:
# p, pick <commit> = use commit
# r, reword <commit> = use commit, but edit the commit message
# e, edit <commit> = use commit, but stop for amending
# s, squash <commit> = use commit, but meld into previous commit
# d, drop <commit> = remove commit
...
On the top, we have the list of rebasing commits followed by the manual. We have plenty of options here. We can change the order by swapping the lines, or reword the commit message, or squash them into one, edit, or even drop a single commit. The instruction lines will be applied from top to bottom.
9.3. git reset – Rollback to the Specific State
Sometimes, we might want to drop the current state and revert to a historical snapshot. To do this, we use the git reset option:
$ git reset 82d8635It undoes all commits after the specified commit, preserving changes locally and moving them to the Staging Area. But, if we want to drop all working changes, we can use –hard flag.
10. Synchronizing the Repository
After working locally on the repository till now, it’s finally time to publish our changes.
Before uploading them, we should always synchronize our local copy with the remote to avoid conflicts during publishing.
10.1. git fetch – Update References
While we’re implementing our changes, others may have published changes to the same branch. So we should check and sync them with our local repository.
The git fetch command helps us to do so:
$ git fetchThis downloads objects and refs from the origin repository.
We should note that this action never modifies the current working tree. This is because we can only inspect the updated commit history for our repository. If we find any pending changes, we must go further.
10.2. git merge – Apply Incoming Changes
We must merge any incoming changes on the same branch before we publish our code. If we don’t do this, the publishing process could fail.
Let’s update our branch:
$ git merge origin/masterThe git merge command is a very powerful tool. It downloads all new changes from the given reference and combines them with the current working tree choosing the right merge strategy. Many changes will be applied automatically, even if modifications exist on the same files.
But sometimes, there is no easy way to merge changes. In that case, we have a merge conflict, and we have to resolve it manually before moving on. We need to edit the failed file, prepare a final version, and commit the changes.
10.3. git pull – Update and Apply at Once
The git pull command is nothing more than git fetch and git merge combined into one:
$ git pull origin/masterIt checks a given branch for the latest changes and merges them with the current branch, in the same way as git fetch and git merge do. It’s the most common way to update the current branch.
Furthermore, pulling changes might also require an additional manual action to resolve merge conflicts.
10.4. git push – Publishing Local Commits
Once we synchronize our local repository and fix pending merge conflicts, we are finally ready to publish our commits. We need to choose the remote target and the local branch.
Let’s execute the git push command:
$ git push origin masterThis updates the master branch of the remote repository with all commits made locally.
Finally, we check the history:
$ git log
commit 6d5810884c3ce63ca08084959e3a21405a1187df (HEAD -> master, origin/master, origin/HEAD)
Author: ...
Date: ...
    My second commit
We’re done! We’ve just sent our changes to the remote repository.
11. Git Branching
Now, let’s talk about branches. Previously, we intentionally skipped any branch operations. All changes were done on the master branch, which is the default one for each Git repository.
Branches are used to develop features isolated from each other. We use other branches for development and merge them back to the master branch upon completion.
11.1. git branch – Manage Branches
The git branch helps us manage branches. To create a new one, we simply specify its name:
$ git branch new-branchA local branch is not available to others until we push it to the remote repository.
We can now see the newly created branch by listing all of them:
$ git branch --list --all
* master
  new-branch
  remotes/origin/HEAD -> origin/master
  remotes/origin/master
If we want to delete a local branch, we execute:
$ git branch -d new-branch11.2. git checkout – Change Current Branch
If we want to switch current branch, we use the git checkout or git switch functions:
$ git switch new-branch
Switched to branch 'new-branch'
$ git checkout master
Switched to branch 'master'
We’ve just changed from the master to the new-branch and then back to master again using both the commands.
Although both work similarly, the git switch command simply allows switching branches. In contrast, the git checkout is a more complex command enabling us to additionally manage working tree files, resetting branches, or reverting files to specific versions.
12. Conclusion
In this article, we covered all the Git basics and discussed most of the common operations which every developer should know while working with Git. Through practical examples, we learned how to work with this Version Control System.
We started by installing and configuring Git and then created the first repository. After that, we made some changes and learned how to modify the commit history. Finally, we published the changes by synchronizing both repositories and learned how to work with Git branches.