


Learn through the super-clean Baeldung Pro experience:
>> Membership and Baeldung Pro.
No ads, dark-mode and 6 months free of IntelliJ Idea Ultimate to start with.
Last updated: April 9, 2025
Learn through the super-clean Baeldung Pro experience:
>> Membership and Baeldung Pro.
No ads, dark-mode and 6 months free of IntelliJ Idea Ultimate to start with.
Keeping track of Jenkins build status directly in GitHub helps us stay on top of code quality without switching between platforms. Instead of checking Jenkins manually, we can make the build status visible in GitHub, allowing us to catch failures early and keep our workflow smooth.
In this tutorial, we’ll set up Jenkins to automatically update build statuses in GitHub.
Before we begin, we need:
Before integrating GitHub Actions with Jenkins, let’s set up a simple Node.js project and configure Jenkins and GitHub Secrets.
Firstly, let’s run the following command to clone the project:
$ git clone https://github.com/Baeldung/ops-tutorials.gitNext, we navigate to the starter project directory with the following command:
$ cd ops-tutorials/jenkins-modules/monitor-jenkins-build-status/starterNow, let’s configure the Jenkins job that GitHub Actions will trigger.
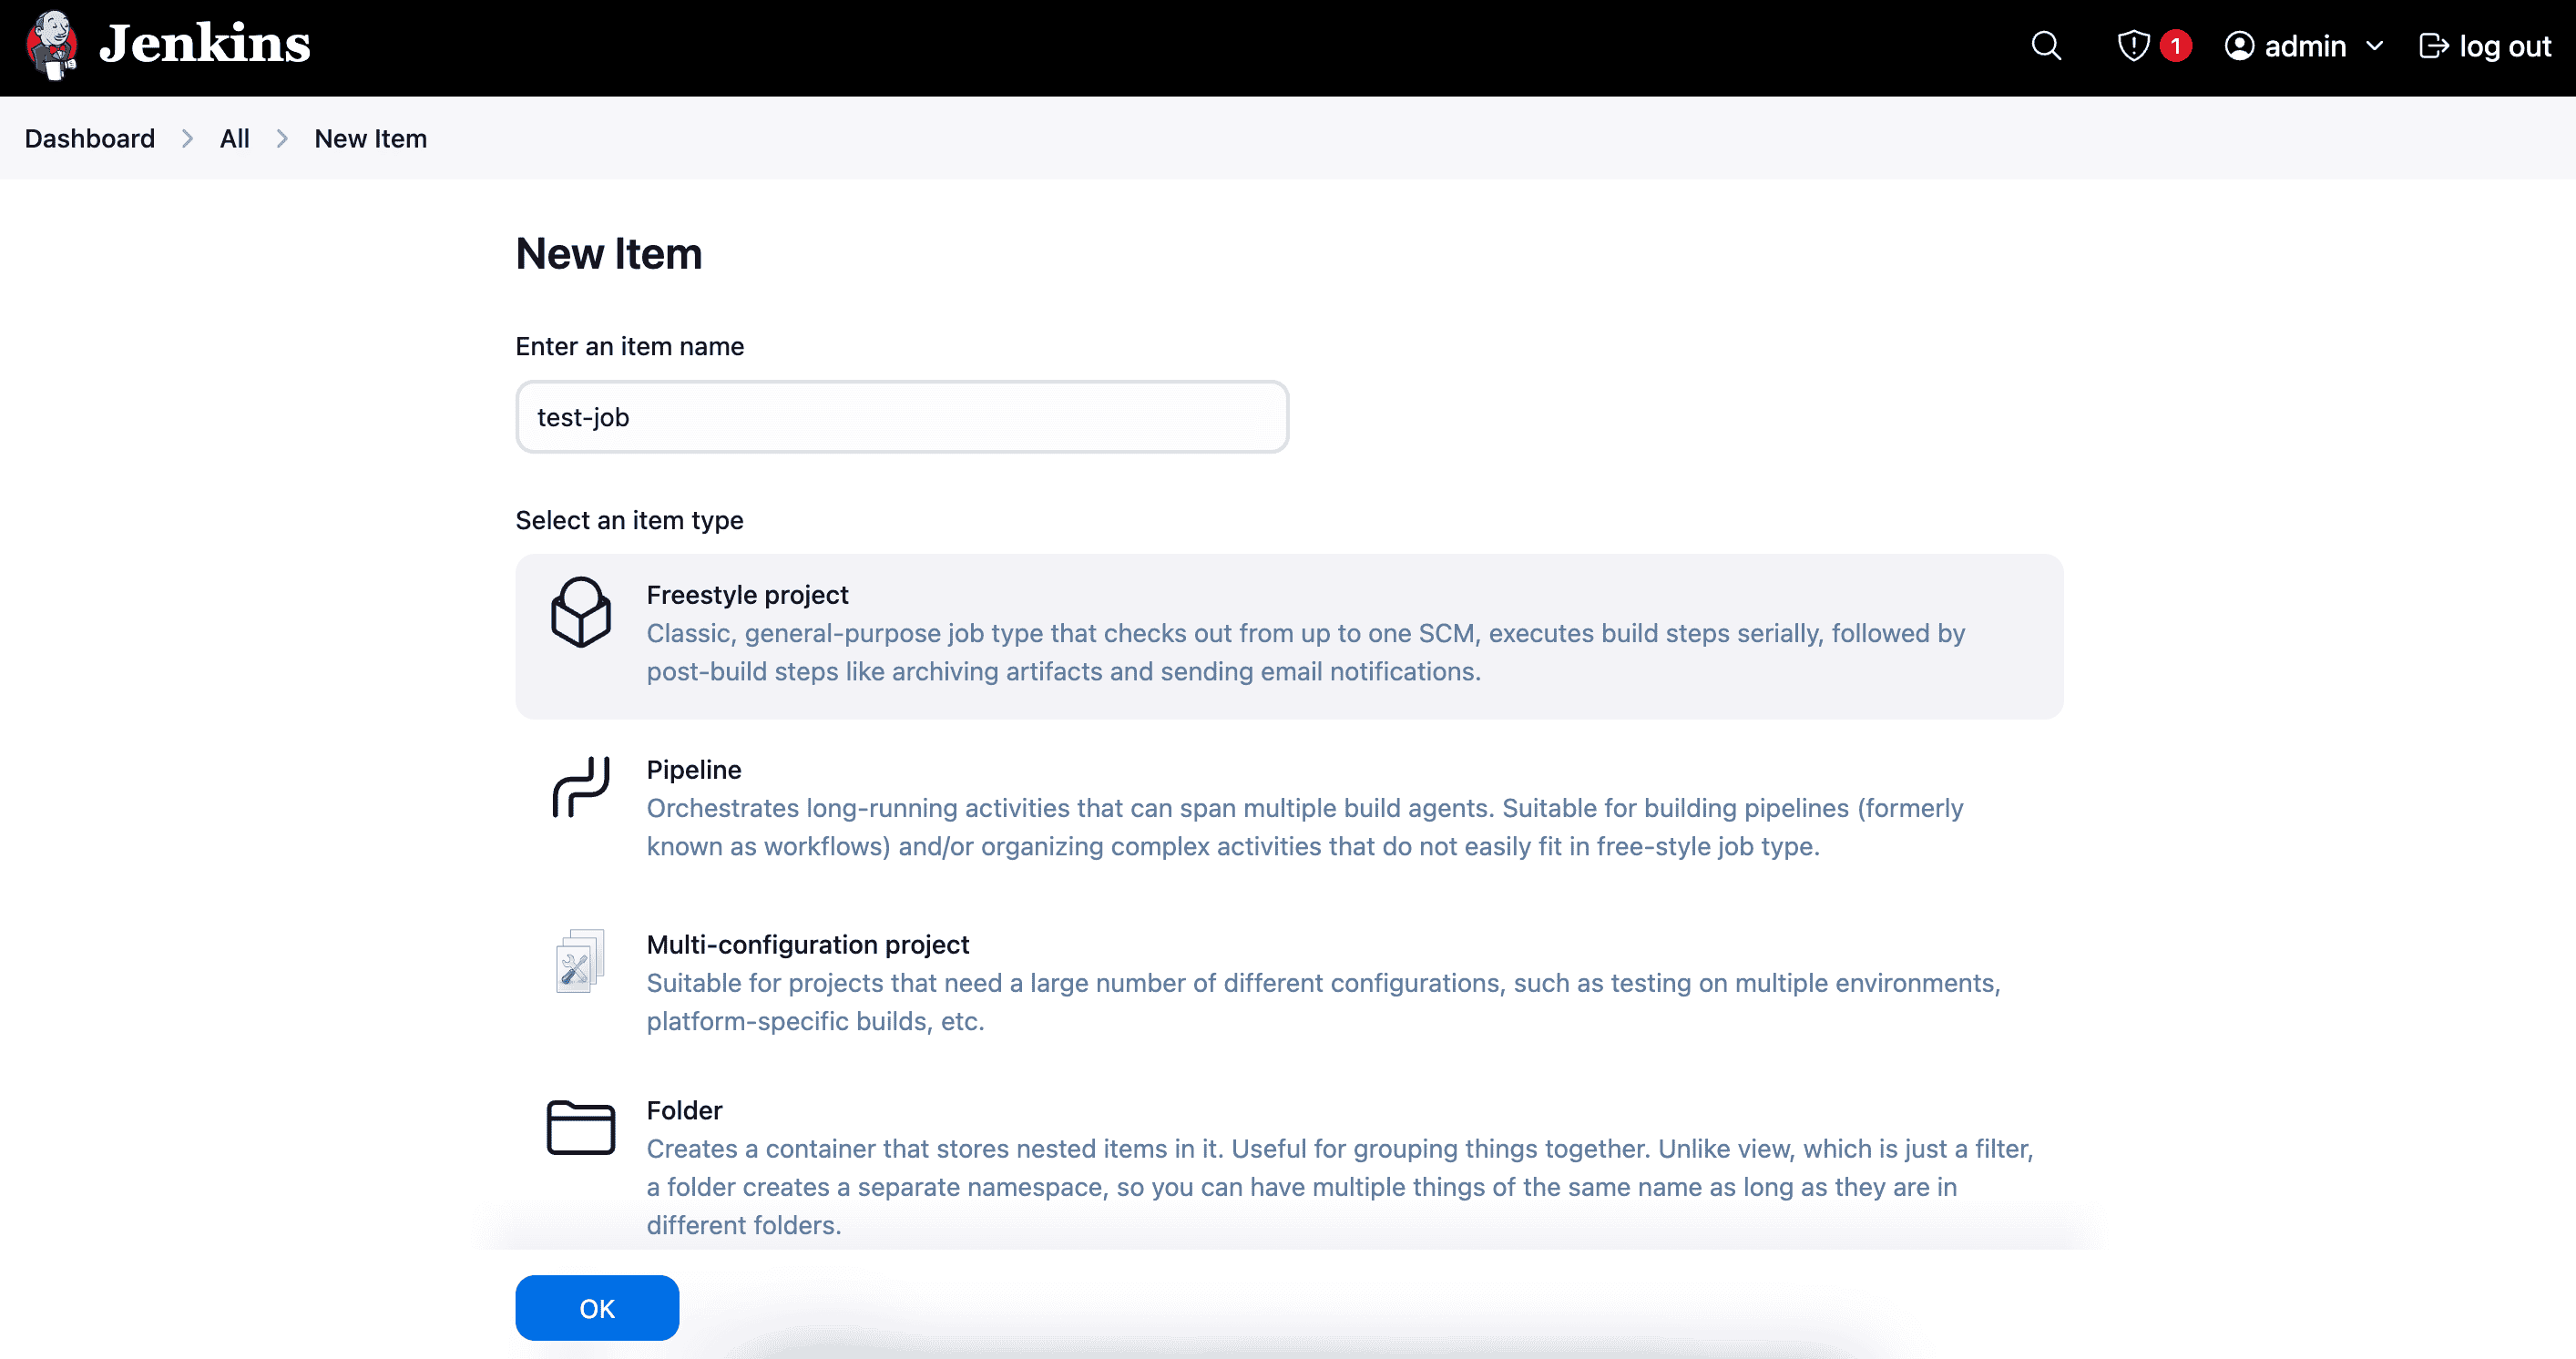
Firstly, we head over to our Jenkins dashboard. Then, click on New Item, enter the job name, select Freestyle Project item type, and click the OK button:
After this, we select the GitHub project option and enter our GitHub repository URL:

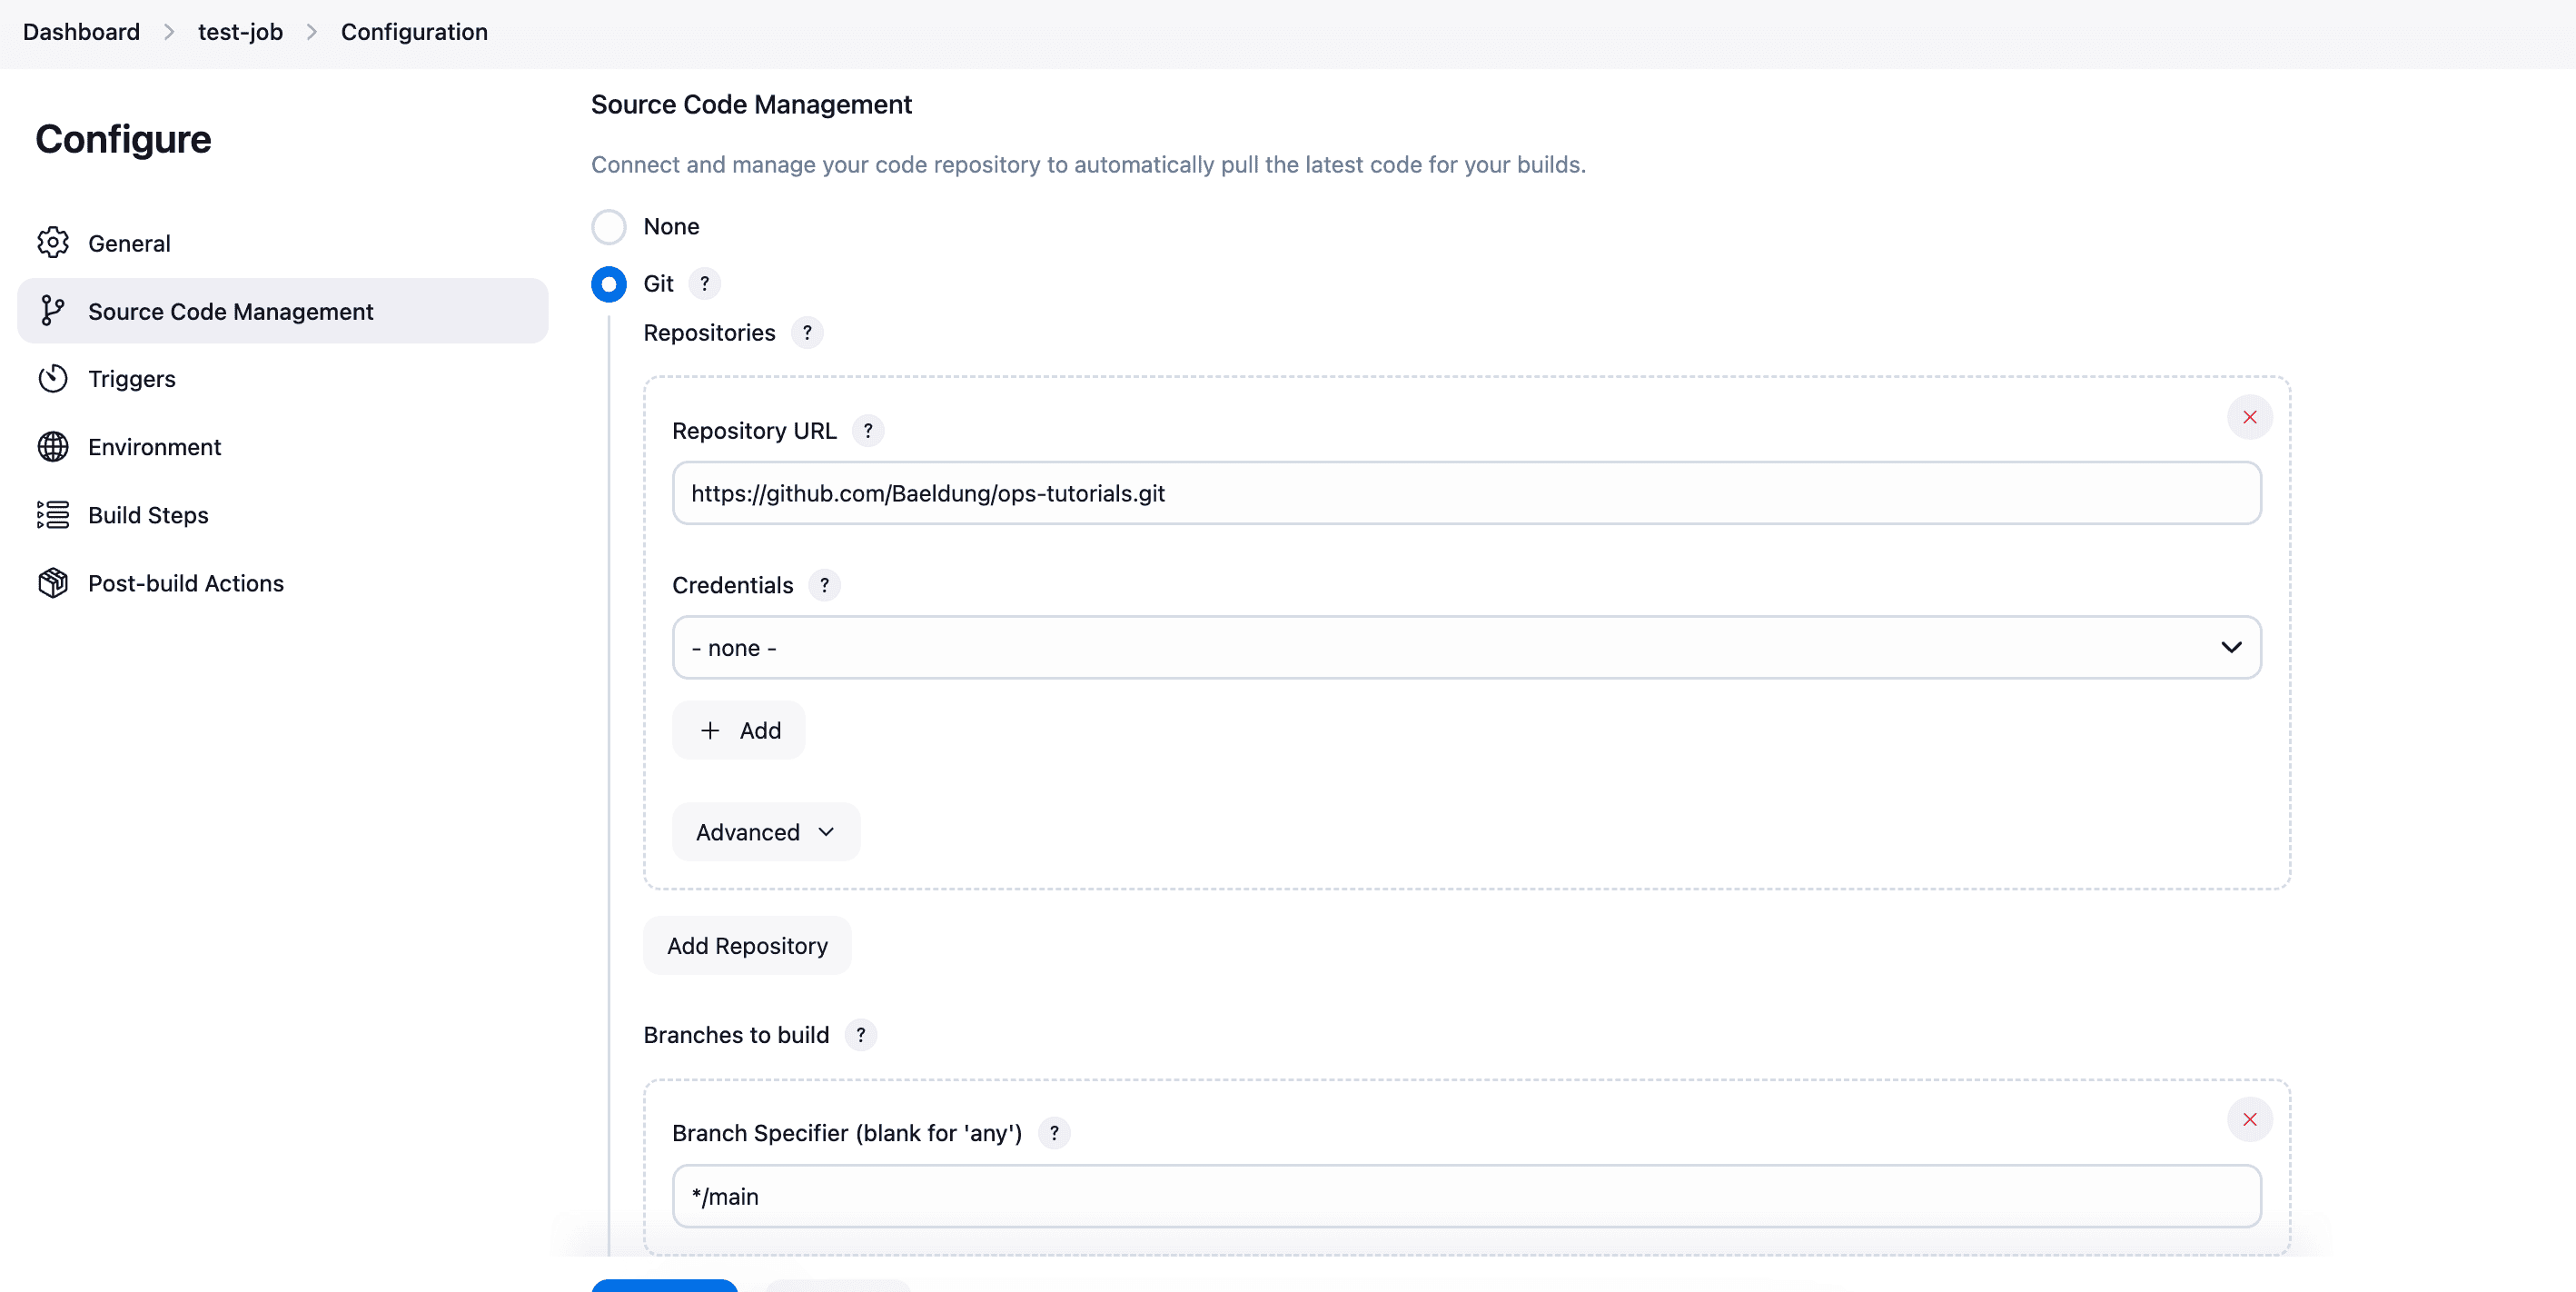
Next, in the Source Code Management section, we select Git, then enter the Repository URL:
After this, in the Triggers section, we select the Trigger builds remotely (e.g., from scripts) option. Here, we can enter a unique phrase for our Authentication Token, such as secret-token. This token will allow GitHub Actions to trigger Jenkins builds remotely.
Next, in the Environment section, we select the Delete workspace before build starts option. This ensures Jenkins starts each build in a clean workspace, preventing leftover files from interfering with our tests:

Now, let’s configure our build steps. Scroll to the Build Steps section, click the Add build step dropdown, and then select the Execute shell option. In the provided field, we enter these commands to install dependencies and run tests:
npm install
npm test
We can now click the Save button to apply the changes we made. These commands install our project’s dependencies and execute tests. With this, Jenkins is now configured to run builds for our Node.js project.
To allow GitHub Actions to communicate with Jenkins, we need to generate an API token.
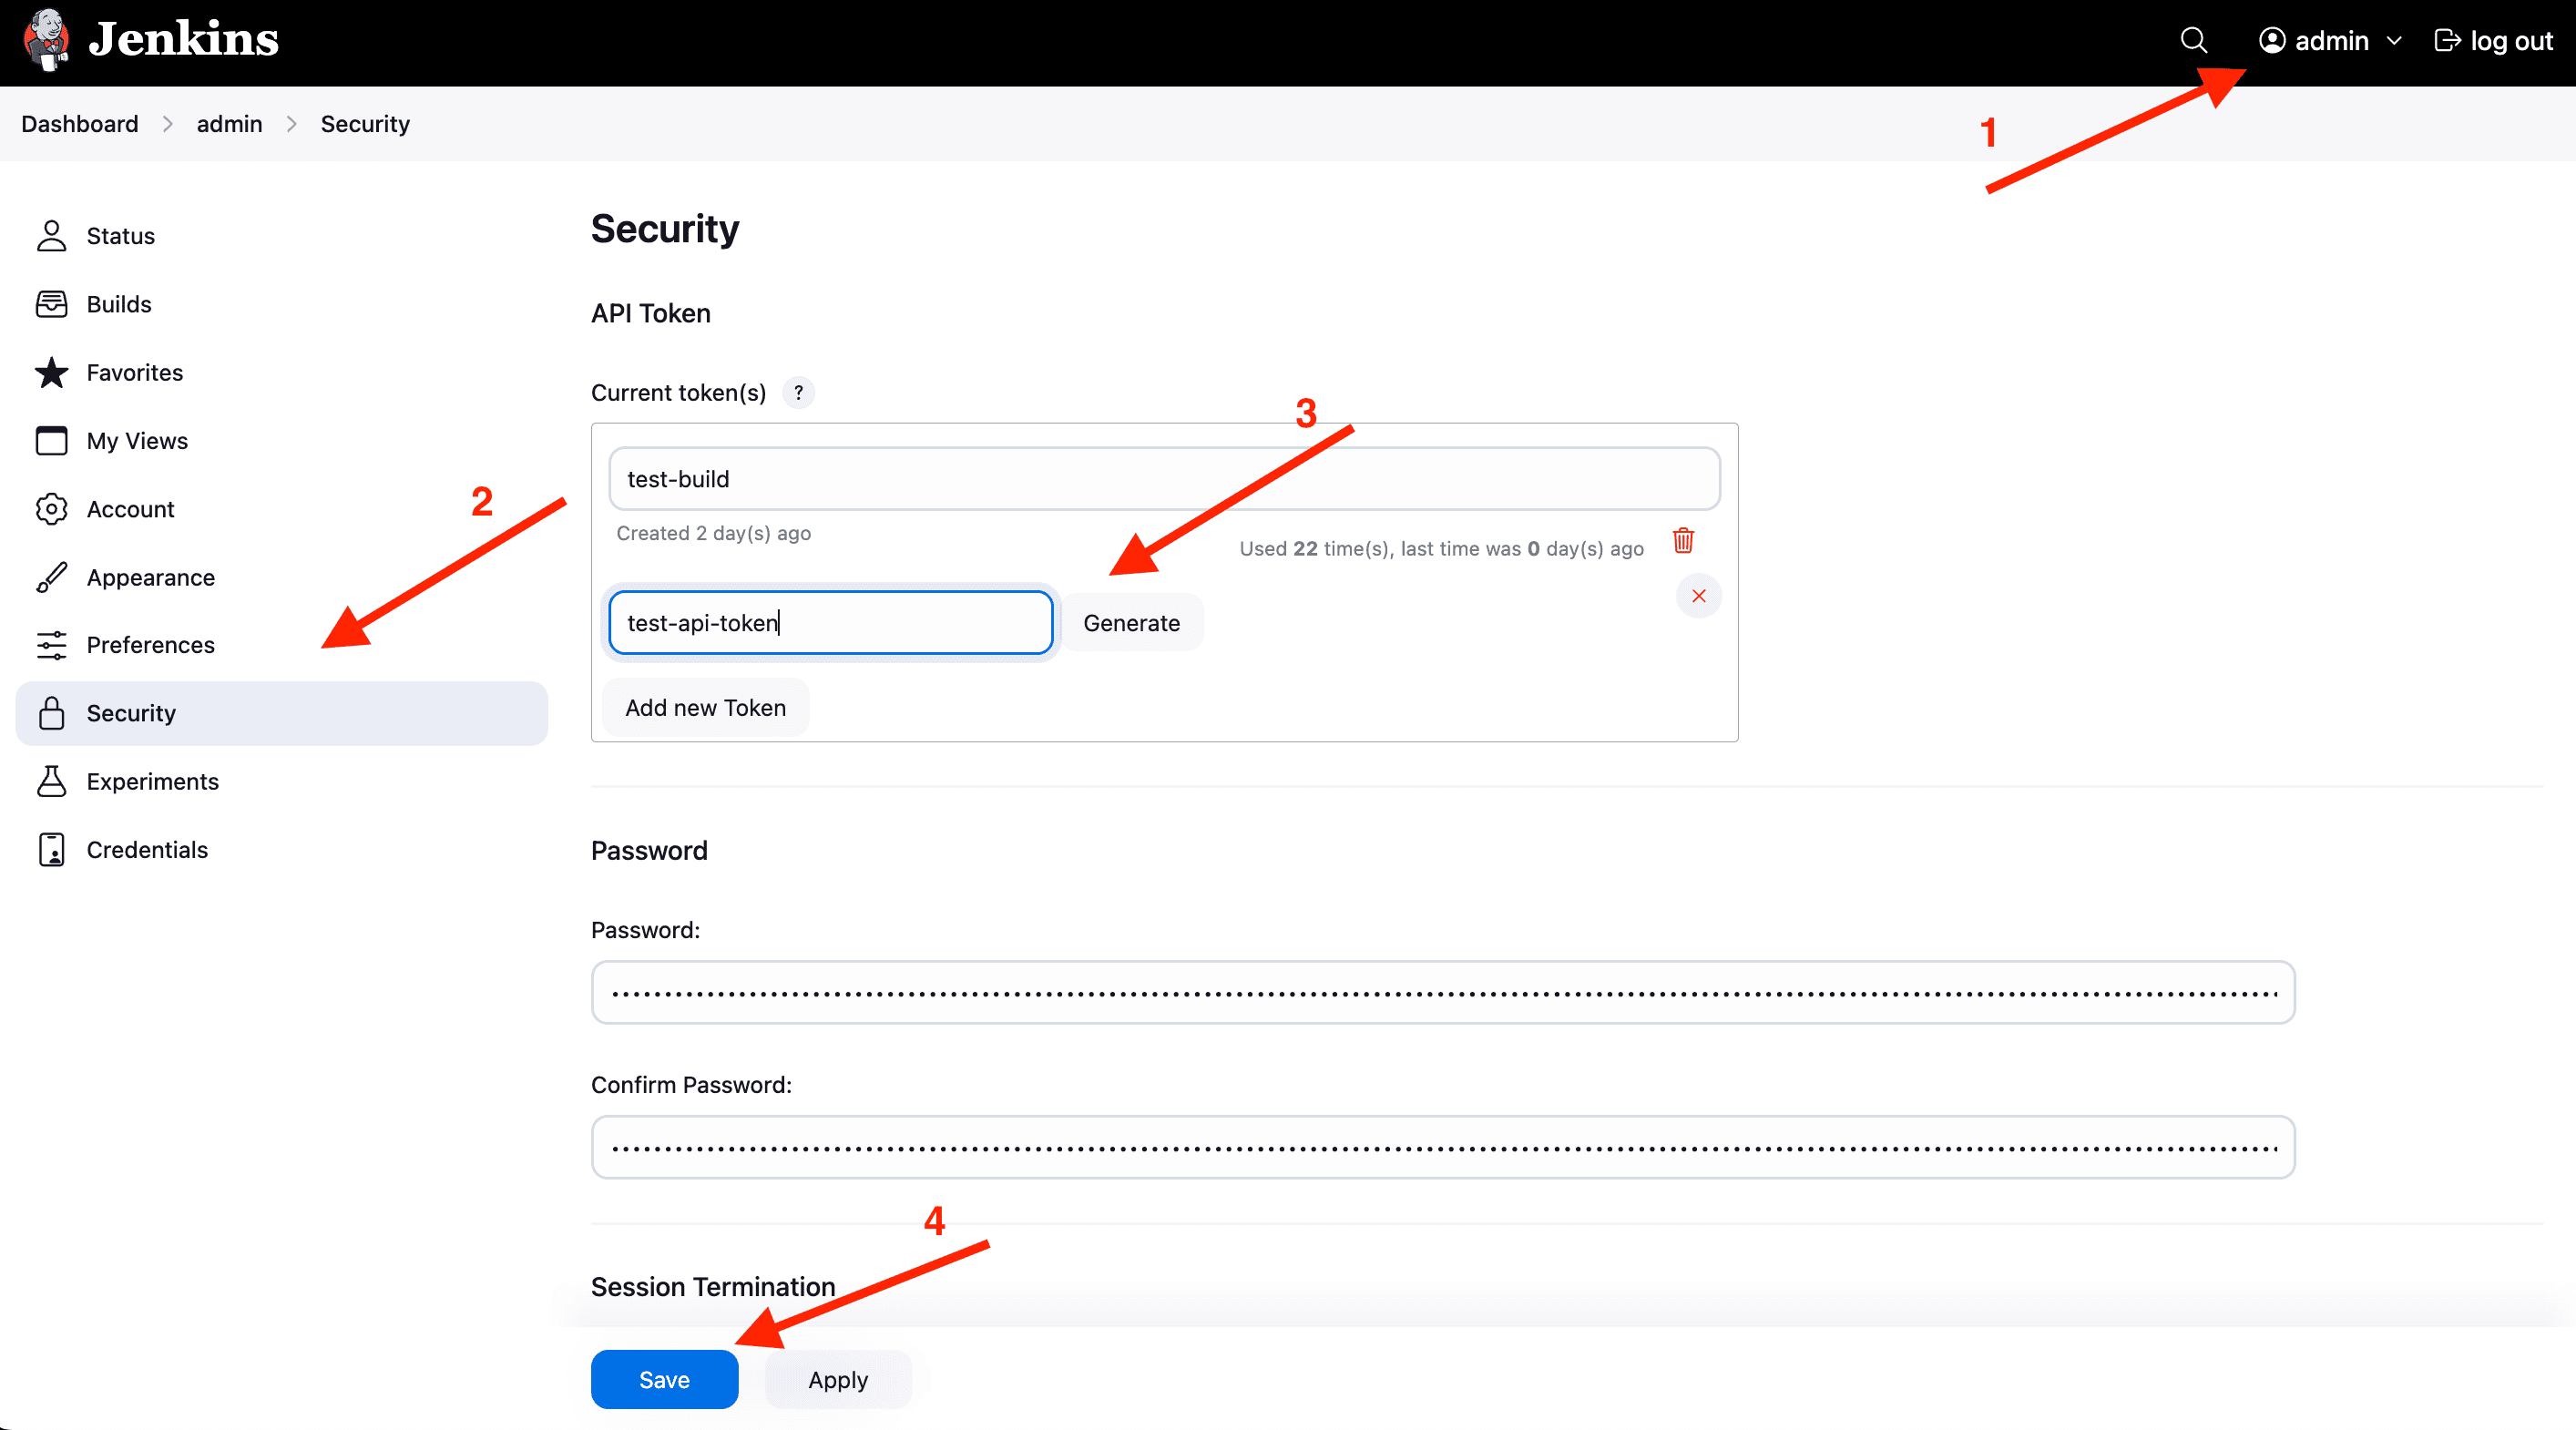
First, we click on our username at the top right, then click on the Security option in the sidebar and enter a name for our token. Next, click the Generate button to generate an API token and click Save.
After this, let’s copy and store the token securely as we will use it for authentication later on.
Since our integration requires secure authentication, we will store the Jenkins credentials inside GitHub Secrets.
So, next, let’s head to the Settings tab in our repository. Under Secrets and variables, select Actions, then click on the New repository secret button to add the following secrets:
With this, GitHub Actions can securely trigger Jenkins builds.
With Jenkins configured, let’s automate builds using GitHub Actions. This section demonstrates how to integrate GitHub Actions with Jenkins to create a lightweight CI/CD setup. Whenever we push code to the GitHub repository, it will automatically trigger a Jenkins build and report the result back to GitHub.
To trigger Jenkins builds from GitHub Actions, we will create a workflow file that:
This ensures that every push to the repository automatically runs the latest build in Jenkins and surfaces its outcome directly within the GitHub interface.
Firstly, let’s create a new workflow file by running these commands in the root directory of our Node.js project:
$ mkdir -p .github/workflows
$ cd .github/workflows
$ touch trigger-jenkins.yml
Next, copy and paste the following code to the trigger-jenkins.yml file.
name: GitHub Actions + Jenkins Integration

on:
    push:
        branches:
            - main

jobs:
    trigger-jenkins:
        runs-on: ubuntu-latest

        steps:
            - name: Securely Trigger Jenkins Build
              env:
                  JENKINS_URL: ${{ secrets.JENKINS_URL }}
                  JENKINS_USER: ${{ secrets.JENKINS_USER }}
                  JENKINS_API_TOKEN: ${{ secrets.JENKINS_API_TOKEN }}
                  JENKINS_JOB_NAME: ${{ secrets.JENKINS_JOB_NAME }}
                  JENKINS_SECRET_TOKEN: ${{ secrets.JENKINS_SECRET_TOKEN }}
              run: |
                  RESPONSE=$(curl -s -w "%{http_code}" -o output.txt \
                  -X POST "$JENKINS_URL/job/$JENKINS_JOB_NAME/build?token=$JENKINS_SECRET_TOKEN" \
                  --user "$JENKINS_USER:$JENKINS_API_TOKEN")

                  if [[ $RESPONSE -ne 201 ]]; then
                    echo "❌ Jenkins build trigger failed!"
                    cat output.txt
                    exit 1
                  fi

            - name: Monitor Jenkins Build Status
              env:
                  JENKINS_URL: ${{ secrets.JENKINS_URL }}
                  JENKINS_USER: ${{ secrets.JENKINS_USER }}
                  JENKINS_API_TOKEN: ${{ secrets.JENKINS_API_TOKEN }}
                  JENKINS_JOB_NAME: ${{ secrets.JENKINS_JOB_NAME }}
              run: |
                  echo "🔍 Waiting for Jenkins build to start..."
                  sleep 10  # Wait before checking status

                  BUILD_URL="$JENKINS_URL/job/$JENKINS_JOB_NAME/lastBuild/api/json"

                  while true; do
                    STATUS=$(curl -s --user "$JENKINS_USER:$JENKINS_API_TOKEN" $BUILD_URL | jq -r '.result')

                    if [[ "$STATUS" == "SUCCESS" ]]; then
                      echo "✅ Jenkins Build Successful!"
                      exit 0
                    elif [[ "$STATUS" == "FAILURE" ]]; then
                      echo "❌ Jenkins Build Failed!"
                      exit 1
                    elif [[ "$STATUS" == "null" ]]; then
                      echo "⏳ Jenkins build still running..."
                      sleep 10
                    else
                      echo "⚠️ Unexpected status: $STATUS"
                      exit 1
                    fi
                  done
The above workflow listens for pushes to the main branch and securely triggers a Jenkins build by sending an authenticated API request. Once the build is triggered, it enters a polling loop where it continuously checks the Jenkins API to determine the result of the most recent build. Depending on the result—SUCCESS, FAILURE, or still running—it logs an appropriate message and either passes or fails the GitHub Actions job accordingly.
This workflow ensures that each push to main triggers a Jenkins build and tracks its outcome. If the build fails, GitHub Actions fails as well, making it easier to catch regressions and errors early.
Before moving on, let’s weigh the benefits and limitations of this GitHub Actions + Jenkins integration approach. Understanding where this setup excels and where it might fall short will help us make better architectural decisions for future CI/CD improvements.
Here is what works well with this setup:
Here are some trade-offs to consider:
This method offers a straightforward way to trigger Jenkins builds from GitHub without adding unnecessary complexity. It works independently and doesn’t rely on visual badges or other integrations to be effective.
Another effective method to track Jenkins builds is by using the embeddable build status badge. This approach independently provides a clear, visual indication of the latest Jenkins build status directly within our GitHub repository, eliminating the need to manually check Jenkins.
The Jenkins Embeddable Build Status plugin generates a dynamic badge image that reflects the latest build status of a specific job. We can embed this badge in our GitHub README.md file using Markdown.
However, there are a few important things to keep in mind:
First, we need to install the Embeddable Build Status plugin. Let’s navigate to Manage Jenkins and select Plugins:

Next, let’s search for embeddable-build-status. Then, check the Install option and click the Install button to install:

Jenkins notifies us as to which actions succeeded:

With the installation complete, let’s head to our job page, https://YOUR-JENKINS-URL/job/YOUR-JOB-NAME. In the left sidebar, click Embeddable Build Status, then choose the badge style you prefer, for example, flat, plastic, or ball-size. Next, let’s copy the provided Markdown snippet and add it to our README.md.
If the Jenkins instance isn’t publicly accessible, GitHub won’t be able to load the badge image. To handle this situation, we have two options:
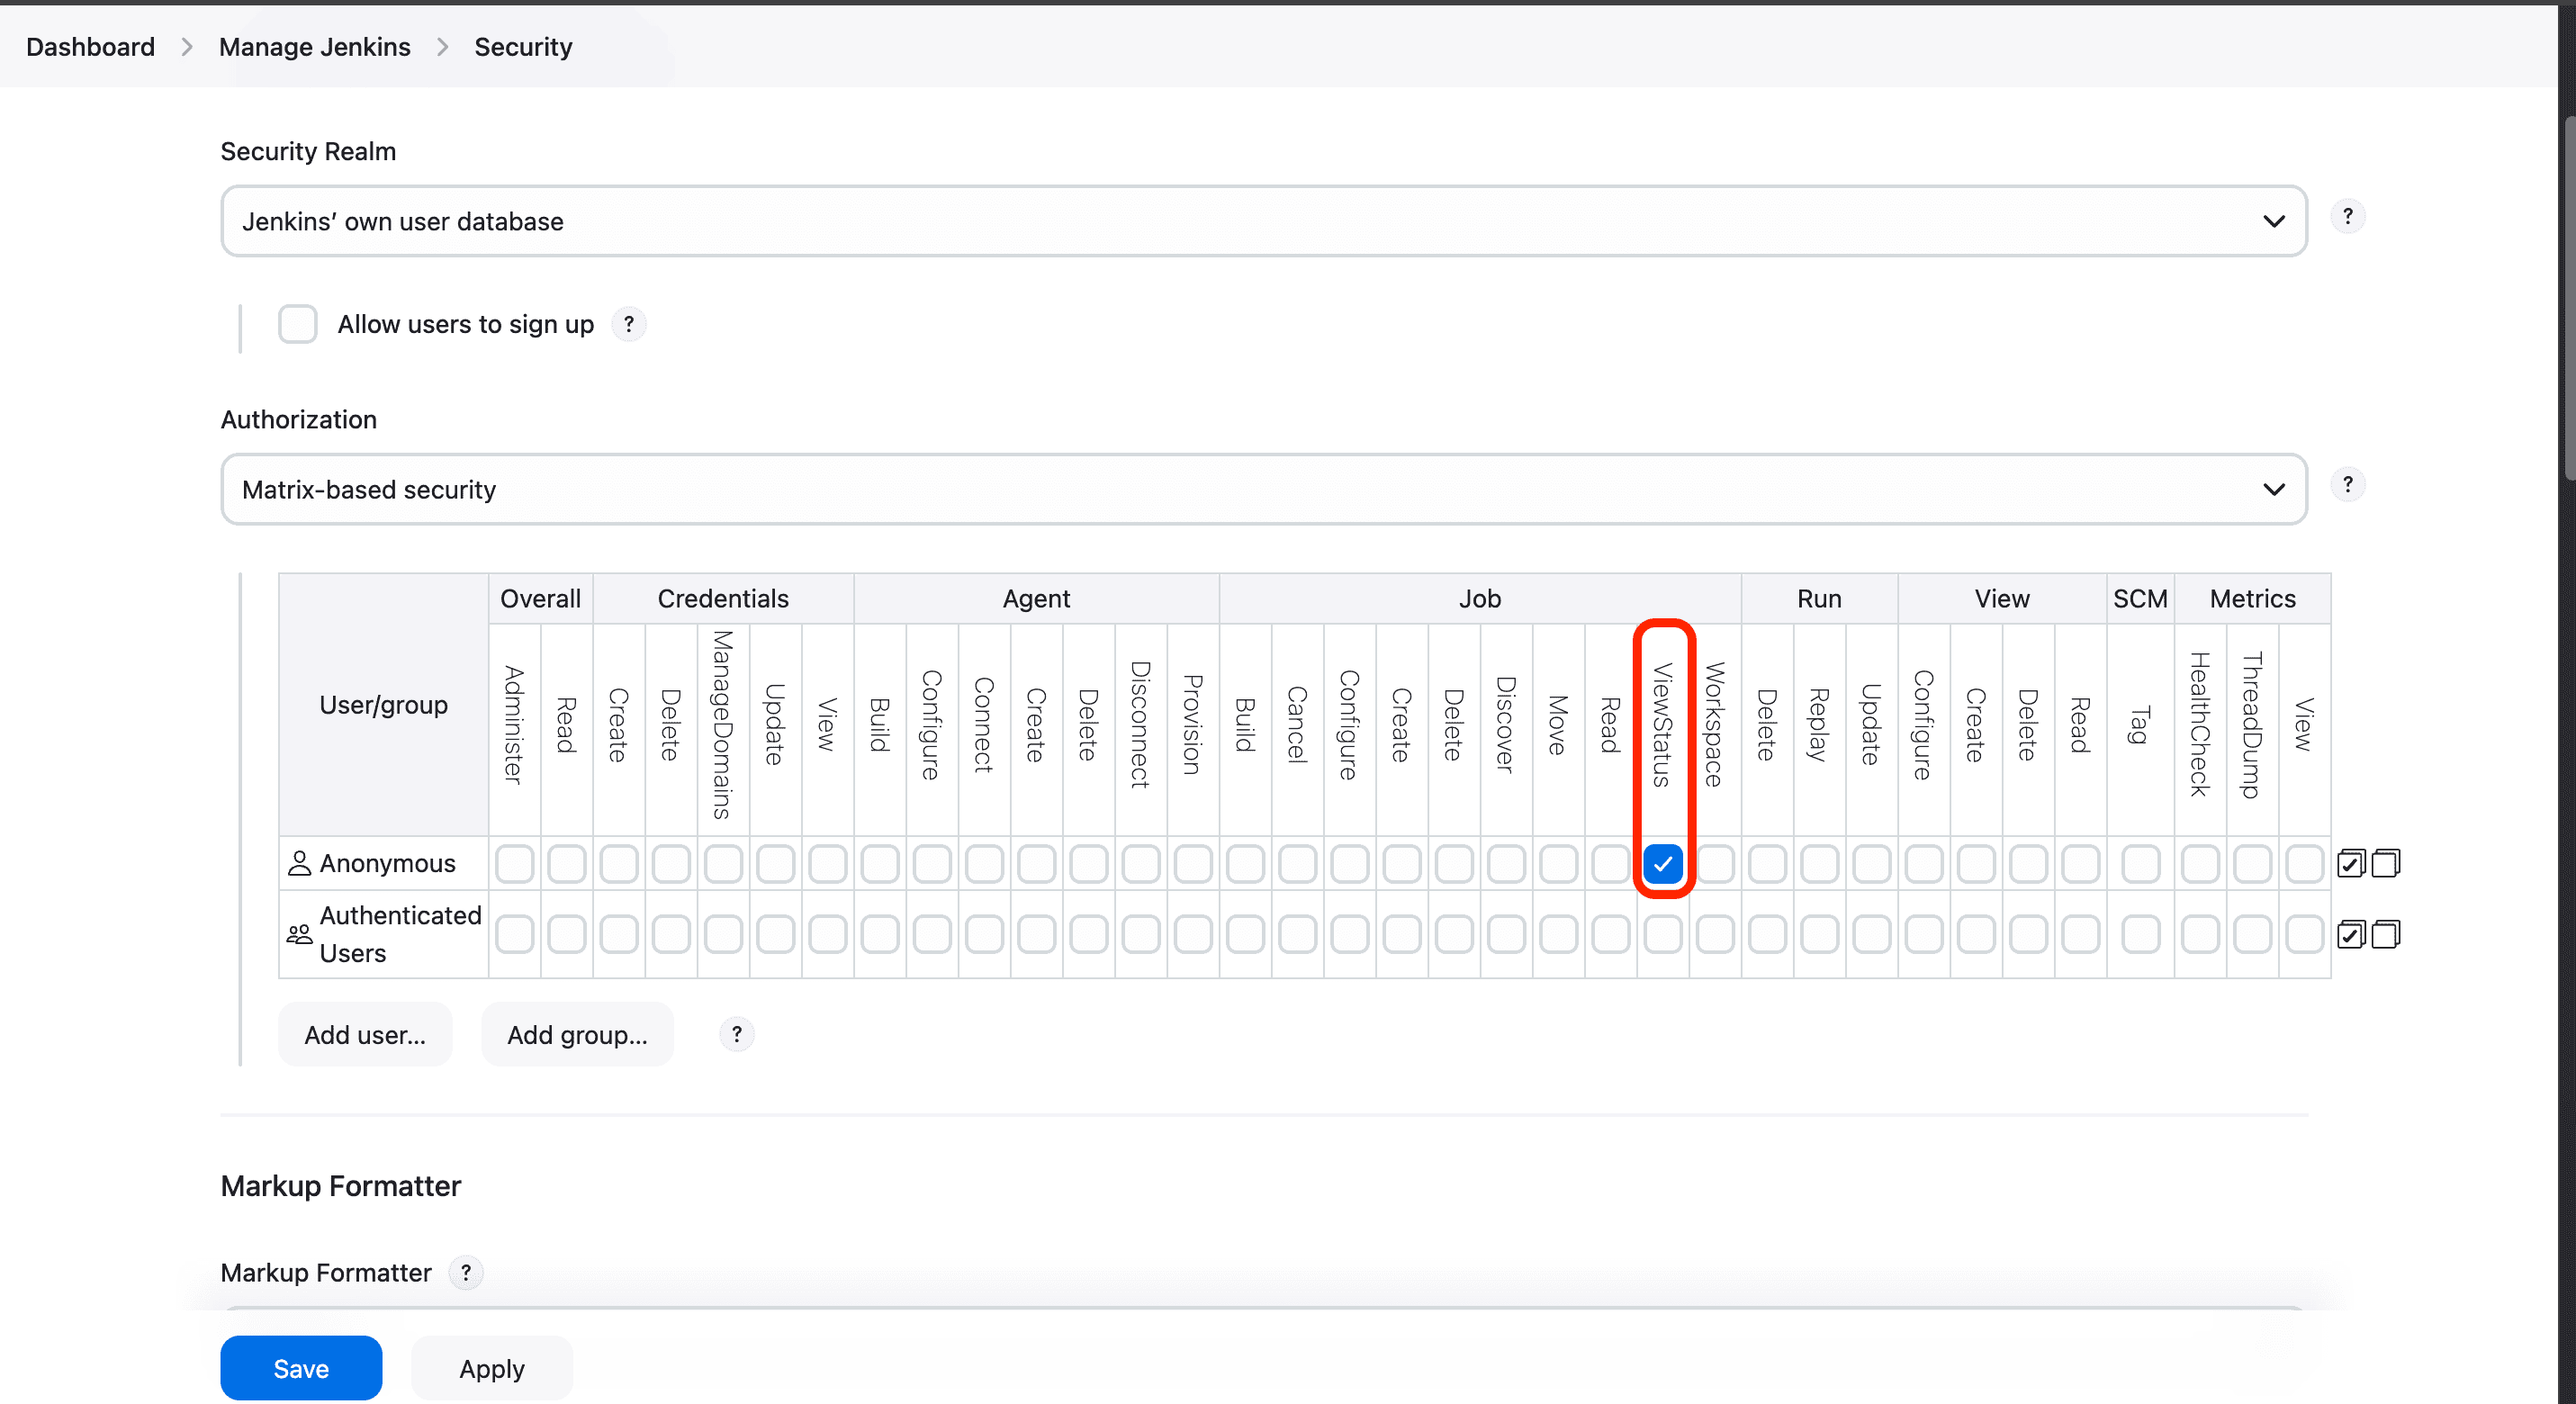
The first one is to allow anonymous access. Here, we navigate to Manage Jenkins -> Security. Next, under the Authorization section, we select Matrix-based security. Then, grant the user Anonymous the ViewStatus permission:
Or we can expose Jenkins publicly via reverse proxy. We can set up a secure reverse proxy, for example, using NGINX or Apache to forward external requests to our Jenkins server. Then, we configure SSL/TLS to ensure secure communication.
Let’s weigh the benefits and drawbacks of using the Jenkins embeddable build status badge.
This method offers a few simple but useful advantages:
There are also some limitations to keep in mind.
Overall, the Jenkins embeddable build status badge is an efficient, visually intuitive method for quickly assessing the health of our Jenkins builds.
In this article, we demonstrated two efficient methods for tracking Jenkins build status directly within GitHub. First, we configured GitHub Actions to automatically trigger and monitor Jenkins builds, ensuring seamless integration and real-time feedback. Second, we leveraged the Jenkins Embeddable Build Status Badge to visually display build statuses within our GitHub repositories.
These integrations help streamline our CI/CD workflow by eliminating the need for constant manual checks in Jenkins, allowing us to quickly detect and resolve issues. The complete code for this article is available over on GitHub.