

Mocking is an essential part of unit testing, and the Mockito library makes it easy to write clean and intuitive unit tests for your Java code.
Get started with mocking and improve your application tests using our Mockito guide:
Handling concurrency in an application can be a tricky process with many potential pitfalls. A solid grasp of the fundamentals will go a long way to help minimize these issues.
Get started with understanding multi-threaded applications with our Java Concurrency guide:
Spring 5 added support for reactive programming with the Spring WebFlux module, which has been improved upon ever since. Get started with the Reactor project basics and reactive programming in Spring Boot:
Since its introduction in Java 8, the Stream API has become a staple of Java development. The basic operations like iterating, filtering, mapping sequences of elements are deceptively simple to use.
But these can also be overused and fall into some common pitfalls.
To get a better understanding on how Streams work and how to combine them with other language features, check out our guide to Java Streams:
Explore Spring Boot 3 and Spring 6 in-depth through building a full REST API with the framework:
Yes, Spring Security can be complex, from the more advanced functionality within the Core to the deep OAuth support in the framework.
I built the security material as two full courses - Core and OAuth, to get practical with these more complex scenarios. We explore when and how to use each feature and code through it on the backing project.
You can explore the course here:
Spring Data JPA is a great way to handle the complexity of JPA with the powerful simplicity of Spring Boot.
Get started with Spring Data JPA through the guided reference course:
Refactor Java code safely — and automatically — with OpenRewrite.
Refactoring big codebases by hand is slow, risky, and easy to put off. That’s where OpenRewrite comes in. The open-source framework for large-scale, automated code transformations helps teams modernize safely and consistently.
Each month, the creators and maintainers of OpenRewrite at Moderne run live, hands-on training sessions — one for newcomers and one for experienced users. You’ll see how recipes work, how to apply them across projects, and how to modernize code with confidence.
Join the next session, bring your questions, and learn how to automate the kind of work that usually eats your sprint time.
1. Introduction
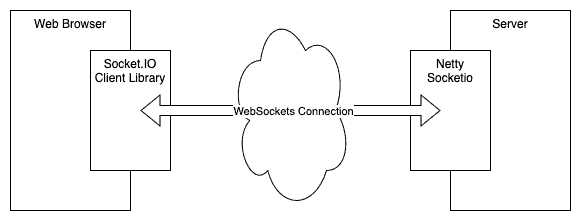
In this article, we’re going to have a look at the Netty-socketio library. We’ll explore what it is and see how to use it to build a Socket.IO service that communicates with web applications.
2. What Is Socket.IO?
Socket.IO is a JavaScript library that enables applications to establish low-latency, bidirectional, event-based communication between the browser and a backend server. Typically, this is done using WebSockets, though the Socket.IO library also supports the newer WebTransport API, or falling back to HTTP long-polling if needed.
We can use the Socket.IO library to abstract away the underlying transport and make it easier to handle communication in our code. However, it does more than this as well. It guarantees in-order message delivery and makes a best effort to deliver messages even over unreliable network connections.
Within the server, Socket.IO automatically manages connections – assigning every connection a unique ID. It then allows us to send named events to the other end of the connection, allowing the receiving end to understand how to deal with the event based on the name.
We can also break events up into Rooms. These are arbitrary channels that can exist within our service, allowing us to easily communicate with an entire set of clients in one go.
3. Setting up Netty-Socketio
Netty-Socketio is a Java library that uses the Netty network server to run a network server that can handle Socket.IO connections. We can then use this as the backend for a Socket.IO client to communicate with.
3.1. Dependencies
To use this, we need to include the latest version in our build, which is currently 2.0.13.
If we’re using Maven, we can include this dependency in our pom.xml file:
<dependency>
    <groupId>com.corundumstudio.socketio</groupId>
    <artifactId>netty-socketio</artifactId>
    <version>2.0.13</version>
</dependency>
At this point, we’re ready to start using it in our application.
3.2. Creating a Network Server
Once we’ve added the dependency, we need to create a network server for the Socket.IO traffic. Netty-socketio works by creating a whole new network server, meaning we’re able to use this even if we don’t have any other servers in our application – e.g., if we’re not otherwise running a web server such as Tomcat. However, this does mean that if we’re using this in a webapp then we need to listen on a different port.
The first thing we need to do is create our server configuration:
Configuration config = new Configuration();
config.setHostname("localhost");
config.setPort(8081);
This tells Netty-socketio the host and port to run the server on.
We can then use this to construct an instance of the Socket IO Server:
SocketIOServer server = new SocketIOServer(config);
Finally, we can start the server running:
server.start();At this point, our server can handle Socket.IO connections. However, we don’t do anything with them yet.
3.3. Connecting to Our Server
As well as a server, we also need a Socket.IO client that can connect to it. Typically, this means code running in our web browser.
The Socket.IO client libraries can be included from a CDN as follows:
<script src="https://cdnjs.cloudflare.com/ajax/libs/socket.io/4.8.1/socket.io.js"></script>We can then use this to connect to our server:
// JavaScript
const socket = io("ws://localhost:8081");
This will give us an active connection to our Socket.IO server that we can then use to communicate with our backend.
4. Handling Events
Once we’ve got our network server working correctly, we need to be able to react to events. We do this by registering event listeners for the events that we’re interested in.
First of all, we can register event listeners to be notified whenever a new client connects or an existing client disconnects:
server.addConnectListener(client -> {
    LOG.info("New connection from client {}", client.getRemoteAddress());
});

server.addDisconnectListener(client -> {
    LOG.info("Disconnection from client {}", client.getRemoteAddress());
});
These are called with an instance of SocketIOClient, representing the connection to this specific client. We can then use this to query the connection details, or even to communicate with the client.
In addition to this, we can register listeners for arbitrary events that are sent to us from the client:
server.addEventListener("message", String.class, (client, message, request) -> {
    LOG.info("Received message from client {}: {}", client.getRemoteAddress(), message);
});
The event name must match the one used in the sending code:
// JavaScript
socket.emit('message', message);
This then allows us to register different handlers for different types of events, and for the client to then send these different events as appropriate.
5. Sending Messages
Now that we can receive messages sent from the client, we also need to be able to send messages back to the client.
Any time that we’ve got a reference to a single client – i.e., an appropriate SocketIOClient instance – we can use it to send events to the client. Where we get this reference from – e.g., if it’s in response to an incoming event, or because we previously stored it for later use – doesn’t matter. The only thing that matters is that the client is still connected.
We manage this using the sendEvent() method, taking both the name and payload of the event to send:
client.sendEvent("message", payload);Unlike with normal HTTP handlers, there’s no requirement that we do this in response to an incoming message. We can send messages to any client at any time, based on whatever trigger we want. We only need a reference to the client and an active connection.
6. Rooms
As well as dealing with individual clients, Socket.IO has the concept of “Rooms”. These are a way to group multiple clients together under a known room name. Once done, we can then deal with them as a whole.
We can add a client to a room using the SocketIOClient.joinRoom() method:
client.joinRoom("testroom");And we can then remove a client from a room using the SocketIOClient.leaveRoom() method:
client.leaveRoom("testroom");Clients are also automatically removed from all rooms when they disconnect, so there’s no need for us to manage that manually.
Clients can be in as many or as few rooms as are appropriate, and adding a client to one room will do nothing to their membership in any other rooms.
We can then interact with the room as a whole by obtaining a reference to the BroadcastOperations object for the named room. This can be done from the SocketIOServer instance, or indirectly from any SocketIOClient instance:
BroadcastOperations room = server.getRoomOperations("testroom");

BroadcastOperations room = client.getNamespace().getRoomOperations("testroom");
This then lets us send events to the entire room, instead of just to a single client:
room.sendEvent("message", "Hello, Room!");Alternatively, we can get a list of all the clients in the room and then deal with them individually:
Collection<SocketIDClient> clients = room.getClients();This returns all the clients that were in the room at the time of the request. This list may get stale, so we should make sure to always retrieve it only when needed.
7. Demonstration
Now that we’ve seen how to write our Socket.IO service, let’s see it in action.
We can write a full client application as follows:
Configuration config = new Configuration();
config.setHostname("localhost");
config.setPort(8081);

SocketIOServer server = new SocketIOServer(config);

server.addConnectListener(client -> {
    client.joinRoom("testroom");
    server.getRoomOperations("testroom")
        .sendEvent("message", "Hello from " + client.getRemoteAddress());
});

server.addEventListener("message",String.class, (client, message, request) -> {
    server.getRoomOperations("testroom")
        .sendEvent("message", "Message from " + client.getRemoteAddress() + ": " + message);
});

server.start();
On GitHub is a sample HTML file. Opening this file in a web browser gives us a simple Socket.IO client application. If we point this at our application, we can immediately see the various events coming through in both directions:
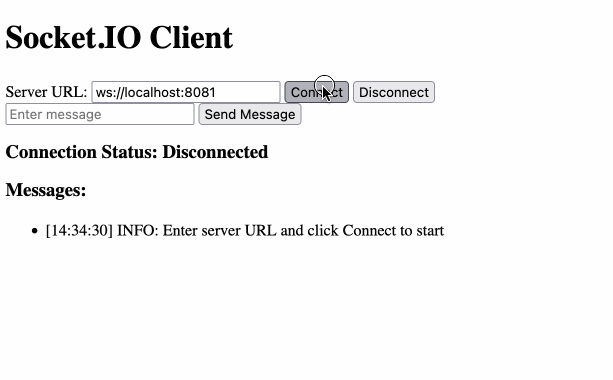
This small application is all that we need to build a small chatroom application. This broadcasts to all clients whenever a new client connects, and when any message is sent.
8. Conclusion
In this article, we’ve taken a very brief look at Netty-socketio and what we can do with it. There’s a lot more that can be achieved using this framework, so the next time you need to run a Socket.IO server, it’s well worth a look.


