

Mocking is an essential part of unit testing, and the Mockito library makes it easy to write clean and intuitive unit tests for your Java code.
Get started with mocking and improve your application tests using our Mockito guide:
Handling concurrency in an application can be a tricky process with many potential pitfalls. A solid grasp of the fundamentals will go a long way to help minimize these issues.
Get started with understanding multi-threaded applications with our Java Concurrency guide:
Spring 5 added support for reactive programming with the Spring WebFlux module, which has been improved upon ever since. Get started with the Reactor project basics and reactive programming in Spring Boot:
Since its introduction in Java 8, the Stream API has become a staple of Java development. The basic operations like iterating, filtering, mapping sequences of elements are deceptively simple to use.
But these can also be overused and fall into some common pitfalls.
To get a better understanding on how Streams work and how to combine them with other language features, check out our guide to Java Streams:
Explore Spring Boot 3 and Spring 6 in-depth through building a full REST API with the framework:
Yes, Spring Security can be complex, from the more advanced functionality within the Core to the deep OAuth support in the framework.
I built the security material as two full courses - Core and OAuth, to get practical with these more complex scenarios. We explore when and how to use each feature and code through it on the backing project.
You can explore the course here:
Spring Data JPA is a great way to handle the complexity of JPA with the powerful simplicity of Spring Boot.
Get started with Spring Data JPA through the guided reference course:
Refactor Java code safely — and automatically — with OpenRewrite.
Refactoring big codebases by hand is slow, risky, and easy to put off. That’s where OpenRewrite comes in. The open-source framework for large-scale, automated code transformations helps teams modernize safely and consistently.
Each month, the creators and maintainers of OpenRewrite at Moderne run live, hands-on training sessions — one for newcomers and one for experienced users. You’ll see how recipes work, how to apply them across projects, and how to modernize code with confidence.
Join the next session, bring your questions, and learn how to automate the kind of work that usually eats your sprint time.
Yes, we're now running our only Summer Sale. All Courses are 30% off until 20th July, 2026:
Yes, we're now running our only Summer Sale. All Courses are 30% off until 20th July, 2026:
Get up to speed with the core of Maven quickly, and then go beyond the foundations into the more powerful functionality of the build tool, such as profiles, scopes, multi-module projects and quite a bit more:
1. Overview
In this tutorial, we’ll learn how to force-update a local Maven repository when it becomes corrupted. To accomplish this, we’ll use a straightforward example to demonstrate why a repository can be corrupted and how to fix it.
2. Prerequisites
To learn and run the commands in this tutorial, we’ll need to use a Spring Initializr project, and have a JDK and Maven installed.
3. Maven Repository Structure
Maven saves all the dependencies of projects in the .m2 folder. For example, in the following image, we can observe the structure of Maven repositories:
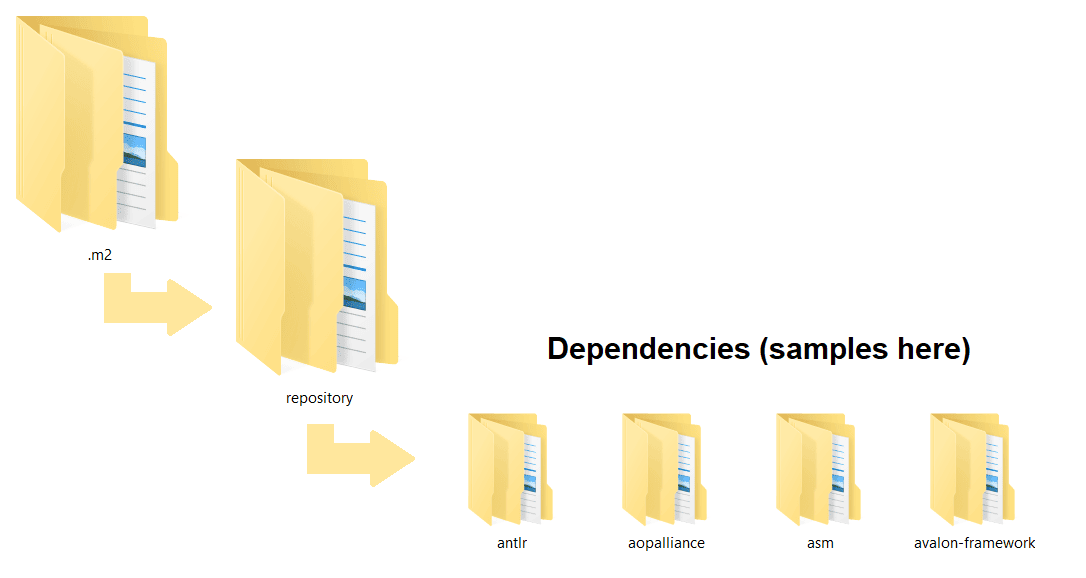
As we can see, Maven downloads all dependencies under the repository folder. Therefore, the download into our local repository is necessary to access all needed code at runtime.
4. Downloading Dependencies
We know that Maven works based on the pom.xml file configurations. When Maven executes this pom.xml file, the dependencies will be downloaded from a central Maven repository and put into our local Maven repository. If we already have the dependencies in our local repository, Maven won’t download them.
The download happens when we execute the following commands:
mvn package
mvn install
Both of the above include executing the following command:
mvn dependency:resolve Therefore, we can solely resolve the dependencies without using a package or install by just running the dependency:resolve command.
5. Corrupted Dependencies
While downloading the dependencies, a network glitch can happen, resulting in corrupted dependencies. The interrupted dependency download is the leading cause of corruption. Maven will display a message accordingly:
Could not resolve dependencies for project ...
Let’s see next how we can resolve this issue.
6. Automatically Fixing the Corrupted Dependencies
Maven usually displays the corrupted dependency when it notifies us that the build failed:
Could not transfer artifact [artifact-name-here] ...
To fix this, we have automatic or manual approaches. Additionally, we should run any repository update in debug mode, adding the -X option after -U to have a better picture of what happens during the update.
6.1. Force Update All SNAPSHOT Dependencies
As we already know, Maven won’t download existing dependencies again. Therefore, to force Maven to update all corrupted SNAPSHOT dependencies, we should add the -U/–update-snapshots option in our command:
mvn package -U
mvn install -U
Still, we have to remember that the option doesn’t re-download a SNAPSHOT dependency if Maven already downloaded it and if the checksum is the same.
This will also package or install our project next. Finally, we’ll learn how to update the repository without including the current working project.
6.2. Dependency Resolve Goal
We can tell Maven to resolve our dependencies and update snapshots without any package or install command. For this purpose, we’ll use the dependency:resolve goal by including the -U option:
mvn dependency:resolve -U6.3. Purge Local Repository Goal
We know that -U just re-downloads the corrupted SNAPSHOT dependencies. As a result, in the case of corrupted local release dependencies, we might need deeper commands. For this purpose, we should use:
mvn dependency:purge-local-repositoryThe purpose of the dependency:purge-local-repository is to purge (delete and optionally re-resolve) artifacts from the local Maven repository. By default, artifacts will be re-resolved.
6.4. Purge Local Repository Options
The purge local repository can be configured to run for only a certain group of dependencies by specifying the “groupId” for the resolutionFuzziness option, and the exact group ID to search for using the include option:
mvn dependency:purge-local-repository -Dinclude:org.slf4j -DresolutionFuzziness=groupId -DverboseThe resolutionFuzziness option can have the values: version, artifactId, groupId, file.
The example above will search for and purge all artifacts in the org.slf4j group. We’ve also set the verbose option so we can see detailed logs of the artifacts deleted.
If any files that match the condition are found, the log will display a text like:
Deleting 2 transitive dependencies for project [...] with artifact groupId resolution fuzziness
[INFO] Purging artifact: org.slf4j:jul-to-slf4j:jar:1.7.31
Purging artifact: org.slf4j:slf4j-api:jar:1.7.31
Note that to specify the artifacts included or excluded for deletion or refresh, we can use the options include/exclude:
mvn dependency:purge-local-repository -Dinclude=com.yyy.projectA:projectB -Dexclude=com.yyy.projectA:projectC7. Manually Deleting the Repository
Whereas the -U option and purge-local-repository might resolve the corrupted dependencies without refreshing all of them, the manual delete of the .m2 local repository will cause a forced re-download of all dependencies.
This can be useful when we have old and maybe corrupted dependencies. Then a simple re-package or re-install should do the job. Moreover, we can use the dependency:resolve option to solve the dependencies of our project solely.
8. Conclusion
In this article, we discussed the options and goals of Maven that forcibly update our local repository.
The samples used are simple Maven commands that can be used on any project with a proper pom.xml configured.


