

Yes, we're now running our only Summer Sale. All Courses are 30% off until 20th July, 2026:
Learn through the super-clean Baeldung Pro experience:
>> Membership and Baeldung Pro.
No ads, dark-mode and 6 months free of IntelliJ Idea Ultimate to start with.
1. Overview
In this tutorial, we’ll learn how to install and configure Wine on Linux. First, we’ll begin with understanding how Wine works. Then, we’ll dive into the installation process of Wine.
Finally, we’ll configure the various aspects of Wine, like audio, video, and fonts.
2. Background
Wine is a compatibility layer that lets us run Microsoft Windows applications on Linux and UNIX operating systems. It’s not to be confused with an emulator because an application running on Wine acts as a native program. Wine achieves this by intercepting and redirecting Windows API system calls to Linux system calls.
Therefore, it’s suitable for performance-intensive applications like video games and graphics rendering software. Furthermore, tools are built on top of Wine for different use cases, such as Proton, Lutris, and Bottles.
In addition, Wine can also run malware. So, we should avoid installing suspicious software.
3. Installation
First of all, if we’re on a 64-bit system, we’ll need to enable 32-bit architecture for better compatibility:
$ sudo dpkg --add-architecture i386Next, we need to add the Wine repository. However, we’ll need the key for the repository first:
$ sudo mkdir -pm755 /etc/apt/keyrings
$ sudo wget -O /etc/apt/keyrings/winehq-archive.key https://dl.winehq.org/wine-builds/winehq.key
Now, we’ll add the repository to sources.list:
$ sudo wget -NP /etc/apt/sources.list.d/ https://dl.winehq.org/wine-builds/ubuntu/dists/$(lsb_release -sc)/winehq-$(lsb_release -sc).sourcesWe shouldn’t forget to update the package cache:
$ sudo apt updateNow, let’s talk about how to install the Wine tool in different Linux distributions.
In Debian-based systems, there are three different versions of Wine: stable, development, and staging. First, let’s see the command to install the stable version of the Wine tool:
$ sudo apt install --install-recommends winehq-stableNow, if the stable version of Wine isn’t working with a particular version of Ubuntu, we can install the development version of the Wine tool. It’s reliable and includes the standard features. Let’s take a look at the command to install the development version of the Wine tool:
$ sudo apt install --install-recommends winehq-devel
Another alternative is to install the staging version of the Wine tool. The staging version includes the latest features, but it’s less stable than the development version of the Wine tool. Let’s see how to install the staging version:
$ sudo apt install --install-recommends winehq-staging
Furthermore, in the case of the Arch Linux-based systems, Wine is available in the default Arch repositories. Therefore, we can utilize the pacman command to install the Wine tool:
$ sudo pacman -S wine
Once installed, let’s verify it:
$ wine --version
wine-8.0.2
4. Configuring Wine
There are three main components through which we configure Wine:
- winecfg lets us easily configure Wine through a GUI
- regedit lets us view and modify the Windows registry for applications running in Wine
- control is the Wine implementation of Windows Control Panel that lets us adjust Wine’s behavior
These tools are already included in the wine package. So, there’s no need to install them separately. In the next sections, we’ll use these utilities to configure different Wine components.
4.1. WINEPREFIX
Wine stores the installed Windows programs and configuration files inside the ~/.wine directory. This directory is known as Wine prefix or Wine bottle. In addition, it also contains a directory tree “c_drive“, which is similar to a typical C: drive in Windows. It’s visible to programs running in Wine.
Furthermore, we can override this directory by setting the WINEPREFIX environment variable. However, we use the environment variable to provide a different Wine prefix for a single application. For instance, we can run a Windows program using a vanilla Wine prefix:
$ wine ps.exeSimilarly, if we need to run the program using our customized prefix, we can specify that directory:
$ WINEPREFIX=$HOME/.config/wine-ps wine ps.exeIn addition, we can also create a default wine prefix without running a program:
$ WINEPREFIX=$HOME/.config/wine-default wineboot -uIf Wine requires the .NET runtime, we can install it as well:
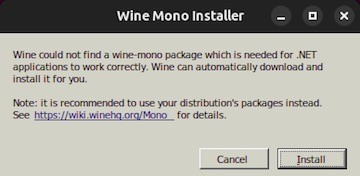
Once .NET is installed, the Wine prefix will resume to configure.
Furthermore, we can add this prefix to our shell profile:
$ echo "export WINEPREFIX=$HOME/.config/wine-default" >> ~/.bashrc4.2. Sound
By default, Wine uses external sound systems like ALSA and PulseAudio. We can configure the input and output devices using winecfg:
$ winecfgIt presents us with a settings view, where we’ll head over to the Audio tab:
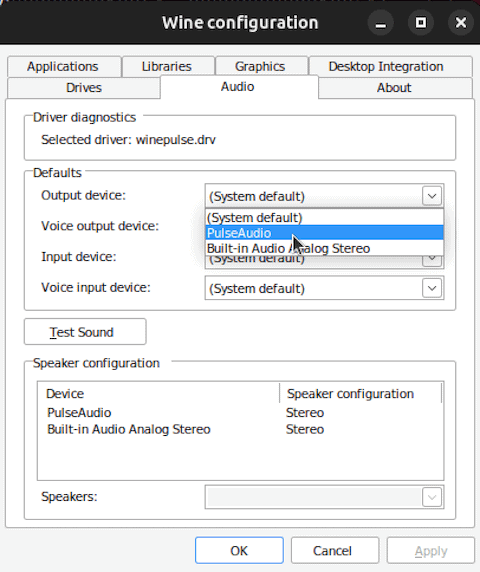
In the Audio tab, we can configure the devices as well as test the sound using the “Test Sound” button. In addition, we can also see that it uses the winepulse.drv driver, which is a bridge between Wine and PulseAudio.
4.3. Graphics
First and foremost, we need to install proper graphics drivers. For that, we’ll first need to identify the graphics card:
$ lspci -v | grep VGA
00:02.0 VGA compatible controller: Intel Corporation HD Graphics 630 (rev 09)
Next, we install the appropriate driver:
$ sudo apt install -y xserver-xorg-video-intelSimilarly, if we’re on Wayland, we need to install XWayland because Wine doesn’t directly support Wayland.
In addition, we can install Mesa drivers, which provide support for OpenGL, Vulkan, and other graphics APIs. Moreover, it also installs drivers for modern Intel, AMD, and Nvidia GPUs. So, let’s install it for both 32-bit and 64-bit architectures:
$ sudo apt install -y libgl1-mesa-glx:i386 libgl1-mesa-glx:amd64Afterwards, we can configure additional graphics settings in the Graphics tab of winecfg:
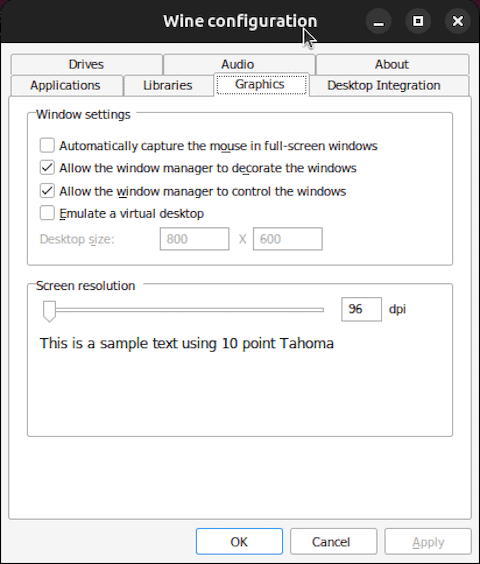
We can change these settings according to our requirements.
4.4. Fonts
Often, the fonts aren’t quite readable in programs running through Wine. Mostly, it’s due to missing fonts. Luckily, we can link all the systems fonts, so they are accessible from Wine:
$ cd ${WINEPREFIX:-~/.wine}/drive_c/windows/Fonts && for i in /usr/share/fonts/**/*.{ttf,otf}; do ln -s "$i"; doneAlternatively, we can install Microsoft TrueType’s fonts through winetricks:
$ winetricks corefontswinetricks is a utility for Wine that simplifies the management of various components, libraries, and settings needed to run Windows applications in Wine. For instance, we can install DirectX, MSXML, and Visual Runtime libraries much more easily through winetricks.
Notably, running winecfg renders fonts much better. However, if the fonts look smeared in any way, then we can fix it with registry settings. So, let’s create a new file fonts-fix.reg and put the following registry settings in it:
Windows Registry Editor Version 5.00
[HKEY_CURRENT_USER\Software\Wine\X11 Driver]
"ClientSideWithRender"="N"
Now, let’s import this using regedit:
$ wine regedit fonts-fix.regFurthermore, we can make the font more smoother using additional registry settings:
REGEDIT4

[HKEY_CURRENT_USER\Control Panel\Desktop]
"FontSmoothing"="2"
"FontSmoothingOrientation"=dword:00000001
"FontSmoothingType"=dword:00000002
"FontSmoothingGamma"=dword:00000578
EOF
Afterwards, we restart all the running instances of Wine.
4.5. Libraries
As we mentioned earlier, winetricks enables us to install certain components and libraries for applications that require them. For instance, Microsoft Office requires MSXML, which we can install through winetricks.
Let’s launch the winetricks GUI:
$ winetricks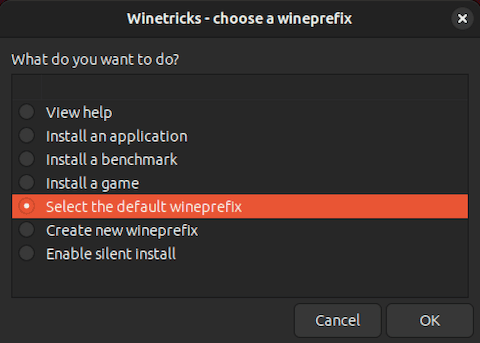
For our use case, we’ll go with the default prefix. Next, we select the component installation option:
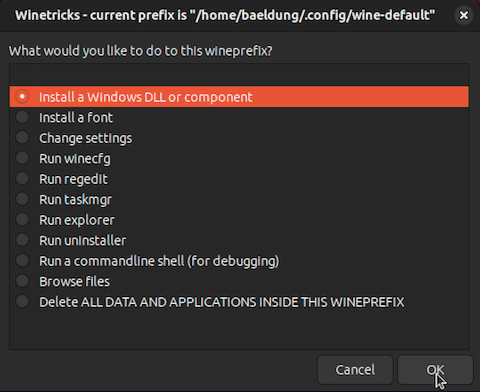
Afterwards, we select the required packages, which are msxml libraries in this case:
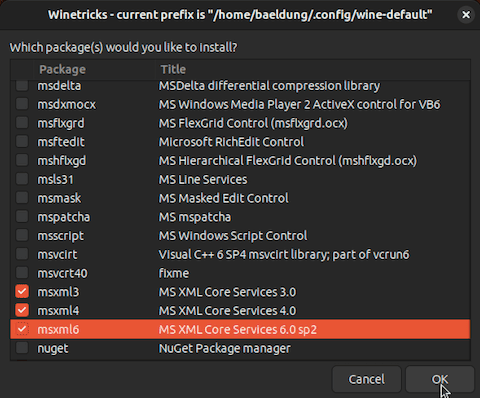
Once we press OK, winetricks begins installing the components.
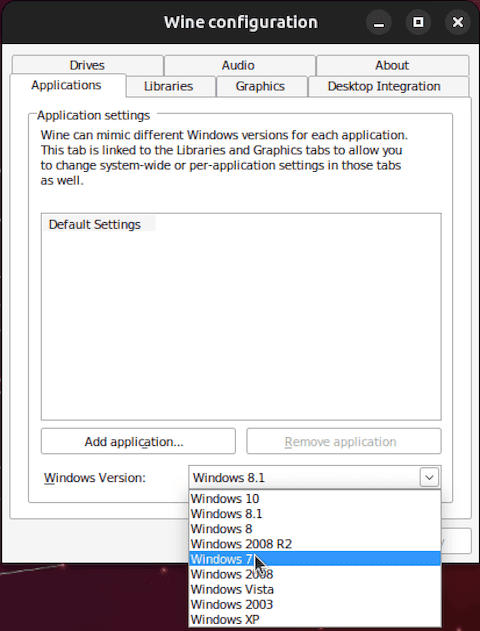
4.6. Software Compatibility
Sometimes, we come across applications that are only supported by older or newer Windows versions. In that case, we can easily select the compatible Windows version from winecfg‘s Applications tab:
6. Conclusion
In this article, we explored how Wine works and how to install it in Linux distributions. Then, we discussed how to configure audio, graphics, and fonts for Wine applications.
Additionally, we learned how to install additional components through winetricks and select compatible Windows versions for our applications.