

Learn through the super-clean Baeldung Pro experience:
>> Membership and Baeldung Pro.
No ads, dark-mode and 6 months free of IntelliJ Idea Ultimate to start with.
Last updated: February 11, 2024
Learn through the super-clean Baeldung Pro experience:
>> Membership and Baeldung Pro.
No ads, dark-mode and 6 months free of IntelliJ Idea Ultimate to start with.
Wireless Fidelity (Wi-Fi) has become integral to our daily lives, connecting us to the digital world more efficiently than ever. Wi-Fi is essential for communication, remote work, and entertainment. Ensuring its optimal performance matters a lot. One critical factor affecting Wi-Fi performance is the choice of wireless channels.
To enhance connectivity, Linux provides a set of tools that allow users to analyze the channels used by the Wi-Fi networks. In this tutorial, we’ll explore some essential Linux tools for checking Wi-Fi channels used by Wi-Fi networks.
Nowadays, our routers mostly operate in two frequency bands, 2.4 GHz and 5 GHz. The difference between these frequency bands lies in their respective capabilities concerning signal strength and the amount of bandwidth that they provide. The 2.4 GHz band covers a wider area with less speed, while the 5 GHz band offers faster speeds but covers a smaller area. A router communicates with its client devices using these frequency bands.
Wi-Fi bands are divided into multiple Wi-Fi channels, each corresponding to a specific radio frequency. These channels help organize communication between wireless devices. Wireless channels are essential to avoid interference and improve overall network performance. They impact how reliable and fast our Wi-Fi connections are.
In the 2.4 GHz band, channels are usually separated 5 MHz apart; however, to avoid interference, only three specific channels- 1, 6, and 11- are mostly used. In the 5 GHz band, channels are 20 MHz apart, providing a greater chance to avoid interference. Changing Wi-Fi channels becomes particularly significant when optimizing Wi-Fi performance in case our network experiences lag, despite it having good signal strength and sufficient bandwidth.
In this section, we’ll comprehensively explore a range of tools available in the Linux environment. These tools can discover the available Wi-Fi channels. Their diverse functionalities empower users to gain valuable insights into network details, including Wi-Fi channel information, thereby contributing to the enhancement of overall connectivity.
iwlist stands out as a versatile command-line tool that offers detailed information about wireless interfaces, including the channels used by nearby Wi-Fi networks.
With the use of iwlist, a user can retrieve all network-related information such as signal strength, encryption algorithm, and also wireless channel information. To only extract channel information for our network, we can use the grep command to filter lines containing Channel in the output:
$ iwlist wlan0 scanning | grep 'Channel'
   Channel:6
   Frequency:2.437 GHz (Channel 6)
The command above shows that the current channel number is 6, and the frequency in use is 2.437 GHz. It’s important to note that, instead of wlan0, users should substitute the appropriate interface name corresponding to their network interface. To obtain a list of available interfaces, let’s use the ifconfig command:
$ ifconfig
... other lines truncated ...
   wlan0: flags=4163<UP,BROADCAST,RUNNING,MULTICAST>  mtu 1500
          inet 192.168.1.100  netmask 255.255.255.0  broadcast 192.168.1.255
          inet6 fq12::512o:235a:9ab1:37bf  prefixlen 64  scopeid 0x20<link>
          ether 11:66:88:bb:22:aa  txqueuelen 1000  (Ethernet)
          RX packets 185738  bytes 237863885 (226.8 MiB)
          RX errors 0  dropped 0  overruns 0  frame 0
          TX packets 66325  bytes 11380575 (10.8 MiB)
          TX errors 0  dropped 0 overruns 0  carrier 0  collisions 0
The above command lists the information related to the available network interface, including details such as interface name, IP address, MAC address, and more. However, for the specific purpose of identifying Wi-Fi channels, our primary focus is on extracting the interface name.
iw is a newer and robust tool that supersedes the older, widely-used iwconfig tool. Let’s use iw to determine the currently used channel:
$ iw wlan0 info | grep 'channel'
	channel 6 (2437 MHz), width: 20 MHz, center1: 2437 MHz
Similarly to iwlist, the wireless interface name wlan0 should be substituted with our specific wireless interface name when using iw. The grep command is employed to selectively extract channel-related information.
wavemon provides real-time monitoring of signal strength, noise level, and channel utilization. Its installation can be done using the apt package manager. To install wavemon, the following dependencies must be installed:
$ sudo apt-get -y install pkg-config libncursesw6 libtinfo6 libncurses-dev libnl-cli-3-devNow, we can use apt to install wavemon:
$ sudo apt install wavemonLet’s check our wireless network information using wavemon:
$ sudo wavemonWe will then access an interface where we can see our network information, as shown in the below image:
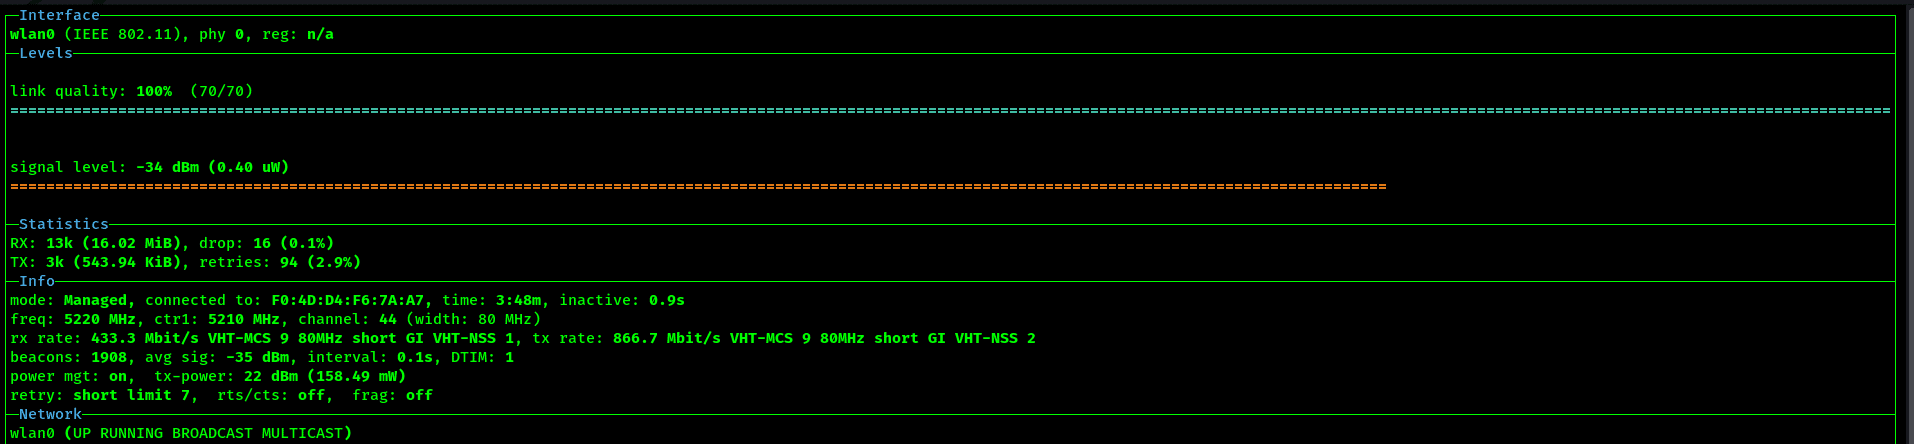
wavemon features an intuitive interface that presents available networks, showcasing their signal strength, operating channel, and more. Under the Info section, we can find the channel number that our wireless network is using.
airodump-ng is known for its role in wireless security, but it also serves the purpose of monitoring Wi-Fi information, making it useful for understanding Wi-Fi channels. Before employing airodump-ng for monitoring, we need to switch our interface to monitor mode using aircrack-ng:
$ sudo aircrack-ng start wlan0Once in monitor mode, the interface name changes. Now, we have to verify the name of the interface using the ifconfig command. In our case, the interface name is wlan0mon, but this may vary depending on the interface names. Then, we can display nearby access points along with their channels using airodump-ng:
$ sudo airodump-ng wlan0mon
CH 13 ][ Elapsed: 12 s ][ 2024-02-03 20:46 ][ paused output ]

 BSSID              PWR  Beacons    #Data, #/s  CH   MB   ENC CIPHER  AUTH ESSID

 00:77:99:BB:BB:EE  -27        6        1    0   1  540   WPA2 CCMP   PSK  BELL122
 00:AA:44:66:77:33  -61        3        0    0   6  195   WPA2 CCMP   PSK  OUR_WIFI
... other lines truncated ...
The above command gives us a detailed list of information regarding wireless networks, offering a comprehensive overview that includes the device’s MAC address, signal strength, and the channels each network is using. The CH column in the output represents channels, indicating that OUR_WIFI is operating on channel 6.
nmcli is a powerful command-line Linux utility that empowers users to manage network connections, including Wi-Fi configuration. Let’s check Wi-Fi channel information using nmcli:
$ sudo nmcli device wifi | grep 'OUR_WIFI'
IN-USE  BSSID               SSID                      MODE   CHAN  RATE        SIGNAL  BARS  SECURITY
        00:77:99:BB:BB:EE  OUR_WIFI                   Infra  6     540 Mbit/s  100     ▂▄▆█  WPA2
*       00:77:99:BB:BB:EE  OUR_WIFI                   Infra  44    540 Mbit/s  100     ▂▄▆█  WPA2
        00:77:99:BB:BB:EE  OUR_WIFI                   Infra  149   540 Mbit/s  100     ▂▄▆█  WPA2
The command provides a list of nearby Wi-Fi networks, indicating their SSID, MODE, respective channels, signal strengths, and so on. By filtering with the grep command, the output is refined to display only information about OUR_WIFI.
An asterisk (*) in the IN-USE column signifies the currently employed Wi-Fi, with the CHAN column denoting the channel number (44 in this instance). We can also see other available channels which we can use as alternatives in case the current channel encounters issues.
sparrow-wifi is a GUI-based Wi-Fi and Bluetooth analyzer tailored for Linux. Its features include SSID identification, a spectrum view of frequency bands, Bluetooth recognition, and various other capabilities. Notably, users can employ sparrow-wifi for identifying channels used by our Wi-Fi network.
To run it, we first need to install sparrow-wifi:
$ sudo apt install sparrow-wifiLet’s launch sparrow-wifi, then click on the ‘Start Scanning’ button within the application:
$ sudo sparrow-wifi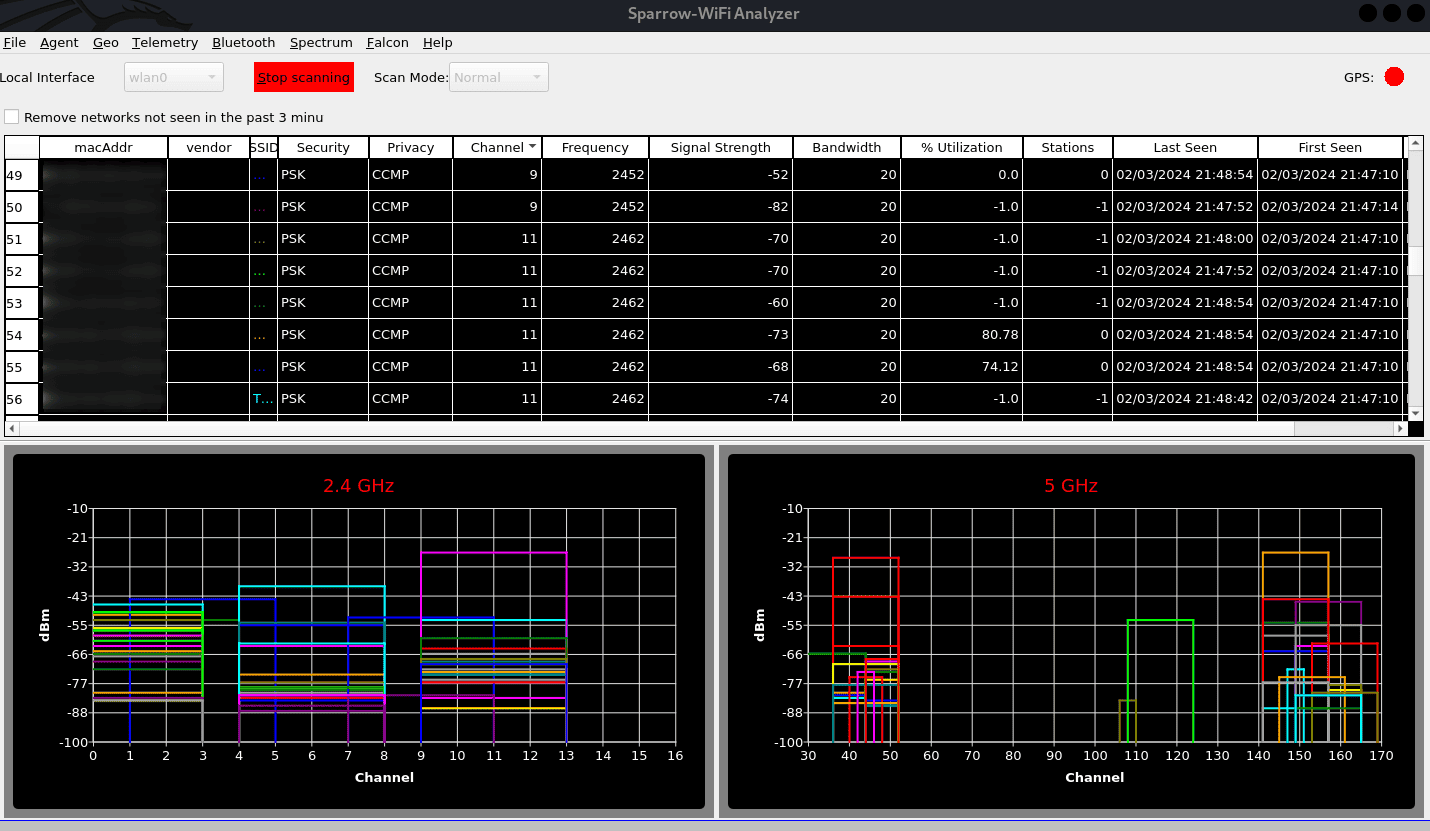
In the above figure, the table presents network information, and the Channel column indicates the channel number utilized by our Wi-Fi. As it compiles information on all networks within our device’s vicinity, we must locate our Wi-Fi SSID by matching it with the entries in the table. Furthermore, the graphical representations below the table depict the strength of various channels in both frequency bands, 2.4 GHz and 5 GHz.
A proficient understanding and optimization of Wi-Fi channels play a crucial role in achieving optimal performance for our daily connectivity requirements. In this article, we’ve outlined some tools that provide valuable insights into the channels used by nearby Wi-Fi networks, allowing users to make informed decisions to enhance their wireless experience.
From command-line tools like iwlist, iw, and nmcli to comprehensive solutions like airodump-ng, Linux users have a variety of options to scan and analyze Wi-Fi channels. Additionally, utilities like wavemon and GUI-based tools like sparrow-wifi offer interfaces for efficiently managing and monitoring Wi-Fi networks.
While modern routers often handle channel selection automatically, there are scenarios where manual intervention becomes necessary to address interference or optimize performance. Leveraging these Linux tools, users can proactively take steps to ensure a seamless and efficient wireless connectivity experience.