
Yes, we're now running our only Summer Sale. All Courses are 30% off until 20th July, 2026:
Learn through the super-clean Baeldung Pro experience:
>> Membership and Baeldung Pro.
No ads, dark-mode and 6 months free of IntelliJ Idea Ultimate to start with.
1. Overview
The advent of powerful GPUs (Graphic Processing Unit) brought new capabilities to various computational areas. Primarily designed to cope with demanding two or three-dimensional graphical tasks, these processors adopted a massively parallel model of computation.
However, making this power useful demands a radical change in our mindset. As programmers, we need to implement algorithms with operations spread over thousands of concurrently running threads.
The manufacturer of popular graphics cards, NVIDIA, facilitates this task by providing CUDA. We can regard it as an API that allows us to program GPUs as we are used to by regular processors. Technically, it extends the popular C/C++ language with syntax, which reflects the GPU parallel architecture.
In this tutorial, we’ll learn how to install the CUDA toolkit and enable nvcc, the NVIDIA CUDA compiler.
2. Detecting the Hardware
First, we must ensure that our computer has a suitable graphics card. Let’s use the lshw command to query the hardware:
$ sudo lshw -short | grep -i display
/0/100/2/0                  display        GM206 [GeForce GTX 960]
/1               /dev/fb0   display        VESA VGA
We can use lspci as well:
$ lspci | grep -i vga
01:00.0 VGA compatible controller: NVIDIA Corporation GM206 [GeForce GTX 960] (rev a1)
The last step is to check if our graphics card is CUDA-capable. Thus, we need to look for the card in the manufacturer’s list. Therein, GeForce GTX 960 is CUDA enabled with a Compute Capability equal to 5.2. The latter figure determines the CUDA toolkit version.
3. Video Card Drivers
Ubuntu distribution doesn’t provide NVIDIA drivers by default as they are proprietary software. They are regarded as additional drivers, and to get them, we need to install the ubuntu-drivers-common package:
$ sudo apt install ubuntu-drivers-commonAfterward, let’s show all devices and corresponding packages with the ubuntu-drivers command:
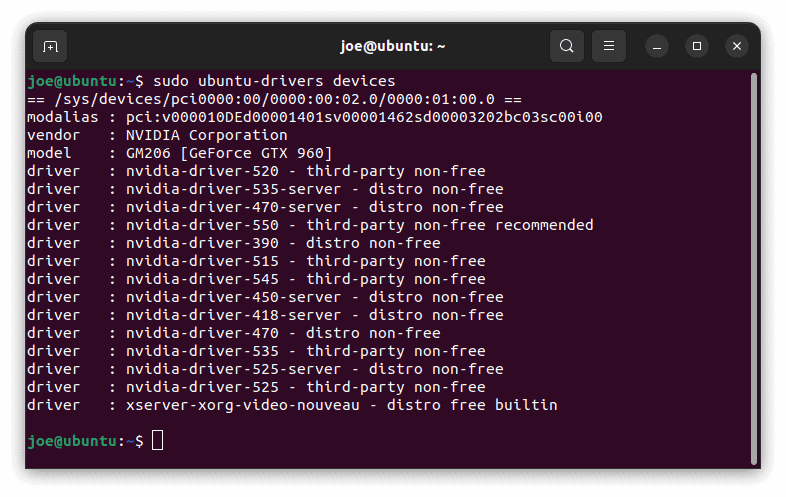
Finally, let’s install the nvidia-driver-535 package:
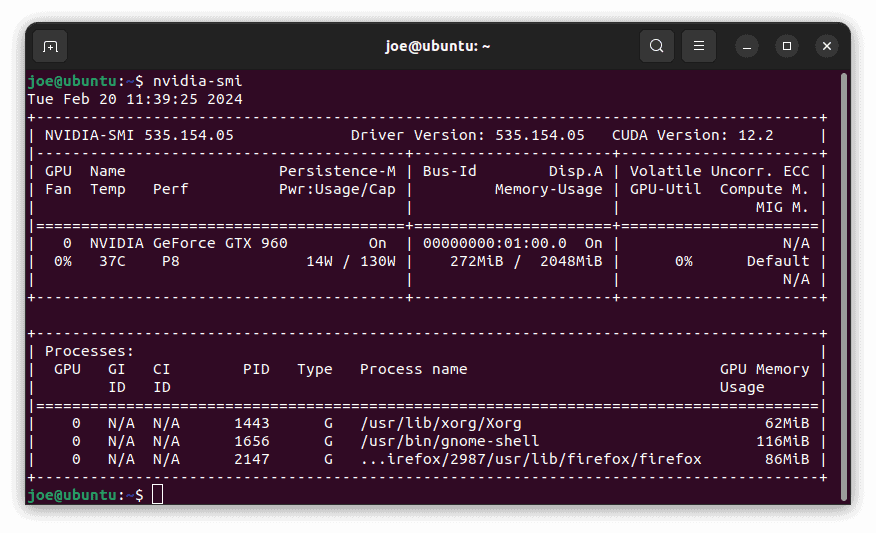
$ sudo apt install nvidia-driver-535At this point, we need to reboot the computer:
$ sudo reboot nowWhen the system is up again, let’s use the nvidia-smi command to check the details:
4. C/C++ Compiler Installation
We need to install the C/C++ compiler if our installation doesn’t provide it. Of those supported by the vendor, let’s choose gcc:
$ sudo apt install gccNext, let’s verify the installation:
$ gcc --version
gcc (Ubuntu 11.4.0-1ubuntu1~22.04) 11.4.0
# ...
5. Installation From NVIDIA
As the first option, we let’s install the CUDA development environment directly from the vendor. NVIDIA profoundly describes this process. Therein, we’ll find information concerning various Linux distributions, different ways of installation, and troubleshooting. In this tutorial, we’ll follow the Ubuntu path with apt to install the software.
5.1. Linux Headers
Because the CUDA toolkit uses the system services, we need headers for the exact kernel version:
$ apt list linux-headers-$(uname -r)
Listing... Done
linux-headers-6.5.0-18-generic/jammy-updates,jammy-security,now 6.5.0-18.18~22.04.1 amd64 [installed,automatic]
So, we have desired linux-headers-6.5.0-18-generic ones. However, if it’s not our case, we can install them:
$ sudo apt install linux-headers-$(uname -r)
Reading package lists... Done
Building dependency tree... Done
Reading state information... Done
linux-headers-6.5.0-18-generic is already the newest version (6.5.0-18.18~22.04.1).
linux-headers-6.5.0-18-generic set to manually installed.
0 upgraded, 0 newly installed, 0 to remove and 0 not upgraded.
5.2. Updating Signing Key
We need to reinstall the NVIDIA key for apt. First, let’s remove the old one:
$ sudo apt-key del 7fa2af80Next, let’s download the cuda-keyring package to manage keys:
$ wget https://developer.download.nvidia.com/compute/cuda/repos/ubuntu2204/x86_64/cuda-keyring_1.1-1_all.debFinally, we can install this package:
$ sudo dpkg -i cuda-keyring_1.1-1_all.deb5.3. CUDA Toolkit Installation
Now we’re ready to install the CUDA toolkit:
$ sudo apt install cuda-toolkitAfterward, we’re ready to invoke the nvcc compiler:
$ nvcc --version
nvcc: NVIDIA (R) Cuda compiler driver
Copyright (c) 2005-2023 NVIDIA Corporation
Built on Wed_Nov_22_10:17:15_PST_2023
Cuda compilation tools, release 12.3, V12.3.107
Build cuda_12.3.r12.3/compiler.33567101_0
5.4. Setting the PATH Variable
To make the newly installed toolkit accessible, we need to add its folder to the PATH environmental variable. We can make it for the current session only:
$ export PATH=/usr/local/cuda/bin${PATH:+:${PATH}}Next, let’s edit the .bashrc file to make this change permanent:
$ nano ~/.bashrcWe should add the export line at the end of this file. Now, the CUDA toolkit is always visible in user’s sessions.
6. Ubuntu’s Fast Lane
With Ubuntu, we can get ready for CUDA programming much faster. This is because we can add NVIDIA drivers during system installation or later from GUI. Additionally, the CUDA toolkit is wrapped into the nvidia-cuda-toolkit package.
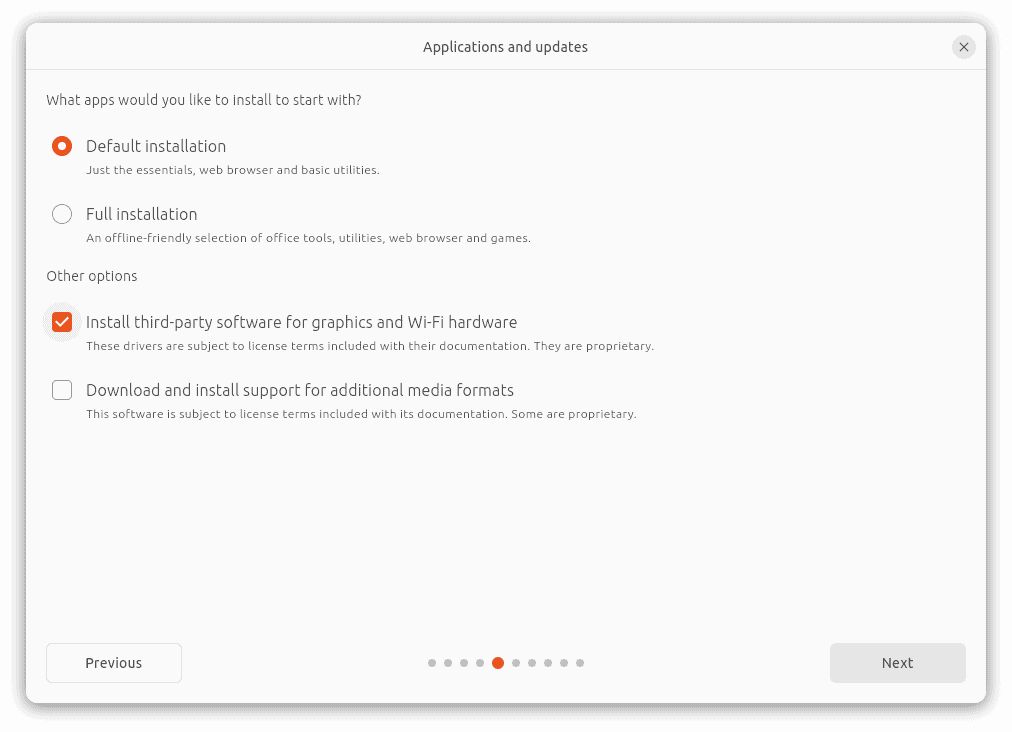
6.1. Installing Proprietary Drivers During Ubuntu Installation
When installing the Ubuntu system, the installer offers us the possibility of adding proprietary drivers. All we need to do is to check the ‘Install third-party software …’ option and continue the installation:
6.2. Installing Drivers in GUI
If we miss driver installation during system setup. we can make up for that later. Since Ubuntu uses GNOME, we can click Activities and start typing ‘Additional’ in the search input line. The system should offer the ‘Software & Updates’ panel with the ‘Additional Drivers’ tab selected:
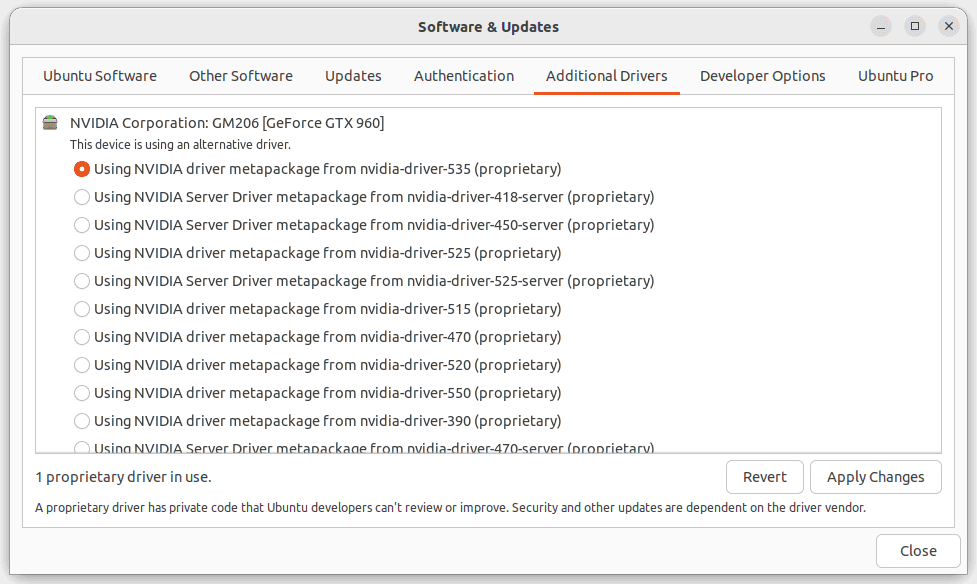
So, let’s choose the appropriate driver and press ‘Apply Changes’. Finally, we can check if the installation has succeeded with the nvidia-smi command as before.
6.3. The nvidia-cuda-toolkit Package
Instead of using the NVIDIA-provided repository, we can install the CUDA toolkit from the Ubuntu multiverse repository. The latter contains all third-party software. Anyway, we’re hinted to install it if we try to run the lacking nvcc compiler:
$ nvcc --version
Command 'nvcc' not found, but can be installed with:
sudo apt install nvidia-cuda-toolkit
So, let’s follow this suggestion and install the compound toolkit:
$ sudo apt install nvidia-cuda-toolkitThen, let’s verify the compiler again:
$ nvcc --version
nvcc: NVIDIA (R) Cuda compiler driver
# ...
Finally, let’s check the package details:
$ dpkg -l nvidia-cuda-toolkit
# ...
ii  nvidia-cuda-toolkit 12.0.140~12.0.1-2 amd64        NVIDIA CUDA development toolkit
7. Testing
NVIDIA provides a lot of proprietary source code, which we can use to learn and understand the concepts related to GPU programming. Our goal now is to run a small fraction of them to check the basic features of the GPU setup.
Before we start, we need to install the CMake utility, which is required to build some examples:
$ sudo apt install cmakeNow, let’s download the source code from GitHub. Then, let’s create the ~/prj/cuda folder and extract the archive inside. In this way, the cuda-samples-master folder should appear.
To build all examples, let’s jump into this folder and start building with make:
$ make
# a lot of output skipped
Finished building CUDA samples
Finally, we should find the sample programs in the subfolder of the ~/prj/cuda/cuda-samples-master/Samples directory:
$ ls ~/prj/cuda/cuda-samples-master/Samples
0_Introduction  2_Concepts_and_Techniques  4_CUDA_Libraries   6_Performance
1_Utilities     3_CUDA_Features            5_Domain_Specific  7_libNVVM
At this point, we’re interested in the content of the 1_Utilities category. Let’s go to this folder:
$ cd ~/prj/cuda/cuda-samples-master/Samples/1_Utilities7.1. Checking the GPU Architecture
The first utility we’ll run is deviceQuery. It provides details about the GPU architecture as they are exposed to the programmer. So, let’s jump into the deviceQuery subfolder and start the program of the same name:
$ ./deviceQuery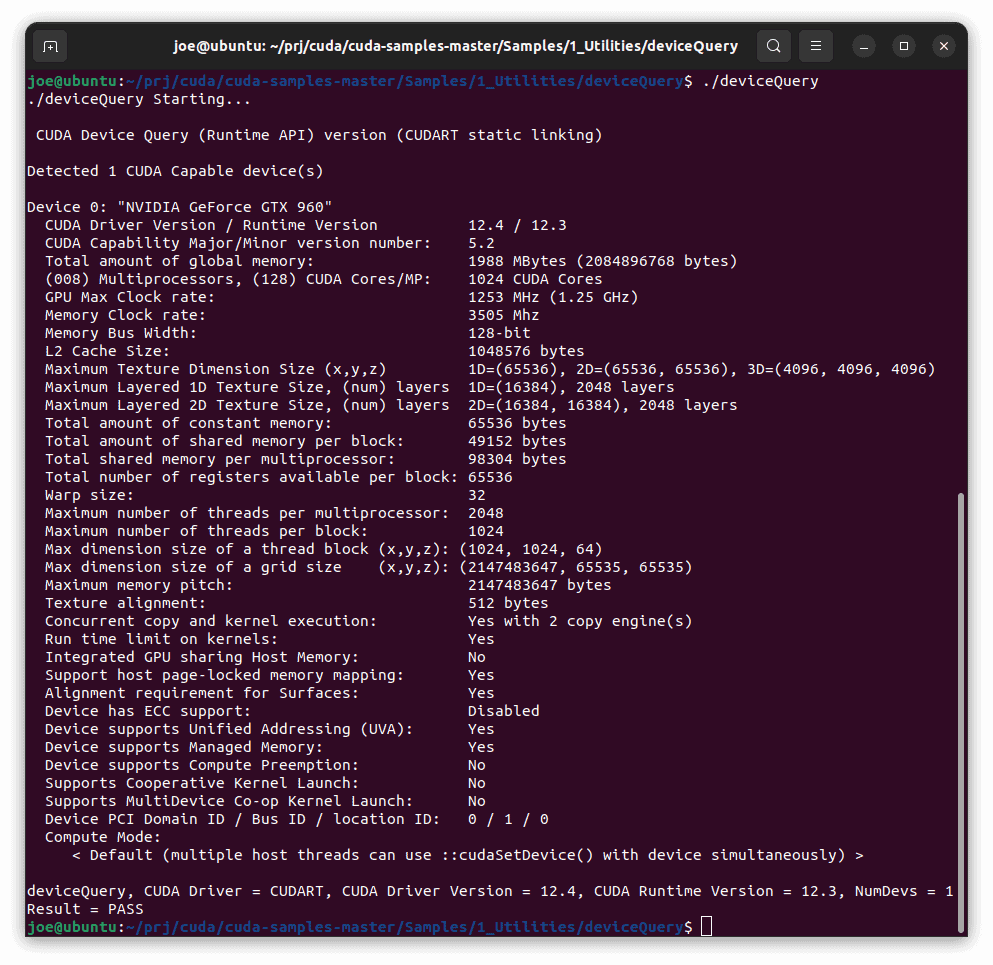
7.2. Checking Communication
Communication with the GPU unit needs data transfer between the CPU, referred to as the ‘host’ and the GPU known as the ‘device’. The bandwidthTest program measures the rate of memory transfers. Let’s move to the folder of the identical name and start the program:
$ ./bandwidthTest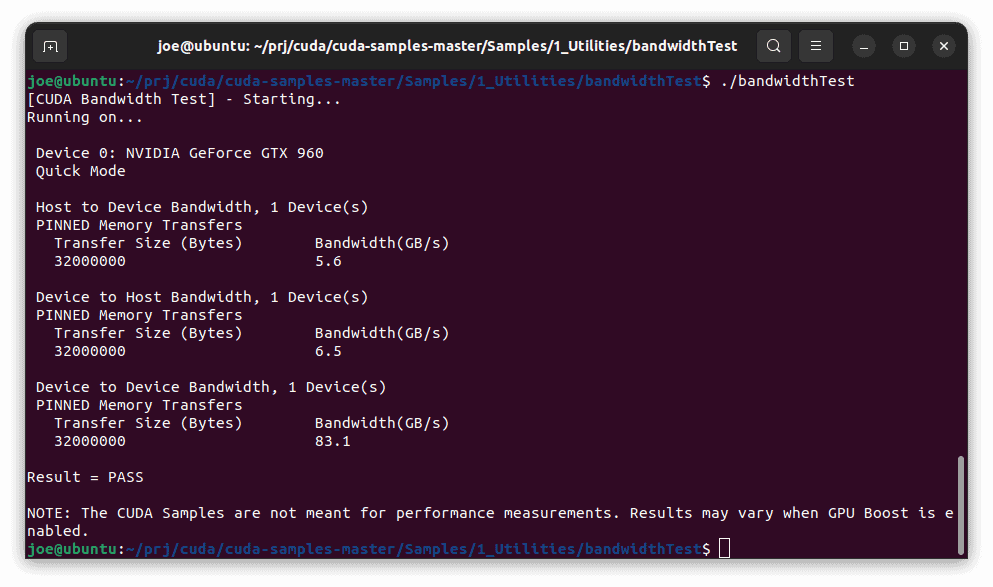
8. Conclusion
In this tutorial, we learned how to install the CUDA toolkit on an Ubuntu machine. First, we needed to check if our computer featured a CUDA-capable graphical card. Then, we manually added the suitable NVIDIA driver. Finally, we showed the step-by-step installation of NVIDIA-provided toolkit components.
As a faster alternative, we demonstrated the Ubuntu way to install video drivers and the multiverse package for CUDA programming tools.
Finally, we obtained, compiled, and built the suite of C/C++ programs supplied by NVIDIA. Then, we ran utility programs to query and measure GPU properties.