

Yes, we're now running our only Summer Sale. All Courses are 30% off until 20th July, 2026:
How to Disable Auto-Mounting of Devices in Ubuntu
Last updated: February 24, 2024
Learn through the super-clean Baeldung Pro experience:
>> Membership and Baeldung Pro.
No ads, dark-mode and 6 months free of IntelliJ Idea Ultimate to start with.
1. Overview
In this article, we’ll discuss device automounting in Ubuntu and how to stop it. Automount is a useful functionality but we may want to disable it, for example, if we’re using our system to rescue drives with tools such as ddrescue. In that case, we don’t want to automatically mount the drives we connect to our system. Automount modifies the disk content itself in some cases, affecting our rescuing efforts.
This article contains several approaches to solving the problem. Firstly, we’ll start with those suited for the GNOME (GNU Network Object Model Environment) desktop environment. Secondly, we’ll discuss solutions for the XFCE desktop environment. Finally, we’ll see general solutions for any desktop environment and Linux distribution.
2. GNOME Desktop Environment
GNOME, like most desktop environments, automatically mounts drives. We can find it shipped by default in several of the most common Linux distributions, such as Ubuntu, Fedora, Debian, Red Hat Enterprise Linux, and SUSE.
We can disable the automatic mounting of devices through the settings from GNOME. To do it, we can use the GUI editor or the command line.
2.1. GNOME GUI Editor
Let’s see how to edit GNOME using its GUI. The first step is to check whether we have the GNOME GUI editor, named dconf-editor.
We might not have dconf-editor installed in our system by default even if we use GNOME as the desktop environment. In case our system doesn’t find the dconf-editor command, we can install it with our package manager:
$ sudo apt install dconf-editorOnce installed, we can open the dconf-editor from the launcher or by running the command in the terminal:
$ dconf-editorWhen we open the dconf-editor we’ll see two options to navigate through the settings:
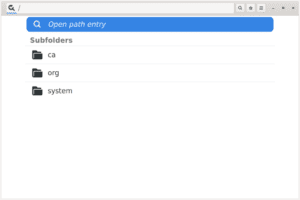
We can click one subfolder after the other or open directly a path. In either case, we need to navigate to org/gnome/desktop/media-handling:
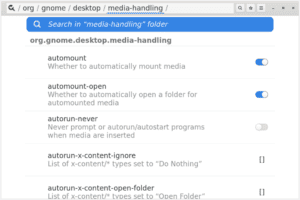
We need to disable two options: automount and automount-open. Let’s start by clicking on automount:
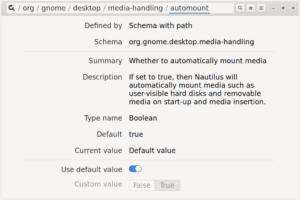
We need to toggle off the “Use default value” option and set the “Custom Value” to False. Then we click the “Apply” button to save the changes:
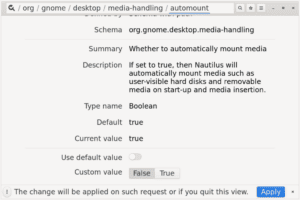
We need to follow the same procedure for the automount-open. After updating both values, GNOME shouldn’t automatically mount devices any longer.
2.2. From the Command Line
We can also disable the automount mechanism handled by GNOME through the command line. In this case, we don’t even need the installation of dconf-editor, since we’ll use the gsettings tool with the same paths as before:
$ gsettings set org.gnome.desktop.media-handling automount false
$ gsettings set org.gnome.desktop.media-handling automount-open false
We’ve asked gsettings to set the options automount and automount-open that are under org.gnome.desktop.media-handling to false. These two commands produce the same result we achieve using the GUI.
3. With the XFCE Desktop Environment
XFCE is another popular desktop environment that we find by default in, for example, Xubuntu. This Ubuntu-flavoured distribution targets less powerful systems because XFCE is more efficient than GNOME. We can also change the settings via the GUI or the command line.
3.1. Using the xfce4-settings-manager GUI Tool
thunar-volman handles the device automounting in XFCE by default. We can access the settings of thunar-volman with the xfce4-settings-manager tool. As before, if we don’t have it installed, we need to use our package manager to do so:
$ sudo apt install xfce4-settingsOnce installed, we can open the tool from the terminal:
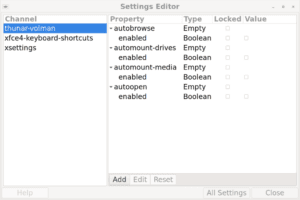
$ xfce4-settings-managerAs opposed to GNOME, there isn’t a menu path to follow. Here, simply selecting the channel for thunar-volman displays all the settings. Under the thunar-volman channel we need to disable the autobrowse, automount-drives, automount-media, and autoopen:
This way, we disable the automounting for drives and media. Moreover, we prevent thunar from popping up whenever we connect an external drive.
3.2. Via the Command Line
We can also disable the options for XFCE from the command line. To do so, we’ll use xfconf-query:
$ xfconf-query -c thunar-volman -p /autobrowse/enabled -s false
$ xfconf-query -c thunar-volman -p /automount-drives/enabled -s false
$ xfconf-query -c thunar-volman -p /automount-media/enabled -s false
$ xfconf-query -c thunar-volman -p /autoopen/enabled -s false
We’ve specified the thunar-volman channel with the -c flag. Then, we’ve given the properties /autobrowse/enabled, /automount-drives/enabled, /automount-media/enabled, and /autoopen/enabled with the -p flag. Finally, we’ve prescribed the value false with the -s flag.
We achieve the same system behavior as with the operations we performed with the GUI.
4. Solutions Independent of Desktop Environments
The following section sketches four solutions that we can use if we don’t use either GNOME or XFCE. These solutions should work in general for any Linux distribution regardless of the desktop environment.
4.1. Disabling udisks Services
Most of the automounting that Linux systems trigger in their desktop environments has udisks as the core daemon. The service is commonly known as udisks2.service, although the name might depend on the distribution. Disabling the udisks2.service prevents the desktop environment from automounting.
Anyway, we should still be able to mount manually the devices that we want to.
When we stop the service for udisks2, there might be side effects that we should be aware of. For example, other services from the desktop environment stop working (such as gnome-disks). Thus, we should be careful when we apply this procedure.
Let’s first start by checking the current status of the udisks2 service with systemctl:
$ systemctl status udisks2
● udisks2.service - Disk Manager
Loaded: loaded (/usr/lib/systemd/system/udisks2.service; disabled; preset: disabled)
Active: active (running) since Tue 2024-02-06 11:37:58 CET; 1 day 8h ago
Docs: man:udisks(8)
Main PID: 1954 (udisksd)
Tasks: 6 (limit: 9123)
Memory: 15.1M (peak: 20.6M swap: 1.4M swap peak: 1.4M zswap: 290.2K)
CPU: 2.879s
CGroup: /system.slice/udisks2.service
└─1954 /usr/lib/udisks2/udisksd
We can see that the service status is active (running). If we can stop the service, this won’t be persistent if we restart our system:
$ sudo systemctl stop udisks2
$ systemctl status udisks2
○ udisks2.service - Disk Manager
Loaded: loaded (/usr/lib/systemd/system/udisks2.service; disabled; preset: disabled)
Active: inactive (dead)
Docs: man:udisks(8)
Now the service has a status of inactive (dead) but it will be active next time we boot up. So, instead of stopping it, we’ll need to disable the service to avoid its autostart on reboot:
$ sudo systemctl disable udisks2Stopped and disabled services can be reactivated by other services without our intervention. Thus, to avoid other services starting udisks2 after having stopped it, we need to mask it:
$ sudo systemctl mask udisks2Overall, knowing that udisks2 is the service responsible for automounting disks we can freely tweak its performance.
4.2. Disabling autofs Services
Some distributions don’t rely on udisks to mount devices but on autofs. Thus, we can follow a similar procedure as before to stop the service:
$ sudo systemctl stop autofs
$ systemctl status autofs
○ autofs.service - Automounts filesystems on demand
Loaded: loaded (/usr/lib/systemd/system/autofs.service; disabled; preset: disabled)
Active: inactive (dead)
As with udisks2, by stopping a service it will be active on the next boot. To completely deactivate it, we need to disable it:
$ sudo systemctl disable autofsWe should also mask it to avoid other services starting autofs in the background without our permission. As with udisks, we should be careful in some scenarios: for example, disabling autofs causes troubles when using network drives.
4.3. Disable Automatic Mounting a Specific Drive in /etc/fstab
The /etc/fstab file contains relevant information for mounting and unmounting devices.
If we add the noauto option in the /etc/fstab file for a specific device, the system won’t automatically mount the device but we’ll still be able to mount it manually. This limits the solution to a specific device but can still be useful.
First, we need to get the Universally Unique Identifier (UUID) of the device that we want to exclude from the automount. We use blkid to get this information, for example of /dev/sdb1:
$ sudo blkid /dev/sdb1
/dev/sdb1: BLOCK_SIZE="2048" UUID="2021-09-22-15-26-02-00" LABEL="LMDE 6 Cinnamon 64-bit" TYPE="iso9660" PARTUUID="31454ae7-01"
Then, we can add this line with our favorite editor into the /etc/fstab file, using the noauto option to avoid automount:
$ cat /etc/fstab
...
UUID="2021-09-22-15-26-02-00" none auto noauto 0 0
...
This solution is especially useful to avoid automounting disks at boot.
5. Conclusion
In this tutorial, we’ve talked about disabling the automatic mounting of devices into our Linux machine.
Some solutions are linked to the desktop environment (such as GNOME or LXDE). In both desktop environments, there are solutions based on user interfaces or directly from the command line.
Other solutions are independent of the desktop environment we use. These solutions target Linux services such as udisks and autofs or prevent automounting based on the /etc/fstab file.