

Yes, we're now running our only Summer Sale. All Courses are 30% off until 20th July, 2026:
Resolving Common Issues With Terminal Autocomplete
Last updated: January 19, 2024
Learn through the super-clean Baeldung Pro experience:
>> Membership and Baeldung Pro.
No ads, dark-mode and 6 months free of IntelliJ Idea Ultimate to start with.
1. Introduction
Ever noticed how computers can predict and finish commands as we type in the terminal? That’s thanks to autocomplete, a handy terminal feature that speeds things up. By predicting file, directory, and command names, this feature makes typing commands in the terminal more efficient and fast. Nowadays, modern terminals like zsh have made autocompletion even more seamless and dynamic.
But sometimes, things don’t go as smoothly, as autocomplete might act up or not work at all. This may lead to some frustration and slowdown. In this tutorial, we’ll look at some of the most common issues that cause autocomplete to fail in the terminal and how to solve them.
2. Shells Supporting Autocomplete
Before we start, we need to know that not all shells that are available in the wild support autocomplete. Especially older shells that ship with the bare minimum features may not support autocomplete. Following is a list of shells that do and do not support autocomplete:
- Autocomplete not supported: Bourne shell (sh), dash, Almquist shell (ash)
- Autocomplete supported: Bourne again shell (bash), zsh, Friendly interactive shell (fish), tcsh
To check the name of the shell we’re currently using, we can use the command:
$ echo $0
bash
Here, $0 is the argument containing the name of the running process. If executed in the terminal, it returns the name of the shell.
An alternative way to find the name of the shell:
$ echo $SHELL
/bin/bash
$SHELL is an environment variable that stores the path to the shell in the default environment. Printing it in the terminal will return the path and the name of the login shell.
3. Switching to Supported Shells
If we do not already have a supported shell running, we could very easily install it or switch to it.
First, we can run this command to check if the desired shell is installed or not:
$ apt list [package name]For example, let’s check if bash is installed using the command above:
$ apt list bash
Listing... Done
bash/kali-rolling,now 5.2.21-2 amd64 [installed]
If bash is installed, we’ll get a similar entry in the command line. However, if bash is not installed currently, then the output will be blank. In that case, we could use the following command to install the desired shell:
# For Debian and Ubuntu systems
sudo apt-get install [shell name]

# For CentOS and other RPM-based systems
sudo yum install [shell name]
Using this command, we can install one of the shells that supports autocomplete. However, it’s recommended to install either bash or zsh for a better user experience.
After installing the appropriate shell, we could then make it the login shell for the system. Each time a new terminal window is spawned, it will use the login shell. For example, we can switch our login shell to bash using the chsh command:
$ chsh -s /bin/bashchsh is a command line utility that changes the login shell. The -s or –shell option lets us specify the shell that should be used. This command will prompt for the password, as it is a sensitive operation. Also, this command changes the login shell permanently for all terminals.
Alternatively, to simply use a particular shell temporarily, we could type in the shell’s name directly:
$ bashNote that this would only change the shell to bash for that current terminal only, and will not be permanently changed like with the previous command. If we open a new terminal, it will again spawn with the previous shell.
4. Enabling Autocomplete in bash
For bash, the best way to enable autocomplete is to install bash-completion. bash-completion is a set of bash scripts that enables customized completion for specific commands. Generally, it comes pre-installed with bash. But still, if it is for some reason missing from our system, we could install it using the command:
$ sudo apt-get install bash-completionIf the package was installed previously but got corrupted for some reason, we could reinstall it with the command:
$ sudo apt-get install --reinstall bash-completionThis command will reinstall bash-completion and fix any broken dependencies or misconfigurations.
Now, we have to modify the bash configuration file. This file is generally located in /etc/bash.bashrc (in Debian systems such as Ubuntu), /etc/bashrc (in macOS, Amazon Linux, etc.), or simply ~/.bashrc. Here ~/. denotes the home directory.
Inside the .bashrc file, we need to uncomment the following lines. If these lines are not already present, we can also add them at the bottom of the file to enable autocomplete. We might have to open this file with root privileges to edit it:
# enable programmable completion features (you don't need to enable
# this, if it's already enabled in /etc/bash.bashrc and /etc/profile
# sources /etc/bash.bashrc).
if ! shopt -oq posix; then
  if [ -f /usr/share/bash-completion/bash_completion ]; then
    . /usr/share/bash-completion/bash_completion
  elif [ -f /etc/bash_completion ]; then
    . /etc/bash_completion
  fi
fi
After adding these lines, we can either spawn a new terminal or source the .bashrc file in the existing shell — both methods work the same. For this purpose, we can use the source command:
$ source ~/.bashrcNow, we should be able to test the autocomplete feature. We can now type something and hit tab to see autocomplete in action.
5. Enabling Autocomplete in zsh
zsh is a very powerful Unix shell that is an improved version of bash. It contains various kinds of useful features and enhancements. One of these enhancements is the updated autocomplete feature. The autocomplete feature in zsh is very dynamic and powerful and uses previous history and completions to provide proper suggestions.
For autocomplete, there is a plugin in zsh called zsh-autosuggestions. It essentially does all the autocomplete in a browser search-bar-like fashion.
To install zsh-autosuggestions, we first need to clone its repository into $ZSH_CUSTOM/plugins (by default ~/.oh-my-zsh/custom/plugins) using git:
$ git clone https://github.com/zsh-users/zsh-autosuggestions ${ZSH_CUSTOM:-~/.oh-my-zsh/custom}/plugins/zsh-autosuggestionsAfter that, like previously, we need to change inside zsh‘s configuration file, located in ~/.zshrc. Inside this file, we need to find an option called plugins, inside which we need to add a new line called zsh-autosuggestions. If the plugins option is not present already, we can simply add it, and it will contain only one entry for the zsh-autosuggestions. The particular part in the .zshrc file will look like:
plugins=(
  # other plugins...
  zsh-autosuggestions
)
This would be enough for the zsh-autosuggestions plugin to install and run. Similar to the setup of bash autocomplete above, we can start a new shell or source the current shell window for the changes to take effect. This command will reload the new zsh configuration file:
$ source ~/.zshrcNew terminal windows running zsh should now be able to suggest and perform autocomplete.
6. For Xfce Environment
The provided solutions may not address the issue for users in the Xfce environment. The tab key in Xfce is initially configured for other tasks, leading to the overwriting of the autocomplete feature. Fortunately, we can easily resolve this.
We can fix this issue easily through the GUI. First, we should open the Application Menu, then go to Settings, and then Window Manager. There are multiple tabs inside this menu, from which we should choose Keyboard. Inside this sub-menu, we should see a plethora of keyboard shortcuts for the window menu. This picture provides a helpful snapshot of that:
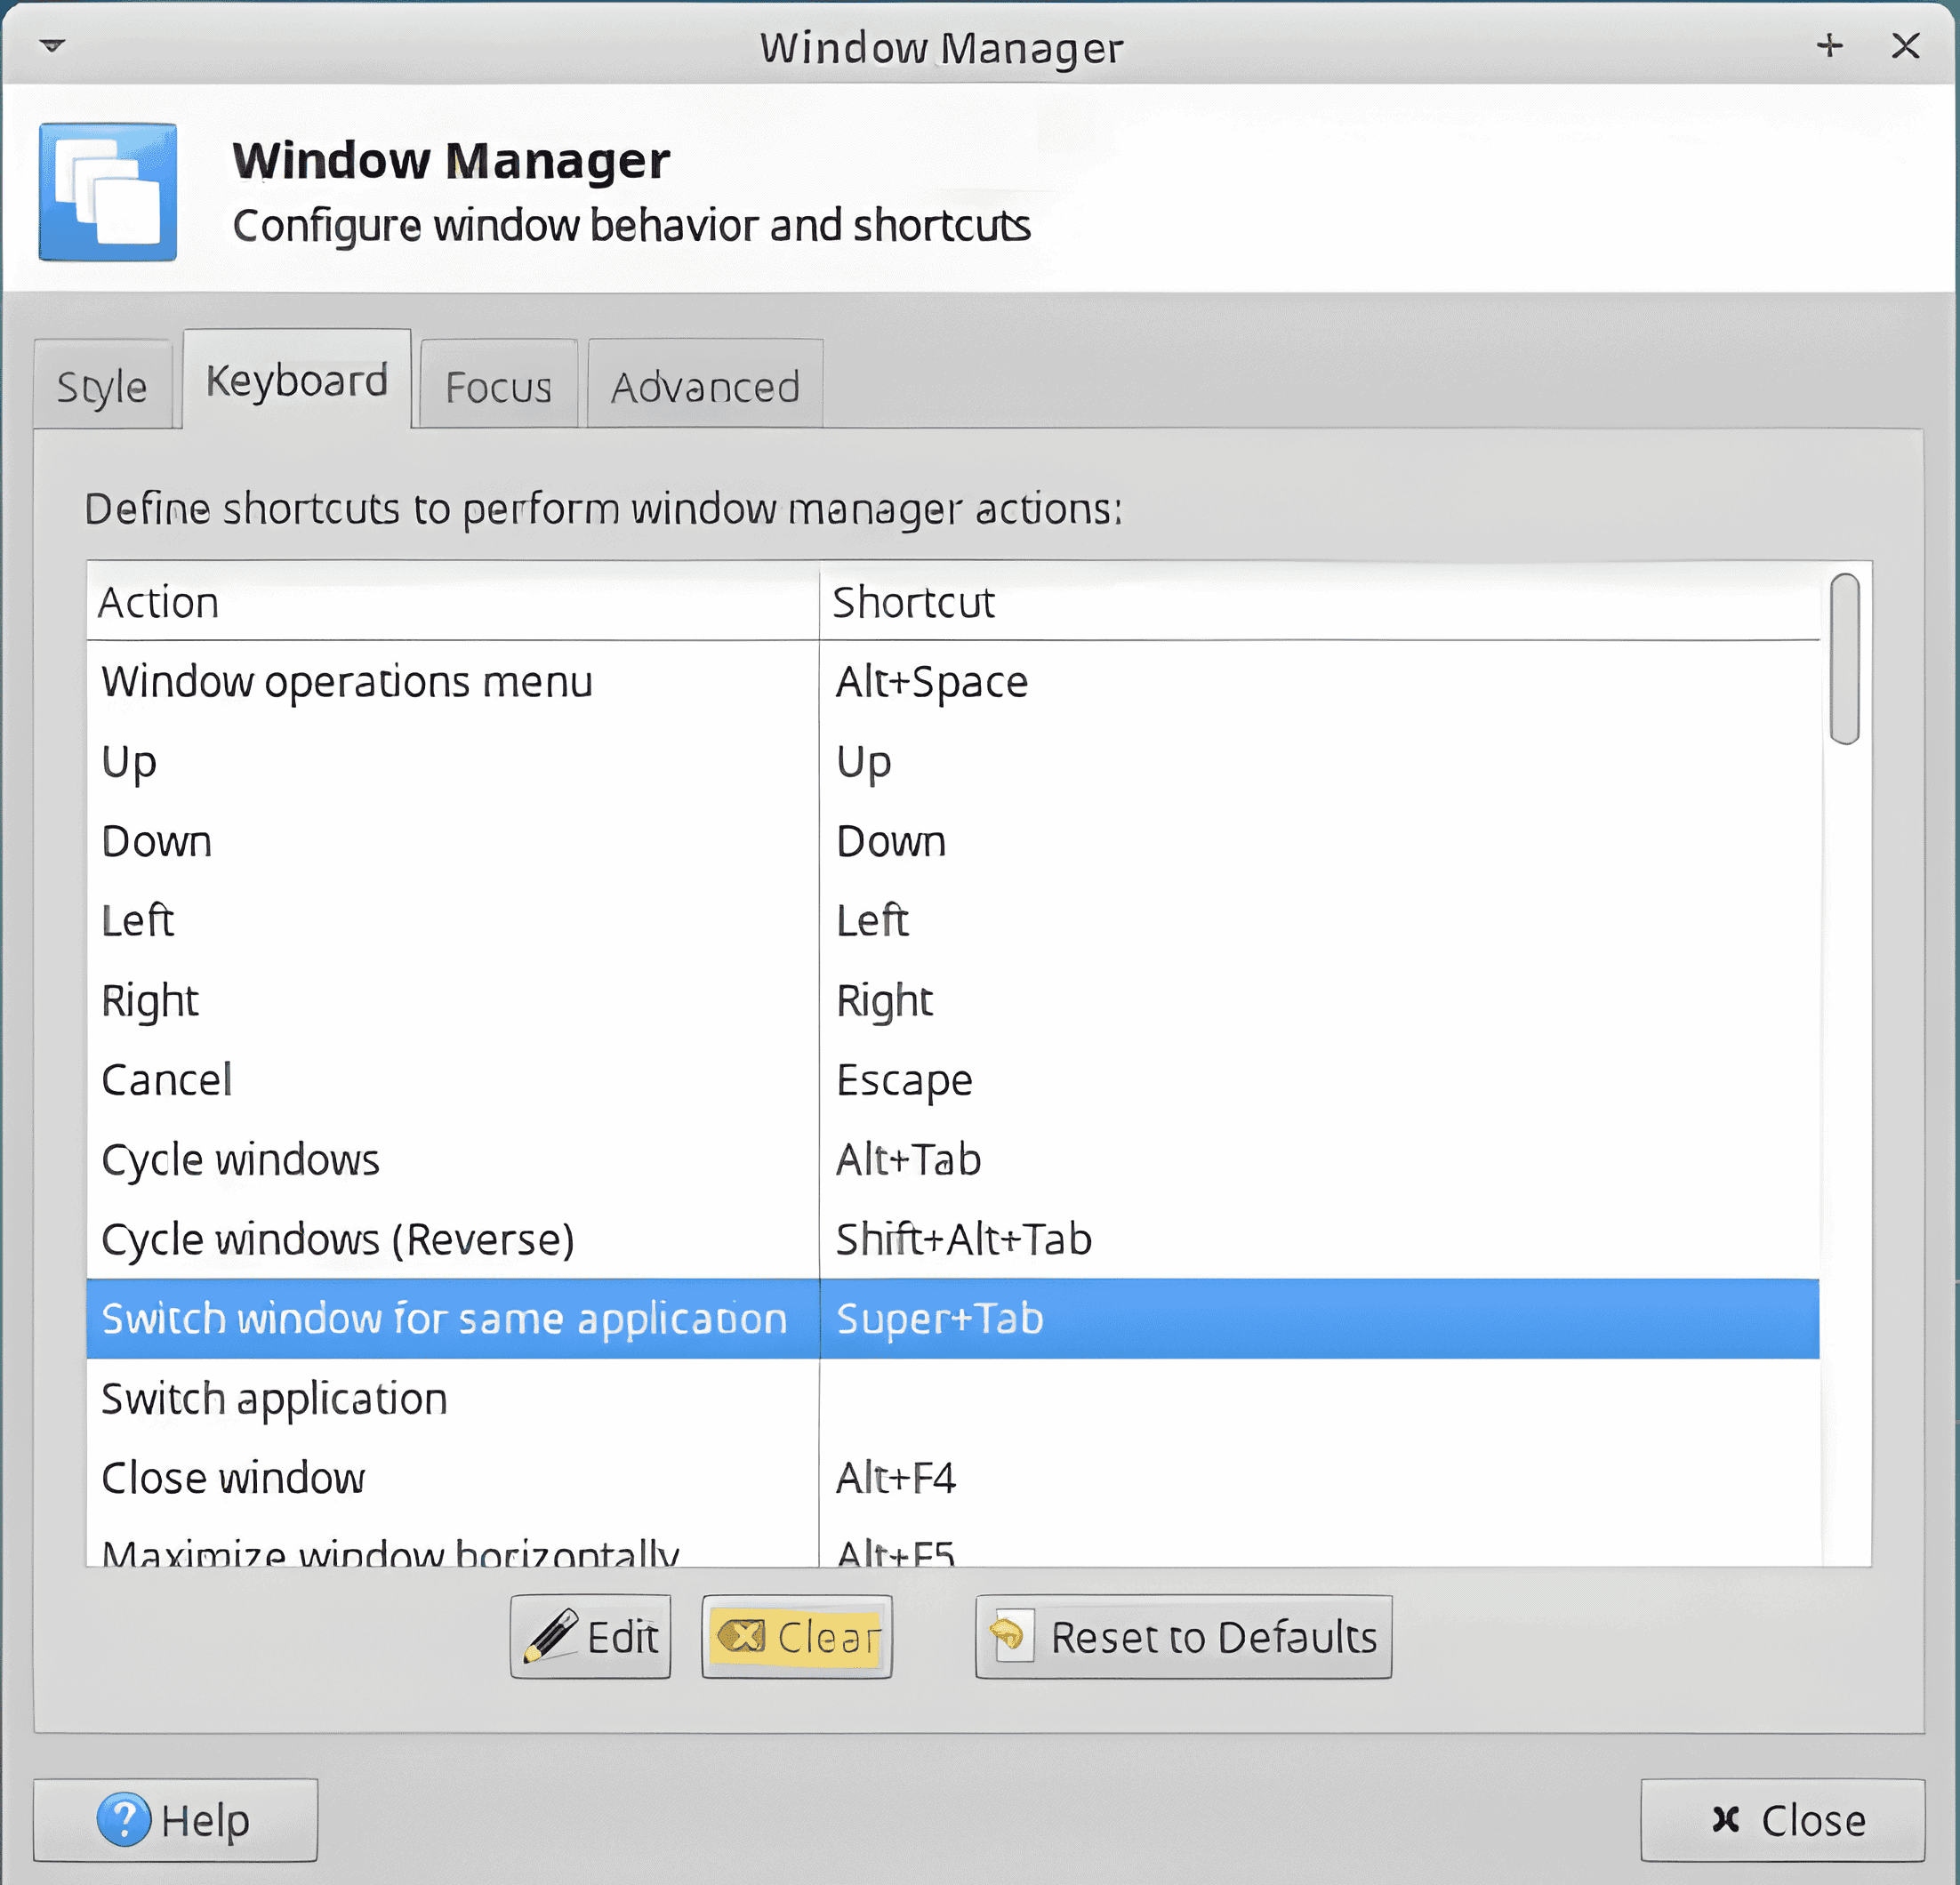
We can see that the highlighted Switch window for same application row has a key-binding using the tab key. We can simply select that setting and hit Clear at the bottom (highlighted in yellow) to release that key binding. This should solve the problem of autocomplete not working in Xfce environments.
7. Conclusion
Autocomplete is a very useful feature for modern terminals, as it helps prevent silly mistakes and makes the entire command writing experience faster. However, issues may arise due to incompatible shells, misconfigurations, or absent dependencies.
In this tutorial, we saw some common fixes for various terminal autocomplete issues. First, we learned about the shells that support autocomplete. Then, we looked into how to install those shells. Subsequently, we saw a specific example of installing autocomplete dependencies for bash and zsh. Lastly, we saw a simple fix for Xfce environments regarding its settings to make tab autocomplete work.