

Learn through the super-clean Baeldung Pro experience:
>> Membership and Baeldung Pro.
No ads, dark-mode and 6 months free of IntelliJ Idea Ultimate to start with.
Learn through the super-clean Baeldung Pro experience:
>> Membership and Baeldung Pro.
No ads, dark-mode and 6 months free of IntelliJ Idea Ultimate to start with.
As Linux users, we work a lot with terminals, and it can get tedious to work with text all the time. Thankfully, multiple programs are available to print ASCII artwork in the shell.
In this tutorial, we’ll have fun exploring different ways to render ASCII artwork on the terminal.
As the name suggests, we can use the banner command to show text banners in the terminal. This is the most straightforward way to render ASCII artwork.
banner doesn’t usually come installed with most Linux distributions and will have to be installed before we use it. For Ubuntu, we can use the following command to install it:
$ sudo apt install sysvbannerThe installation procedure can vary across distributions, and we must use the appropriate command and package name for the distribution we’ve got at hand.
We can get started straight away using the banner command followed by whatever text is to be printed:
$ banner hello

 #    #  ######  #       #        ####
 #    #  #       #       #       #    #
 ######  #####   #       #       #    #
 #    #  #       #       #       #    #
 #    #  #       #       #       #    #
 #    #  ######  ######  ######   ####
That’ll be it for banner. It doesn’t offer different fonts or other customization options.
For printing banners with more customization options, we can use the figlet command.
Figlet is not bundled with most distributions either, and we need to install it before use. For Ubuntu, we can use the apt command and install the figlet package:
$ sudo apt install figletThe easiest way to use figlet is to type the command followed by the text to be printed:
$ figlet hello
 _          _ _
| |__   ___| | | ___
| '_ \ / _ \ | |/ _ \
| | | |  __/ | | (_) |
|_| |_|\___|_|_|\___/
However, the best part about figlet is that it offers multiple options to tweak the output, which we’ll see in a second.
For starters, we can use the -f option and specify a font name for the output:
$ figlet -f mini hello

|_  _ || _
| |(/_||(_)
The mini font uses smaller letters to print the result. Next, we can use the -l, -c, and -r options to align the text to the left, center, or right, respectively:
$ figlet hello -c
                              _          _ _
                             | |__   ___| | | ___
                             | '_ \ / _ \ | |/ _ \
                             | | | |  __/ | | (_) |
                             |_| |_|\___|_|_|\___/
Another important option is -k, which enables kerning. This will print each letter individually, unlike the previous cases where they were stuck to each other:
$ figlet hello -k
 _            _  _
| |__    ___ | || |  ___
| '_ \  / _ \| || | / _ \
| | | ||  __/| || || (_) |
|_| |_| \___||_||_| \___/
figlet offers many more options, and we can read more about them on the man page by using man figlet.
After figlet, we must try the toilet command, which essentially works the same way figlet does but offers more options.
We first install toilet:
$ sudo apt install toiletPackage names and commands for other Linux distributions may vary.
toilet is essentially a figlet clone with additional features. That means we can use all the options we used with figlet earlier with toilet too. For example, we can print a banner with the mini font.
$ toilet -f mini hello

|_   _  | |  _
| | (/_ | | (_)
One of the significant additions toilet provides over figlet is the filters feature. We can use different filters to apply special effects to the text using the -F flag.
$ toilet -F border hello
┌───────────────────────────────────┐
│                                   │
│ #             ""#    ""#          │
│ # mm    mmm     #      #     mmm  │
│ #"  #  #"  #    #      #    #" "# │
│ #   #  #""""    #      #    #   # │
│ #   #  "#mm"    "mm    "mm  "#m#" │
│                                   │
│                                   │
└───────────────────────────────────┘
In the above example, we used the border filter to print the text with a rectangular border. To display the complete list of available filters, we can use the following command:
$ toilet -F list
Available filters:
"crop": crop unused blanks
"gay": add a rainbow colour effect
"metal": add a metallic colour effect
"flip": flip horizontally
"flop": flip vertically
"180": rotate 180 degrees
"left": rotate 90 degrees counterclockwise
"right": rotate 90 degrees clockwise
"border": surround text with a border
Some of these filters show colored output and will need a terminal that supports color.
As the name suggests, we can use the cowsay command to print an ASCII cow saying a customizable piece of text.
For Ubuntu:
sudo apt install cowsayFor other distributions, we need to use the appropriate package name with the package installer.
Using the cowsay command is as simple as typing the command followed by the text we want the cow to speak:
$ cowsay hello
 _______
< hello >
 -------
        \   ^__^
         \  (oo)\_______
            (__)\       )\/\
                ||----w |
|| ||We can customize the facial expression using different flags such as -g, -d, and -p for greedy, dead, and paranoid cows, respectively:
$ cowsay -d hello
 _______
< hello >
 -------
        \   ^__^
         \  (xx)\_______
            (__)\       )\/\
             U  ||----w |
                ||     ||
These flags essentially change the characters used for the eyes and the tongue of the cow. We can use any characters of our choice for the eyes and the tongue by using the -e and the -T flags, respectively:
$ cowsay -e oO -T V hello
 _______
< hello >
 -------
        \   ^__^
         \  (oO)\_______
            (__)\       )\/\
             V ||----w |
                ||     ||
We see that the custom characters are displayed in the eye and the tongue of the cow.
Apart from cows, the cowsay command also gives us other creatures to choose from. We can get the list of available creatures using the -l flag:
$ cowsay -l
Cow files in /usr/share/cowsay/cows:
apt bud-frogs bunny calvin cheese cock cower daemon default dragon
dragon-and-cow duck elephant elephant-in-snake eyes flaming-sheep fox
ghostbusters gnu hellokitty kangaroo kiss koala kosh luke-koala
mech-and-cow milk moofasa moose pony pony-smaller ren sheep skeleton
snowman stegosaurus stimpy suse three-eyes turkey turtle tux unipony
unipony-smaller vader vader-koala www
To use a particular “cow” file, we need to specify its name using the -f flag
cowsay -f duck hello
 _______
< hello >
 -------
 \
  \
   \ >()_
(__)__ _The fortune command is a fun Linux command that prints a random quote. Its output can be piped into the cowsay command to have the cow speak out a random quote:
$ fortune | cowsay
 ____________________________________
/ Try to relax and enjoy the crisis. \
|                                    |
\ -- Ashleigh Brilliant              /
 ------------------------------------
        \   ^__^
         \  (oo)\_______
            (__)\       )\/\
                ||----w |
                ||     ||
For fancy rainbow-colored output, we can use the lolcat command. To see how this works, we need to pipe the output of the cowsay command into lolcat:
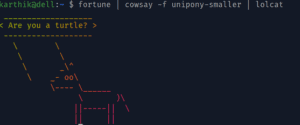
lolcat provides options to tweak the output, and these can be listed using lolcat –help.
The jp2a command prints a given input image as ASCII text.
For Ubuntu:
$ sudo apt install jp2aSame as before, for other distributions, the package name may be different, and we’ll have to use the appropriate package manager.
$ jp2a baeldung.png


                                      d.
                                   'kNM;
                               'l0MMMMMo
                       ::ldkKKMMMMMMMMM;
                  :dKNMMMMMMMMMMMKMMMMM.
                lNMMMMMMMMMMMMMO'MMMMMM
               xMMMMMMMMMMMMMMd kMMMMMO
              .MMMMMMMMMMMMMc  ;MMMMMM.
              KMMMMMMMMMMMk   ,MMMMMMk
              NMMMMMMMMMl   .KMMMMMMW
              KMMMMMMW     :MMMMMMMM
              xMMMMM.     0MMMMMMMM.
          ':dKMMK      .dNMMMMMMM.
      dKKMMMd        lKMMMMMMMN
                   .kWMMM0;
In the above example, we specify the image filename to be printed, and the command prints an ASCII character-filled version of the image. We can also use the –colors flag to obtain colored output.
In this tutorial, we looked at different ways to print ASCII artwork in the shell.
We used the banner, figlet, and toilet commands to print banners of text in different ways. Then, we explored the cowsay command to print text spoken out by a cow and other fancy creatures. We also looked at the jp2a to print images as ASCII characters on the shell. Further, we can use our creativity to combine these commands to create even fancier art, as we did by combining cowsay with fortune and lolcat.