

Yes, we're now running our only Summer Sale. All Courses are 30% off until 20th July, 2026:
Learn through the super-clean Baeldung Pro experience:
>> Membership and Baeldung Pro.
No ads, dark-mode and 6 months free of IntelliJ Idea Ultimate to start with.
1. Introduction
Many corporate environments use proxy servers to control their Internet traffic better. Proxy servers can cache Internet resources, reduce bandwidth needs by compressing data streams, and do advanced content-based web filtering. They can even improve privacy by masking metadata within the stream. Unfortunately, it’s hard to run Linux smoothly behind web proxies without messing with a lot of configuration. In this tutorial, we’ll take a look at the configurations needed to run and update Linux behind proxy servers.
2. What Is a Proxy Server?
A proxy server is a software solution that acts as an intermediary between clients and other service servers. Instead of reaching the servers directly, the clients must connect to the proxy server and ask it to forward their requests to the actual servers. The figure below shows the schematic of a regular Internet access proxy server, detailing how the connections compare with a non-proxied connection:  As we can see, the proxy relays messages between two connections, mimicking the actual server to the client.
3. Configuring Linux Proxy Clients
Of course, the configuration must take into account the type of proxy, its deployment style, and authentication requirements. Let’s review the more common scenarios.
3.1. Web Proxy Auto-Discovery
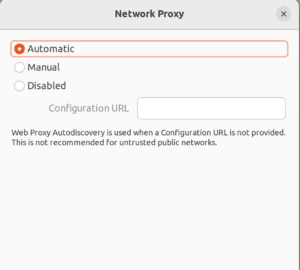
Many organizations seek easy-to-configure and deploy proxy systems. That’s when Web Proxy Auto-Discovery (WPAD) comes into place. It consists of a JavaScript-like Proxy Auto-config (PAC) file whose location is advertised. The advertisements can use DHCP or DNS. Linux only supports it using graphical interfaces. For instance, in Gnome, the current default GUI in Ubuntu, Debian, and Fedora, the Network Configuration applet allows configuring proxies: 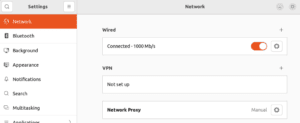 We can set up automatic proxying. We’ll need a Configuration URL only if our network doesn’t deploy it through DNS or DHCP:
Also, we can also input the proxies manually. If only the HTTP Proxy is entered, this proxy defaults to HTTPS and FTP services:
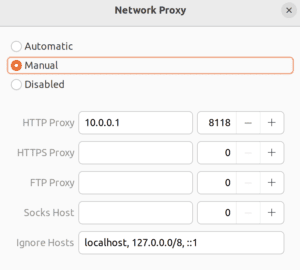
That configuration will be used for all clients, like Firefox, and Chrome/Chromium, that can use Gnome configuration settings. Moreover, in the case of manual configuration, it should create the proxy environment variables for legacy application compatibility. Auto-configuration, on the other hand, is not that easy: not all client software can understand, parse and execute PAC files. That’s actually a feature that most web browsers have, and that’s pretty much it. Another GUI configuration issue is that some settings only apply during login. Therefore, it’s recommended to log out and log in again.
3.2. Command-Line Applications, Proxy URIs, and Environment Variables
Many command-line (and some GUI) applications, look for environment variables to check proxy requirements to gain Internet access. These variables are defined in the format “VARIABLE=Proxy URL“:
<Schema>://[<user>[:<password>]@]<Host|IP address>[.<Domain>]:<Port>/Let’s look at an example:
$ http_proxy="http://myproxy.mydomain:3128/"
$ https_proxy="http://myproxy.mydomain:3128/"
$ ftp_proxy="http://myproxy.mydomain:3128/"
$ no_proxy="localhost,127.0.0.0/8,::1,*.mydomain"
$ export http_proxy https_proxy ftp_proxy no_proxy
Here’s how we’d do it for Socks proxy:
$ socks_proxy="socks://mysocksproxy.mydomain:1080"
$ export socks_proxy
We should note that some very old commands expect those variables to be in uppercase. So, sometimes, we must define both forms in lower and upper cases. To globally persist environment variables, we can add their definitions to the /etc/environment file.
4. Special Cases
Unfortunately, many applications can’t use the proxy variables or the Gnome settings. Even though their numbers are lowering, depending on the version, and proxy type, we must do additional configuration. Besides, there are no standard environment variables for auto-configurations, and even if there were, the applications would need to parse and run the Javascript-like PAC files. Moreover, when configuring servers, most of the time, we don’t install any graphical user interfaces. This spares valuable resources and reduces the risk surface. As a best practice, it’s recommended to only use the software on a server that’s essential to the task at hand. Those are some of the reasons that even in the best cases, sometimes we might need to go a little further. In that sense, we’ll now review some of the applications that may require special settings.
4.1. APT
In recent versions, APT (advanced package tool), the default Debian-based Linux (such as Ubuntu) package manager, should use proxy environment variables. However, with older versions or proxy autoconfiguration, we’ll need to configure it. To do so, we must add a new file to the /etc/apt/apt.conf.d directory. APT reads this directory to gather additional options, so let’s create a file named /etc/apt/apt.conf.d/90proxy.conf using the proxy URL:
Acquire::http::Proxy "http://USERNAME:PASSWORD@SERVER:PORT";
Acquire::https::Proxy "https://USERNAME:PASSWORD@SERVER:PORT";
Let’s look at the same for Socks proxy:
Acquire::http::proxy "socks5h://USERNAME:PASSWORD@SERVER:PORT";
Acquire::https::proxy "socks5h://USERNAME:PASSWORD@SERVER:PORT";
We should note that APT only supports Socks version 5. The trailing ‘h‘ on the proxy schema is to force the use of the Socks proxy server’s own DNS resolution. If our Socks server is unsupported, we can work around it using proxy wrappers such as tsocks or proxychains.
4.2. DNF and YUM
On RedHat-based Linux (Centos, Fedora), both DNF and its legacy brother YUM packet managers may use, in their recent versions, the proxy environment variables. However, there are cases in which we must configure them directly (Web Proxy Auto-Discovery, for instance). To configure DNF, we add the proxy configuration to the [main] section of the /etc/dnf/dnf.conf file:
# For HTTP proxy
proxy=http://SERVER:PORT
# For Socks proxy
proxy=socks5h://SERVER:PORT
# If authentication is required:
#proxy_username=USERNAME
#proxy_password=PASSWORD
#proxy_auth_method=basic | digest | negotiate | ntlm
Being much newer, DNF has better support for proxy protocols and authentication schemes than YUM. Anyway, if our server only has YUM, we can configure it by adding the proxy configuration to the /etc/yum.conf file:
proxy=http://SERVER:PORT
proxy_username=USERNAME  # only if authentication is required
proxy_password=PASSWORD
Newer YUM versions may support Socks version 5 proxy. So we could use:
proxy=socks5h://USERNAME:PASSWORD@SERVER:PORT
proxy_username=USERNAME  # only if authentication is required
proxy_password=PASSWORD
However, YUM only supports basic authentication. Any different schemas must use wrapper applications such as tsocks or proxychains.
4.3. Snap
Once again, Snap, the default application store for Ubuntu and many other distributions, should work with the environment variables. However, as its daemon is instantiated way before the variables are set, this may fail. Then, we might need to configure it directly. We can use the following commands to do that:
$ sudo snap set system proxy.http=http://SERVER:PORT
$ sudo snap set system proxy.https=http://SERVER:PORT
Or, for Socks proxies we can use:
$ sudo snap set system proxy.http=socks5h://SERVER:PORT
$ sudo snap set system proxy.https=socks5h://SERVER:PORT
Another alternative that may work for other services started at the boot is to add the environment variable to their systemd definitions:
$ sudo systemctl edit snapd.serviceThis opens the definition file, where we can add the variables:
[Service]
Environment="http_proxy=http://USERNAME:PASSWORD@SERVER:PORT"
Environment="https_proxy=http://USERNAME:PASSWORD@SERVER:PORT"
Then we must reload the daemon and restart the unit:
$ sudo systemctl daemon-reload
$ sudo systemctl restart snapd.service
4.4. Docker
Finally, Docker is a special case. First, we must configure its daemon to use proxies so it can go to any external hub service to download images and containers whenever we are building or running containers. Then, if any container requires Internet access to work, we must ensure that it will use the required proxies by adding respective environment variables to its environment.
5. Wrapper Applications to “Fix” Proxy-Incompatible Applications
And what if the application doesn’t support any proxy at all? Fortunately, there’s wrapper software that can intercept the connection, injecting its own code. By doing this, it’s possible to fool the incompatible application. Instead of opening direct connections, they’re relayed to the proxy. Let’s review the more common wrapper applications.
5.1. Tsocks
Tsocks is a wrapper application to make other applications work with Socks proxy servers. To configure it, we must create a /etc/tsocks.conf file like this one:
# We can access 192.168.0.* directly
local = 192.168.0.0/255.255.255.0

# Otherwise we use the server
server = SERVER
port = PORT
type = 5  # The default is socks server type 4

# If server requires authentication
default_user = USERNAME
default_pass = PASSWORD
To use it, we just call the command tsocks using the incompatible application name and arguments as parameters. Let’s see an example:
tsocks telnet remotehostThis encapsulates the Telnet connection through our Socks proxy server.
5.2. Proxychains
Proxychains is quite similar. However, it supports not only Socks proxy servers, but HTTP proxies as well. Again, we add the parameters to its configuration file /etc/proxychains.conf. For example, let’s add the parameters for a simple HTTP authenticated proxy falling back to a Socks proxy server:
# Will use the first online proxy on the proxyList
dynamic_chain

# Proxy DNS requests - no leak for DNS data
proxy_dns

# By default enable localnet for loopback address ranges
# RFC5735 Loopback address range
localnet 127.0.0.0/255.0.0.0

# ProxyList format
#       type  host  port [user pass]
#
#       proxy types: http, socks4, socks5, raw
#        * raw: direct connection
[ProxyList]
http	SERVER1 PORT USERNAME PASSWORD
socks5	SERVER2 9050
And then, we execute the command using the target application and arguments as parameters:
proxychains telnet remotehost6. NTLM Authentication
Next, let’s consider the case when the application doesn’t support the proxy server authentication scheme. That’s expected, for instance, if the proxy server uses proprietary or non-standard authentication methods, like Microsoft NTLM. In that case, we’ll need to configure an intermediary proxy server. Cntlm is one such proxy server. We can set it up as a front-end to an NTLM back-end proxy server. To configure we must first calculate the authentication hashes:
$ sudo cntlm -H -d DOMAIN -u USERNAMEIt will ask for the user’s password and return three types of hash- one for each NTLM version up to version 2. Usually, we’ll use the PassNTLMv2. Let’s add the following to the /etc/cntlm.conf file:
Username USERNAME
Domain DOMAIN
Proxy IP1:PORT
Proxy IP2:PORT
Password PassNTLMv2_Hash
Ideally, we must avoid using NTLM. But if we can’t, we must ensure that no one besides the cntlm daemon user can read the hash. Also, while NTLMv2 is far from being secure, version 1 is even worse. It’s almost as bad as plaintext passwords. That’s why Microsoft currently recommends Kerberos authentication as a single sign-on alternative to NTLM. As for the client, we just configure our system or application to use cntlm as its proxy. It responds by default, as an HTTP proxy on port 3128. It can act as a Socks proxy server as well.
7. Conclusion
In this article, we saw that while configuring a proxy server should be very simple, it can have many different scenarios. However, as proxy servers are invaluable tools for enterprise network security, many organizations rely on them to reduce their risks. In organizations where the platform of choice is not Linux, configuring a Linux desktop, and even a server, can be tough. For this reason, understanding how proxies work and the most diverse configuration options they provide is very important. Then, system administrators and users can properly run and update Linux behind proxy servers.