Learn through the super-clean Baeldung Pro experience:
>> Membership and Baeldung Pro.
No ads, dark-mode and 6 months free of IntelliJ Idea Ultimate to start with.
Last updated: May 6, 2025

Learn through the super-clean Baeldung Pro experience:
>> Membership and Baeldung Pro.
No ads, dark-mode and 6 months free of IntelliJ Idea Ultimate to start with.
More often than never, as system administrators, we invariably manage different types of servers remotely. Executing a script on remote machines becomes the fundamental requirement for effective server management. Notably, there’re only a few majorly used remote management tools to get the data from remote servers. These are extensively employed in the management of hundreds of remote servers for easy orchestration.
This tutorial will expound on the easiest ways of executing the scripts on a remote machine, considering both Linux and Windows as the local machine.
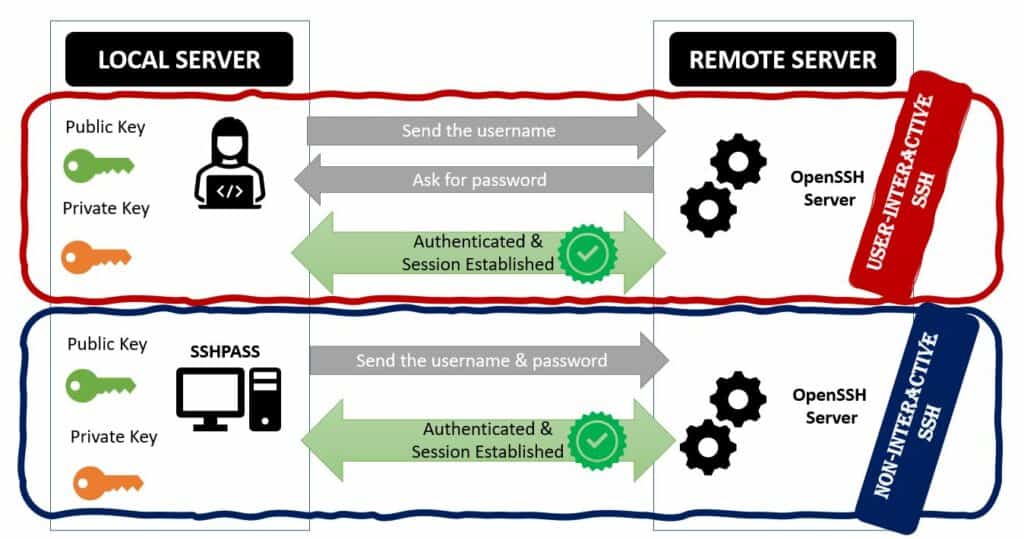
SSH stands for Secure Shell, is a cryptographic network protocol that runs at layer 7 of the OSI model for secure network services over the insecure network. It runs over the TCP port 22 with SSHv2 as its latest version.
It has many interesting features like running a command on the remote servers, port forwarding, tunneling, and more. Initially, the client starts the negotiation with the server. Then, the server further sends its public exchange key to invoke the channel and negotiate the other parameters. After successful negotiations, it displays the login prompt of the server host operating system. Further on, the end-to-end data transfer takes place in encrypted form.
Here, we’re going to use the SSH module for executing the scripts on the remote machines.
For the sake of illustration, we use the below BASH script throughout this article. It extracts the basic details of the remote machine like hostname, IP address, date, and current user id:
#!/bin/bash
echo "CURRENT TIME = "`date`
echo "HOSTNAME = "`hostname`
echo "USER id = "`whoami`
echo "IP ADDRESS = "`ip a s enp0s3 | grep "inet " | cut -f6 -d" "`
First, the command will log in into the remote box using SSH, and then it executes the bash command in the Shell. The “s” option of bash helps to read the executable command from the standard input:
local-machine# ssh [email protected] 'bash -s' < get_host_info.sh
[email protected]'s password:
CURRENT TIME = Sun Oct 3 18:29:38 IST 2021
HOSTNAME = REMOTE-SERVER
USER id = tools
IP ADDRESS = 192.168.56.103/24Needless to mention, it would be burdensome to type the password every time, in such a case, use the sshpass package and pass the credentials in line with the command. It is a flying hack that proffers an easy way of accessing the remote box:
local-machine# sshpass -vvv -p Baels@123 ssh [email protected] 'bash -s' < get_host_info.sh
SSHPASS searching for password prompt using match "assword"
SSHPASS read: [email protected]'s password:
SSHPASS detected prompt. Sending password.
SSHPASS read:
CURRENT TIME = Sun Oct 3 18:42:23 IST 2021
HOSTNAME = REMOTE-SERVER
USER id = tools
IP ADDRESS = 192.168.56.103/24
local-machine#
In the above verbose snippet, the sshpass is searching for the password pattern (without P/p – “assword”) where it supplies the password to the ssh prompt. To provide the password from the file, we can use the “-f” option of sshpass. It supports ssh by providing the password but nevertheless, it cannot supplant the ssh command:
plink is the open-source freely available SSH client for Windows platforms. It is the most secure, clean, and convenient method for automating SSH actions on remote machines. By default, it uses SSH protocol to manage the UNIX machines remotely. But besides, it also has other options like telnet, rlogin, raw and serial. Most importantly, plink is flexible enough to integrate easily with Windows batch scripts that execute the scripts remotely through SSH.
Without any further ado, let’s get into action.
Here, for the sake of explanation, we have deployed a plink 0.62 release:
C:\Users\baeldung.01\Downloads>.\plink -V
plink: Release 0.62
The get_host_info script is placed in the local Windows machine, as shown below:
C:\Users\baeldung.01\Downloads>dir | findstr get_host_info
03-10-2021 03:49 166 get_host_info.shFor better elucidation, let’s get the verbose output of the command using the option -v. Here, we force the communication protocol as SSH and give the script name under the option -m:
C:\Users\baeldung.01\Downloads>.\plink.exe -v -ssh [email protected] -m get_host_info.sh
Looking up host "192.168.56.103"
Connecting to 192.168.56.103 port 22
Server version: SSH-2.0-OpenSSH_7.6p1 Ubuntu-4ubuntu0.5
Using SSH protocol version 2
We claim version: SSH-2.0-PuTTY_Release_0.62
...
output truncated
...
Firstly, it begins with the layer 3 IP reachability checks and establishes the session using port number 22. Secondly, SSH version 2 is the preferred version after successful version negotiations:
...
output truncated
...
Using Diffie-Hellman with standard group "group14"
Doing Diffie-Hellman key exchange with hash SHA-1
Host key fingerprint is:
ssh-rsa 2048 1e:77:e1:d2:eb:32:6b:b1:f9:cb:72:fe:ef:e6:a6:24
Initialised AES-256 SDCTR client->server encryption
Initialised HMAC-SHA1 client->server MAC algorithm
Initialised AES-256 SDCTR server->client encryption
Initialised HMAC-SHA1 server->client MAC algorithm
Thirdly the Diffie-Hellman key exchange algorithm is used for exchanging the cryptographic keys between two machines. Further on, communication is fully encrypted using AES-256 and HMAC-SHA1 algorithms.
...
output truncated
...
Using username "tools".
[email protected]'s password:
Sent password
Access granted
Lastly, we have to provide the password to authenticate the session. Now, plink launches the subshell in the remote machine for executing the get_host_info.sh in our local Windows machine:
...
output truncated
...
Opened channel for session
Started a shell/command

CURRENT TIME = Sun Oct 3 15:32:40 IST 2021
HOSTNAME = REMOTE-SERVER
USER id = tools
Server sent command exit status 0
IP ADDRESS = 192.168.56.103/24
Disconnected: All channels closed
Obviously, it will be tedious to type the password at all times. Hence, plink supports the inline password feature using the option -pw. The option -pw in unison with the option -m bolsters its faster integration with Windows batch scripts for better management of remote servers:
C:\Users\baeldung.01\Downloads>.\plink.exe [email protected] -m get_host_info.sh -pw Baels@123

CURRENT TIME = Sun Oct 3 03:49:18 IST 2021
HOSTNAME = REMOTE-SERVER
USER id = tools
IP ADDRESS = 192.168.56.103/24Usually, expect scripting in Linux enables the automation of multiple CLI terminal-based processes. To better assimilate, let’s write an expect the program to run a script in the remote machine from the localhost.
A simple expect script is explained below that login to the remote box first, copies the script from the source to the remote machine, and subsequently executes it:
#!/usr/bin/expect
set timeout 60
spawn ssh [lindex $argv 1]@[lindex $argv 0]
expect "*?assword" {
    send "[lindex $argv 2]\r"
    }
expect ":~$ " {
    send "
        mkdir -p /home/tools/baeldung/auto-test;
        cd /home/tools/baeldung/auto-test;
        tree
        sshpass -p 'Baels@123' scp -r [email protected]:/home/tools/cw/baeldung/get_host_info.sh ./;
        tree
        bash get_host_info.sh\r"
    }
expect ":~$ " {
    send "exit\r"
    }
expect eof
Apply the executable permissions on the created expect program using the chmod command. The credentials and IP address of the remote box are the input arguments to the program:
local-machine# chmod 755 get_host.exp
local-machine# ./get_host.exp "localhost" "tools" "Baels@123"
local-machine#
In the first step, it spawns a new ssh session with the remote server. Depending on the CLI pattern, it sends the password for successful login. The program creates the test environment by creating a directory and copying the main script from the source machine. Here, sshpass is used to send the password inline to the scp command for copying the main script. The program executes the copied get_host_info.sh using the BASH command in the remote box. Finally, it safely terminates the communication channel using the exit command:
local-machine# ./get_host.exp "192.168.56.103" "tools" "Baels@123"
spawn ssh [email protected]
[email protected]'s password:
..
..
Last login: Mon Oct  4 12:19:02 2021 from 10.45.67.11
remote-machine# mkdir -p /home/tools/baeldung/auto-test;
remote-machine# cd /home/tools/baeldung/auto-test;
remote-machine# ls -ltrh
total 0
remote-machine# sshpass -p 'Baels@123' scp -r [email protected]:/home/tools/cw/baeldung/get_host_info.sh ./;
remote-machine# ls -ltrh
total 4.0K
-rw-rw-r-- 1 tools tools 168 Oct  4 12:20 get_host_info.sh
remote-machine# bash get_host_info.sh
CURRENT TIME = Mon Oct 4 12:20:42 IST 2021
HOSTNAME = REMOTE-SERVER
USER id = tools
IP ADDRESS = 192.168.56.103/24
remote-machine# exit
logout
Connection to localhost closed.
local-machine#
As a useful tip, we can also add a couple of clean-up commands like rm, mv to make the destination clean after proper exiting.
In this article, we saw how to run the scripts in remote machines through SSH.
We learned the usage of commands like ssh for the Linux variant and plink for the Windows variant machines for remote server management. So, plink basically acts as a wrapper on top of SSH, where the installer is available for different OS platforms.
Additionally, we saw the usage of expect scripts to accomplish the same. However, expect scripts have flexible and customizable options and hence, its usage is generally advised for custom or complex transactions between the servers.