

Yes, we're now running our only Summer Sale. All Courses are 30% off until 20th July, 2026:
How to Remove Personal Package Archives (PPAs)
Last updated: March 18, 2024
Learn through the super-clean Baeldung Pro experience:
>> Membership and Baeldung Pro.
No ads, dark-mode and 6 months free of IntelliJ Idea Ultimate to start with.
1. Overview
Sometimes, we add PPAs to our Ubuntu systems to install packages unavailable in the official repositories. Over time, these PPAs might be ditched and simply deleted. Therefore, we’ll get all kinds of errors when installing and updating packages, thereby introducing clutter and, possibly, security issues.
In this tutorial, we’ll learn how to remove PPAs from Ubuntu-based distributions. First, we’ll remove the PPAs manually to get a good understanding of the process. Afterward, we’ll use several utilities to delete the PPAs quickly and easily.
2. Removing a PPA Manually
On Ubuntu-based distributions, PPAs are added as repositories. Usually, they’re put in the /etc/apt/sources.list file and inside the /etc/apt/sources.list.d/ directory.
As an example, let’s examine this whole process by adding the NeoVim PPA:
$ sudo add-apt-repository ppa:neovim-ppa/unstableOnce we add the PPA, apt automatically updates the package index cache. In the next sections, we’ll manually remove the PPA from the system.
2.1. Identifying the PPA
We know that PPAs are added as sources to /etc/apt/sources.list.d. We’ll now list the items inside /etc/apt/sources.list.d:
$ ls -lh /etc/apt/sources.list.d/
total 4
-rw-r--r-- 1 root root 158 Aug 20 19:32 neovim-ppa-ubuntu-unstable-lunar.list
In this file, there are the sources from which the NeoVim source code and binaries can be downloaded:
$ cat neovim-ppa-ubuntu-unstable-lunar.list
deb https://ppa.launchpadcontent.net/neovim-ppa/unstable/ubuntu/ lunar main
# deb-src https://ppa.launchpadcontent.net/neovim-ppa/unstable/ubuntu/ lunar main
Similarly, there will be a lot of files for different PPA repositories. So, we should first make sure that we’re deleting the right repository.
2.2. Removing the PPA
We can simply use rm to delete the respective source list:
$ sudo rm -rf /etc/apt/sources.list.d/neovim-ppa-ubuntu-unstable-lunar.listThen, we uninstall the associated packages as well:
$ sudo apt remove --purge neovim -y2.3. Removing the Associated Keys
In addition, we can also remove the key that is associated with the PPA. This is entirely optional. However, doing so causes less clutter and possibly makes maintenance easier. Moreover, it’s also a good security practice.
So, let’s find out the associated key for the NeoVim Unstable PPA:
$ sudo apt-key list
...
/etc/apt/trusted.gpg.d/neovim-ppa-ubuntu-unstable.gpg
-----------------------------------------------------
pub   rsa4096 2014-12-11 [SC]
      9DBB 0BE9 3669 64F1 3485  5E22 55F9 6FCF 8231 B6DD
uid           [ unknown] Launchpad PPA for Neovim PPA Team
...
In the same way, let’s remove the .gpg file in the given directory:
$ sudo rm -rf /etc/apt/trusted.gpg.d/neovim-ppa-ubuntu-unstable.gpg
As a final step, we’ll update the package index cache:
$ sudo apt updateAnd that’s it! In the next sections, we’ll look at more convenient ways to remove PPA repositories.
3. add-apt-repository
add-apt-repository is a helper utility that lets us add new PPA repositories to the list of sources.
Similarly, it also enables us to remove the PPA repositories:
$ sudo add-apt-repositories --remove -n "ppa:neovim-ppa/unstable"Here’s a breakdown:
- –remove removes the PPA repository from the sources list
- -n disables the updating of the package index cache after the operation
- “ppa:neovim-ppa/unstable” is the canonical name of the PPA
Additionally, we should put quotes around the PPA name to escape the special characters.
4. ppa-purge
ppa-purge works similar to the –remove option of add-apt-repository. However, besides the repository sources, it also removes the packages and additional configurations associated with the PPA.
It’s available on the official package repository. Therefore, we can install it with a package manager under its canonical name, ppa-purge:
$ sudo apt install ppa-purge -yOnce installed, let’s verify it:
$ whereis ppa-purge
ppa-purge: /usr/sbin/ppa-purge /usr/share/man/man1/ppa-purge.1.gz
Now, we’ll use it to remove the PPA as well as the installed package(s):
$ sudo ppa-purge "ppa:neovim-ppa/unstable"Once we run the command, it removes the sources and the packages. Finally, it updates the package cache index.
We should keep in mind that ppa-purge only removes those packages that are installed from the PPA and doesn’t remove the packages installed from the official package repositories. Therefore, we should use apt to remove those packages if required.
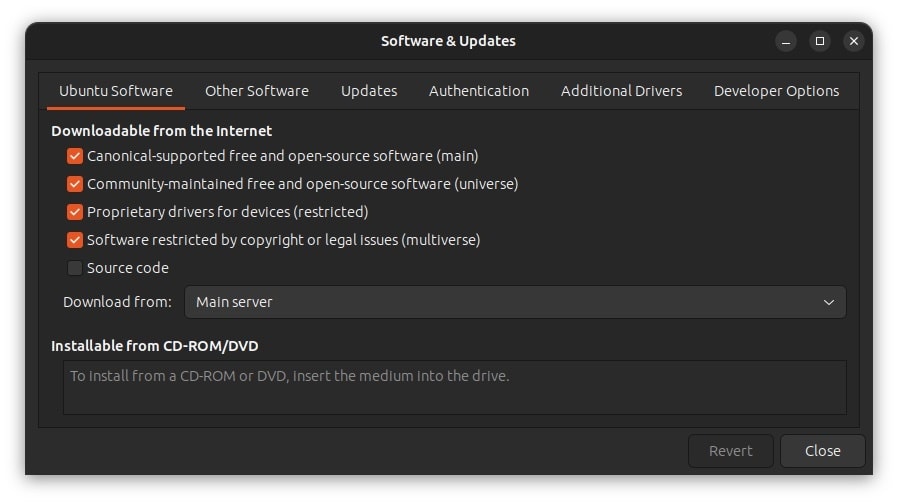
5. GUI: Ubuntu Software Center
Ubuntu Software Center provides a more ergonomic approach to managing packages on Ubuntu-based distributions. By default, it’s installed on all Ubuntu distributions.
In addition, it also lets us manage the software sources. It can be done through the “Software & Updates” tool, which is a part of the Ubuntu Software Center:
We can launch Software & Updates from the application launcher. Once the window is opened, we head over to the “Other Software” tab. It lists the repository sources:
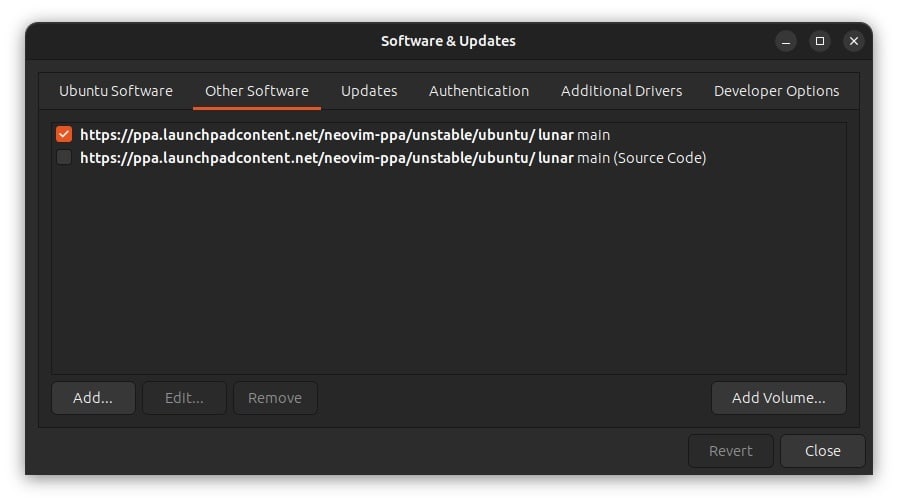
From the list, let’s select the sources and press the “Remove” button to delete them. It prompts us for the password. Upon successful authentication, it removes the sources.
In addition, we can also press the “Revert” button to undo the changes. Notably, this option is available for as long as we have the tool running. Moreover, if we need to disable the repositories, we can simply uncheck the sources from the list.
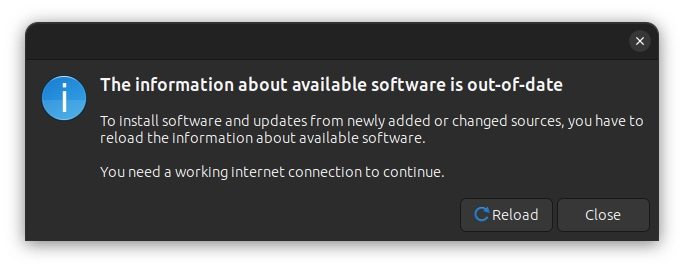
Once we’re done, we press the Close button and then the “Reload” button to update the package index cache:
6. Conclusion
In this article, we learned how to remove the PPA repositories from Ubuntu-based distributions. First, we adopted a manual approach to removing the repositories. Then, we used the add-apt-repository built-in and the ppa-purge utility to completely remove the PPA repositories.
Finally, we discussed the Software & Updates utility to remove the PPAs in a more convenient way.