

Yes, we're now running our only Summer Sale. All Courses are 30% off until 20th July, 2026:
Learn through the super-clean Baeldung Pro experience:
>> Membership and Baeldung Pro.
No ads, dark-mode and 6 months free of IntelliJ Idea Ultimate to start with.
1. Introduction
Photo scanning tools are indispensable for digitizing physical images and documents on Linux. Furthermore, these tools cater to a wide range of users, from basic scanning to advanced image editing.
In this tutorial, we’ll explore some notable photo scanning tools and their features on Linux.
Firstly, we’ll discuss GIMP, a comprehensive image manipulation program that includes scanning functionality. Transitioning to dedicated scanning applications, we’ll cover SimpleScan, and Skanlite.
2. GIMP
GIMP, the GNU Image Manipulation Program, is renowned for its robust image editing capabilities, but it also facilitates scanning directly from compatible scanners. Let’s delve into its installation process, usage, and key features.
2.1. Installation
Installing GIMP on Linux is straightforward. Further, most distributions include it in their software repositories, allowing users to install it using their package manager. We install GIMP using the apt utility.
Firstly, let’s update the repository information on the machine using the update command with the APT package manager:
$ sudo apt updateSecondly, we install the GIMP using the install subcommand:
$ sudo apt install gimpLastly, we confirm the installation by checking the version:
$ gimp --version
GNU Image Manipulation Program version 2.10.36
The output verifies a successful installation of GIMP on the system. Furthermore, the displayed information provides details about the installed version of GIMP (version 2.10.36).
Once the installation is complete, let’s start using GIMP for photo scanning.
2.2. Setting up Scanner
Before scanning, we need to ensure we have a TWAIN-compliant scanner. If not, we can check our scanner manufacturer’s website for TWAIN-compliant software updates. Once ready, we can connect our scanner to the computer and power it on.
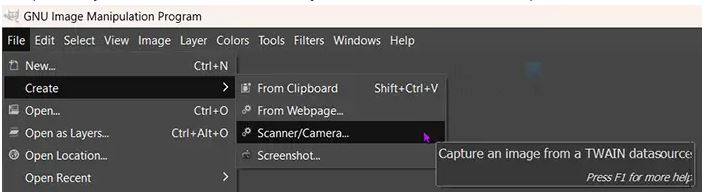
This image is part of an article in thewindowsclub (source). To begin, let’s launch GIMP and navigate to File, then Create, and finally Scanner/Camera. This action will prompt a Select source window to appear, listing available scanners. From there, we can choose our scanner and click Select.
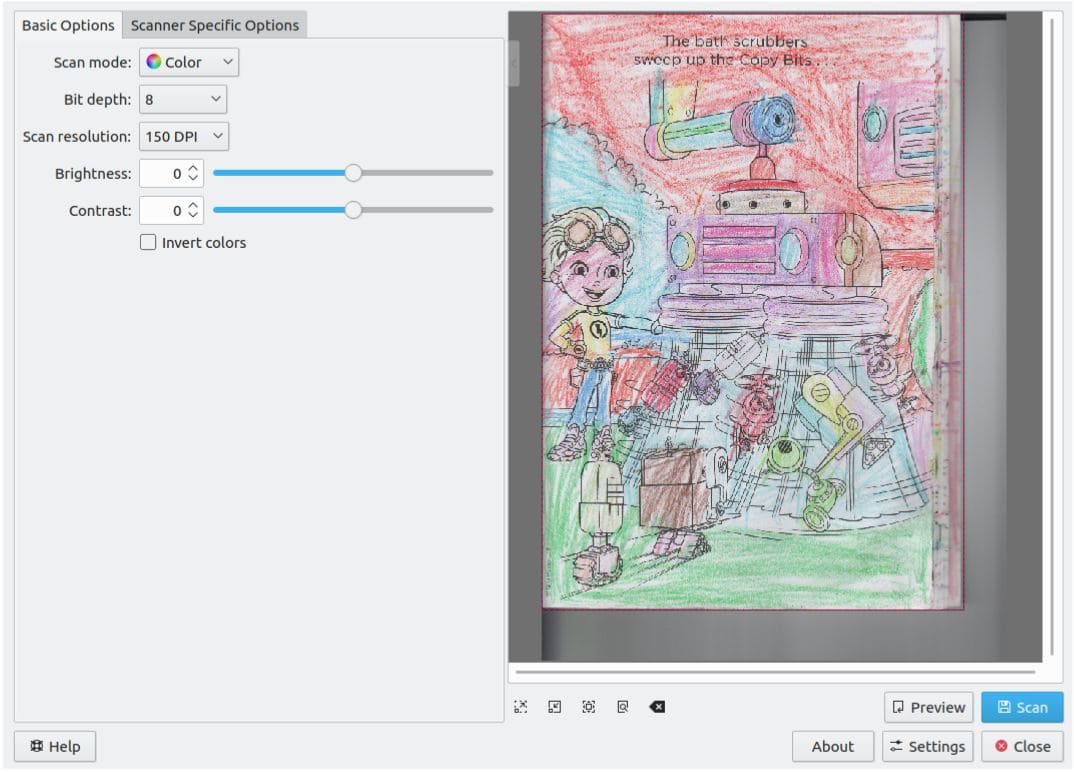
Upon selecting the scanner, a setup page will emerge, allowing adjustments to scan settings. Further, we can modify parameters like scan resolution to suit our preferences.
2.3. Capturing an Image
After setting up the scanner in GIMP, capturing an image is a straightforward process. First, let’s preview the image to ensure proper alignment and settings. Next, we can click on the Preview button within the scanning interface to get a preview image. If satisfied, we can proceed by clicking Start to initiate the scan. The scanned image will appear in GIMP. Further, after scanning, we navigate to File, then click on Save.
2.4. Features
GIMP offers a wide range of features which include:
- allows users to connect directly to TWAIN-compliant scanners, enabling seamless scanning of physical images and documents
- comprehensive set of tools that facilitates professional-level photo retouching, image composition, and authoring tasks
- functionality can be extended through plugins and extensions, allowing users to customize and enhance its capabilities according to their specific needs and preferences
- open-source and cross-platform, accessible on various operating systems, including Linux, Windows, and macOS, making it a versatile choice for users across different platforms
Overall, GIMP stands out as a versatile and powerful image scanning software, offering a wide array of features to meet the diverse needs of users.
3. SimpleScan
Simple Scan is a straightforward yet powerful scanning tool designed for Linux systems. Additionally, it offers an intuitive interface and essential scanning features suitable for both casual users and professionals. Let’s explore how to install Simple Scan and its key features.
3.1. Installation
Simple Scan can be installed using the APT package manager:
$ sudo apt install simple-scanAfter the installation is complete, SimpleScan is ready to use.
3.2. Initiating Scan
Once the installation is complete, we launch SimpleScan using the simple-scan command:
$ simple-scanAlternatively, we run it through the application menu. In this case, it will initiate a search for the scanner process. Then, it will select the scanner available.
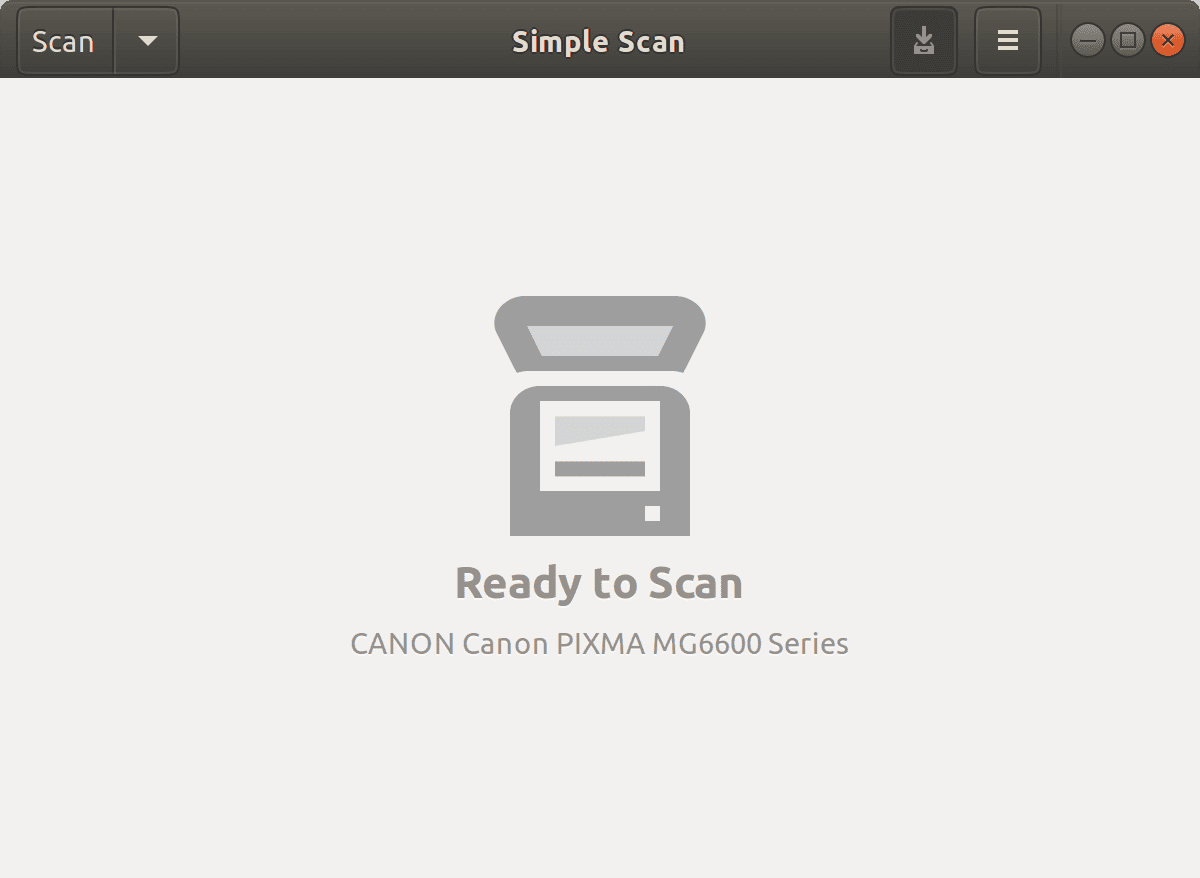
This image is part of snapcraft documentation on simple scan installation (source). Upon opening Simple Scan, we can place an image we want to scan and click on the Scan button. Additionally, The interface of SimpleScan comes with a clean and minimalistic interface, making it easy to navigate for users of all levels.
3.3. Features
Simple Scan offers the following key features:
- provides a user-friendly interface, making it easy to scan documents and images without any prior experience
- automatically detects connected scanners, eliminating the need for manual configuration
- users can customize scanning settings such as color mode, resolution, and document size to achieve the desired scan quality
- supports batch scanning, enabling users to scan multiple documents or images in a single session
- allows users to save scanned documents as PDF files, making it convenient for sharing and archiving
Overall, Simple Scan provides a convenient and efficient solution for scanning documents and images on Linux systems, making it a valuable addition to any user’s toolkit.
4. Skanlite
Skanlite, provided by the KDE project, offers a convenient solution for importing documents scanned on a flatbed or tethered camera. Additionally, this application is handy for scenarios where a higher quality scan is required compared to a quick snapshot taken with a phone.
4.1. Installation
Just like other Photo scanners, Skanlite can be installed using the APT manager:
$ sudo apt install skanliteAfter installation, Skanlite is ready for use.
4.2. Scanner Drivers
Skanlite is compatible with scanners that support the SANE (Scanner Access Now Easy) API, which is a protocol for communicating with image capture devices. Furthermore, most scanners on the market adhere to this standard, ensuring compatibility with Skanlite.
However, if we encounter issues with scanner recognition, we can check the manufacturer’s website for SANE or TWAIN drivers.
4.3. Using Skanlite
Additionally, let’s open the Skanlite application. One way to do that is via the terminal:
$ skanliteAlternatively, we utilize the Activities panel. We input skanlite into the search bar and press Enter to launch. s.
This image is part of an installation guide for Skanlite (source). Upon launching Skanlite, the application automatically detects available image capture devices connected to our system. Further, this includes flatbed scanners and webcams, making it versatile for various scanning needs.
4.4. Features
Skanlite offers the following key features:
- provides a clean and intuitive interface, making it easy for users to navigate and perform scanning tasks efficiently
- automatically detects connected scanners and webcams, eliminating the need for manual configuration
- users can easily select specific regions for scanning, enabling precise digitization of documents and images
- allows users to customize scan settings such as color mode, resolution, and document size to achieve the desired scan quality
Overall, Skanlite offers a user-friendly interface and essential scanning features, making it an invaluable tool for digitizing documents and images on Linux.
5. Conclusion
In this article, we explored four powerful photo scanning tools for Linux: GIMP, Simple Scan, and Skanlite. Each tool offers unique features and benefits, from GIMP’s versatile image editing capabilities to Simple Scan’s intuitive interface, and Skanlite’s seamless integration with flatbed and camera scanners. Further, these tools provide Linux users with comprehensive solutions for digitizing images and documents, enhancing productivity, and accessibility in various workflows.