

Learn through the super-clean Baeldung Pro experience:
>> Membership and Baeldung Pro.
No ads, dark-mode and 6 months free of IntelliJ Idea Ultimate to start with.
Learn through the super-clean Baeldung Pro experience:
>> Membership and Baeldung Pro.
No ads, dark-mode and 6 months free of IntelliJ Idea Ultimate to start with.
In this article, we’ll convert Markdown files to PDF in Linux. First, we’ll use the popular Pandoc utility, which is a universal converter for documents. Then, we’ll use Okular, which is a document reader that supports a wide range of formats.
Pandoc is a document convert that supports multiple document markups and formats as well as presentation and e-book formats. It’s the Swiss army knife when it comes to converting documents because most of the document converters use Pandoc in some kind of way.
By default, it’s not installed on most Linux distributions. However, we can install it from the package repositories:
# Debian and derivatives
$ sudo apt install -y pandoc

# Fedora, CentOS Stream, and RedHat
$ sudo dnf install -y pandoc

# openSUSE
$ sudo zypper install --non-interactive pandoc

# Arch Linux and derivatives
$ sudo pacman -S --noconfirm pandoc
Once installed, let’s verify it:
$ pandoc --version
pandoc 2.17.1.1
Compiled with pandoc-types 1.22.2.1, texmath 0.12.4, skylighting 0.12.3.1,
citeproc 0.6.0.1, ipynb 0.2
User data directory: /home/baeldung/.local/share/pandoc
The conversion process from Markdown to PDF is not done directly. The Markdown file is converted to an intermediary format, first. Then, the intermediary format is converted to PDF.
The reason for this is the availability of better tools and engines. The conversion process between documents includes complex transformations. For that reason, few conversion engines have native capabilities to handle the intermediary formats efficiently and accurately.
In the next sections, we’ll utilize different PDF engines to convert Markdown to PDF.
groff is a typesetting system to produce documents. It’s usually used for text data and is widely used for man pages on Unix-like operating systems. Particularly, the man tool uses groff to format and display man pages.
The pdfroff engine used by Pandoc depends on groff and Ghostscript, which we can install from the package repositories:
# Debian and derivatives
$ sudo apt install -y groff ghostscript

# Fedora, CentOS Stream, and RedHat
$ sudo dnf install -y groff ghostscript

# openSUSE
$ sudo zypper install --non-interactive groff ghostscript

# Arch Linux and derivatives
$ sudo pacman -S --noconfirm groff ghostscript
Once installed, we’ll specify this engine to Pandoc:
$ pandoc --pdf-engine=pdfroff --toc-depth=1 README.md -o README.pdfLet’s break this down:
Mind that we’ll get errors if there are unstructured headers in the Markdown file. For instance, we’ll get an error if we have headers like this:
# Level 1 header
### Level 3 header
## Level 2 header
We can remedy this issue by correcting the levels of the headers:
# Level 1 header
## Level 2 header
### Level 3 header
## Another level 2 header
Finally, if we have images in the document, they will not be embedded in the PDF document:
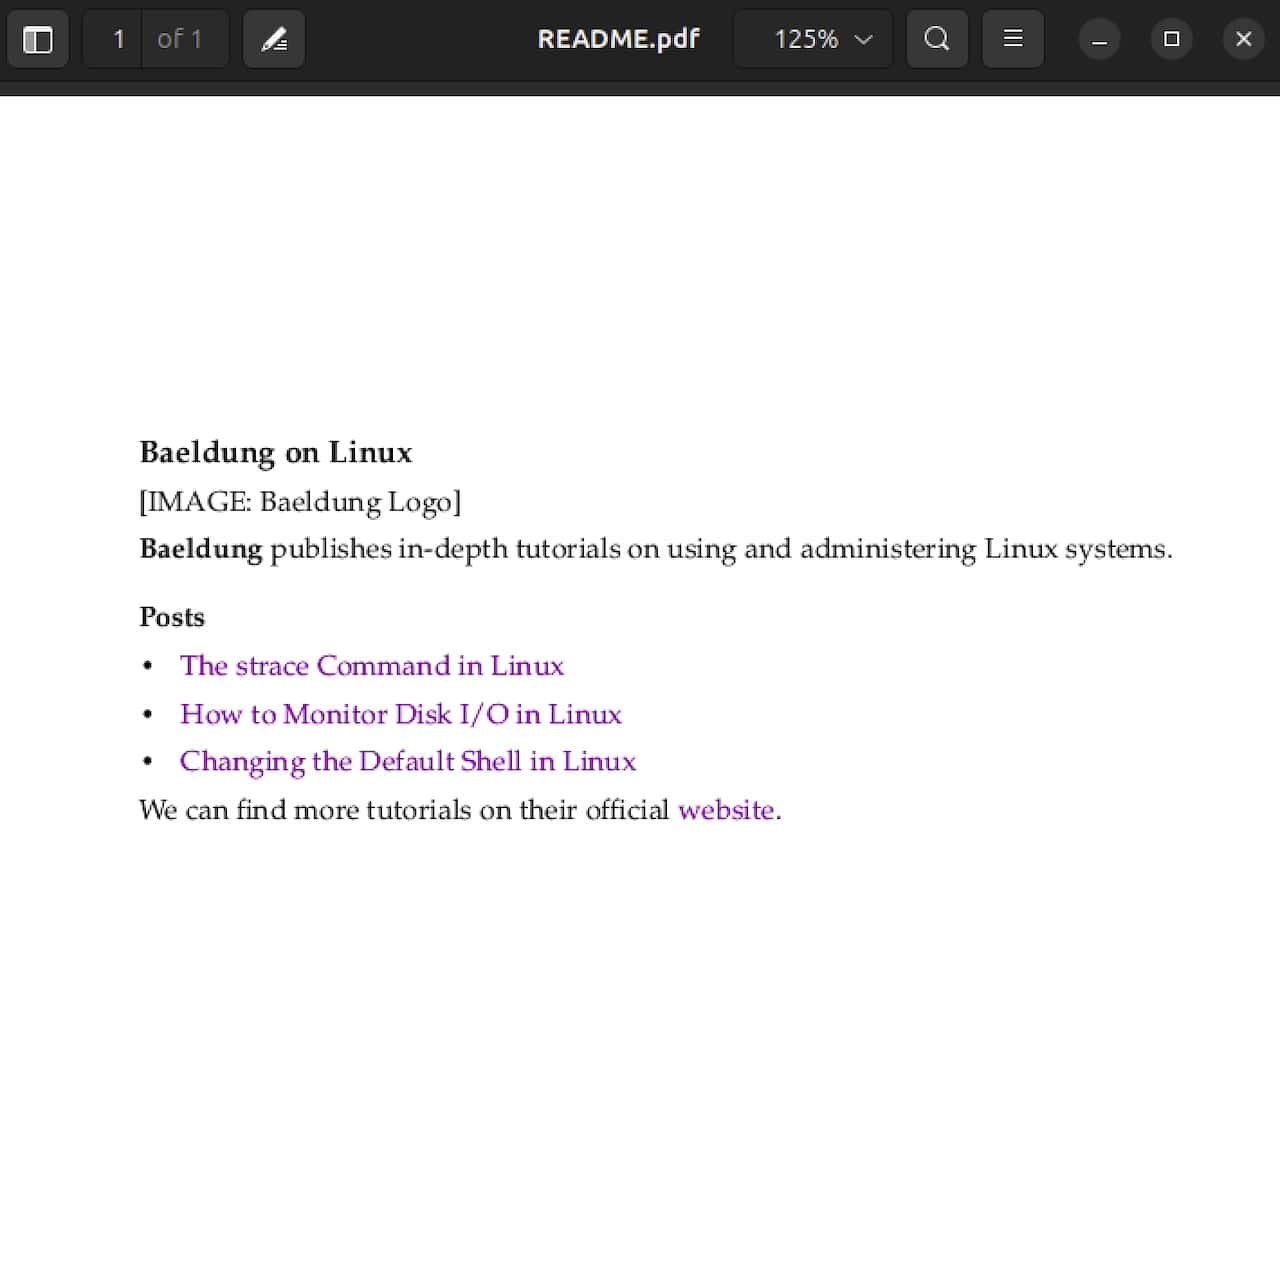
Notably, we can only see the alt text for the image.
In addition to groff, we can also use HTML to PDF engines. Currently, Pandoc supports two such engines: weasyprint and wkhtmltopdf. weasyprint is written in Python, and wkhtmltopdf is built on top of the WebKit browser engine.
We can install both of these from the package repositories:
# Debian and derivatives
$ sudo apt install -y weasyprint wkhtmltopdf

# Fedora, CentOS Stream, and RedHat
$ sudo dnf install -y weasyprint wkhtmltopdf

# openSUSE
$ sudo zypper install --non-interactive weasyprint wkhtmltopdf

# Arch Linux and derivatives
$ sudo pacman -S --noconfirm weasyprint wkhtmltopdf
Now, let’s use weasyprint as the conversion engine:
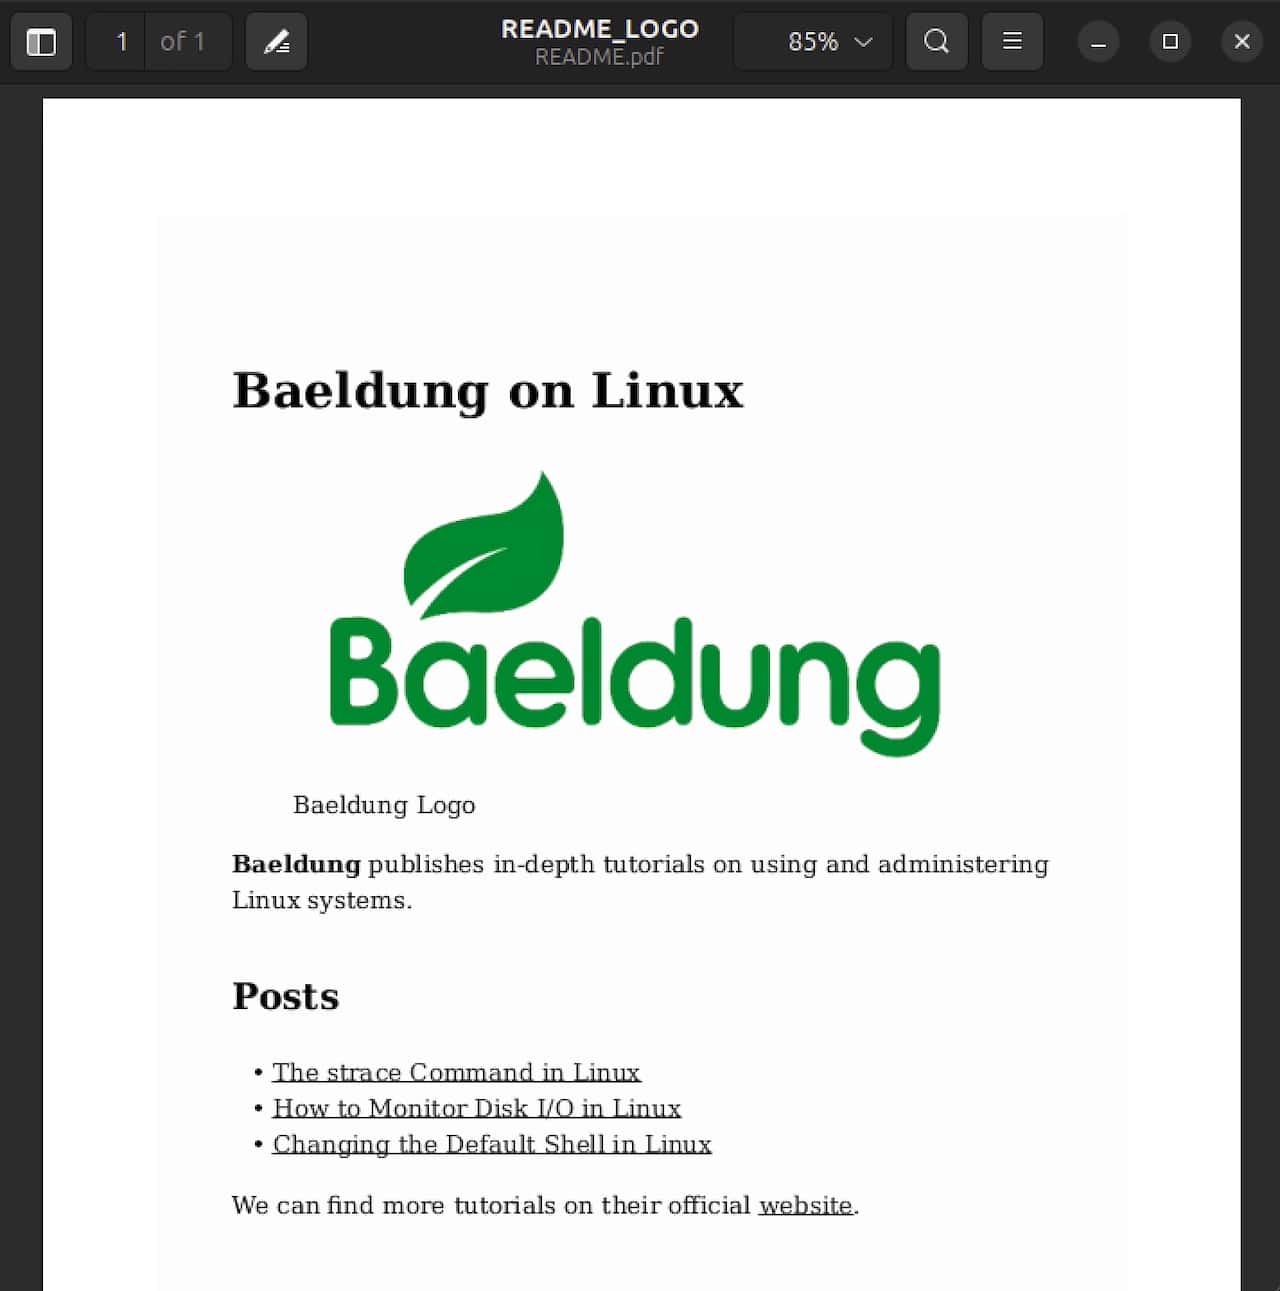
$ pandoc --pdf-engine=weasyprint README.md -o README.pdfLet’s see the result:
Similarly, we can use wkhtmltopdf as well:
$ pandoc --pdf-engine=wkhtmltopdf README.md -o README.pdfHere’s check the output PDF:
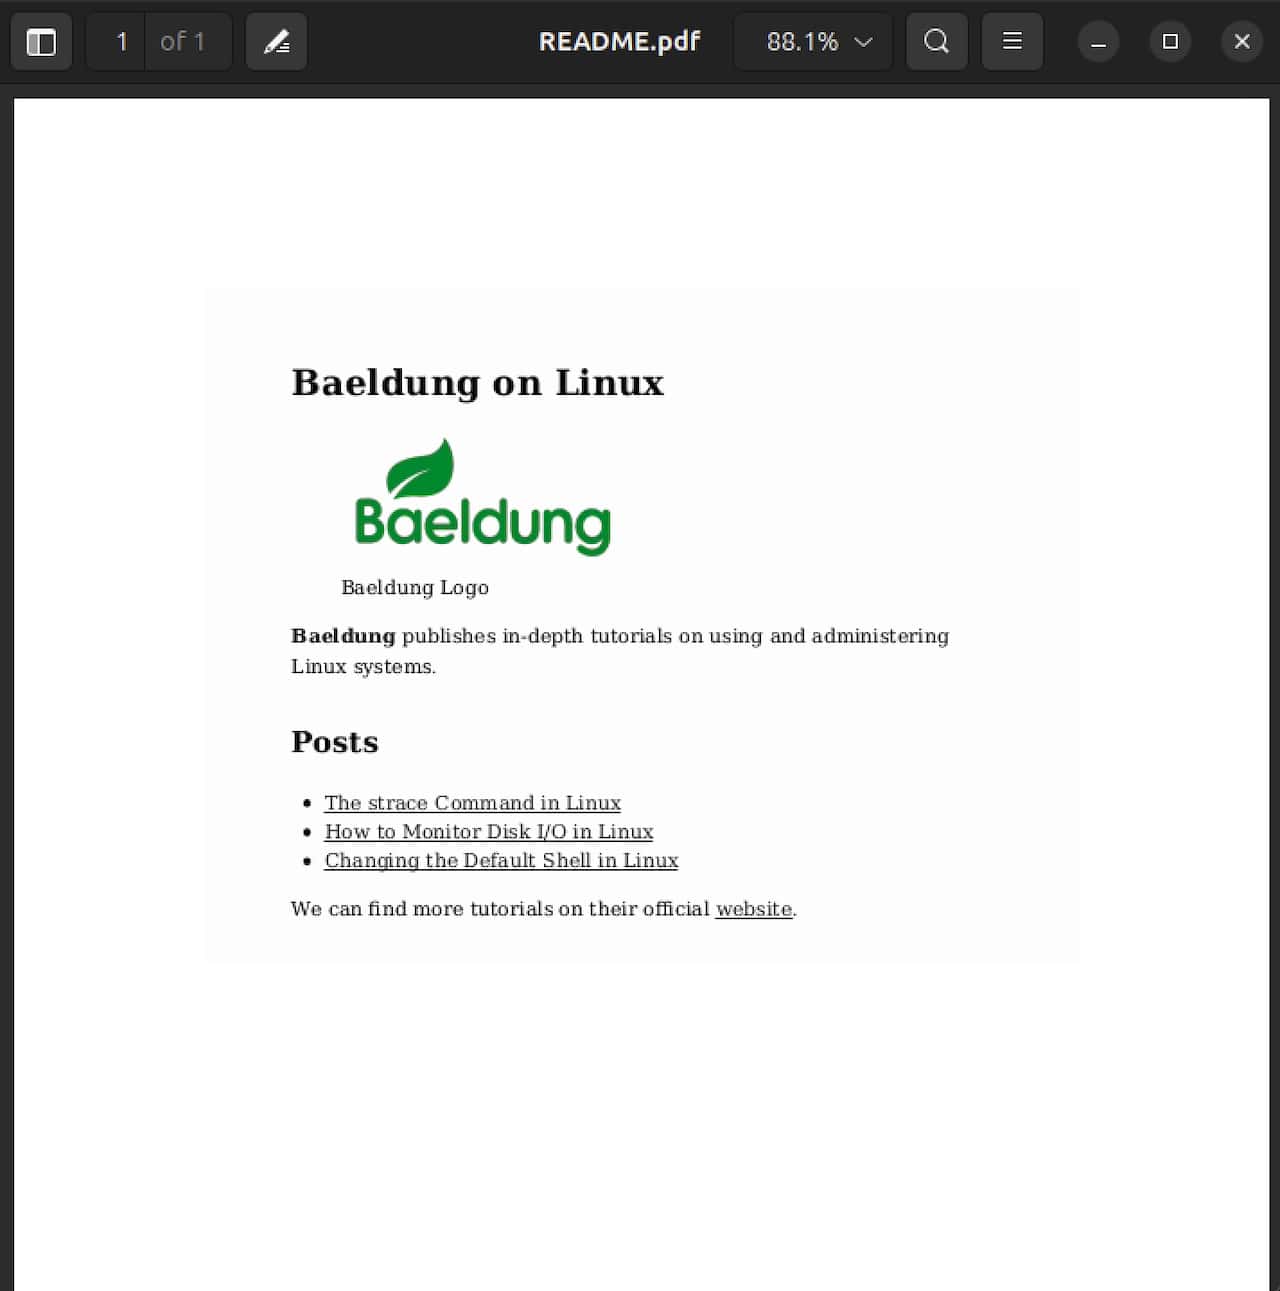
You might have noticed the difference between the two documents. The logo image in the second document is smaller than the first one. It’s because wkhtmltopdf respects attributes in Markdown.
In README.md, we’ve set the following attribute for image width:
...
{width=240px}
...On the other hand, weasyprint ignores these attributes. So, in conclusion, use wkhtmltopdf as it’s more performant and has support for more features.
LaTeX is a typesetting system that is widely used for scientific and mathematical documents. Pandoc uses LaTeX as its default PDF engine if we omit the –pdf-engine option. Specifically, it uses the pdflatex implementation.
However, Pandoc doesn’t install the LaTeX package. So, we’ll need to install it explicitly:
# Debian and derivatives
$ sudo apt install -y texlive

# Fedora, CentOS Stream, and RedHat
$ sudo dnf install -y texlive

# openSUSE
$ sudo zypper install --non-interactive texlive

# Arch Linux and derivatives
$ sudo pacman -S --noconfirm texlive
Once installed, we can simply specify the files to Pandoc:
$ pandoc README.md -o README.pdfThat’s it. It will use the pdflatex engine. However, we can use lualatex and xelatex as well.
Mind that texlive is a heavyweight package, and it pulls a plethora of dependencies into our system. If we don’t want this, we can simply use a Docker image for this operation:
$ docker run --rm -v "$(pwd)":/data -u $(id -u):$(id -g) pandoc/latex --output=README.pdf README.mdLet’s break this down:
The remaining arguments are the options we specify to Pandoc. In this case, we’re providing the input file and the output file.
This approach is much better because it will use the latest LaTeX and Pandoc versions, and the final document looks much better as compared to the other engines.
Okular is a document reader that supports a variety of different formats. In addition, we can also print Markdown documents to a PDF file using Okular.
We can install Okular from the package repositories:
# Debian and derivatives
$ sudo apt install -y okular

# Fedora, CentOS Stream, and RedHat
$ sudo dnf install -y okular

# openSUSE
$ sudo zypper install --non-interactive okular

# Arch Linux and derivatives
$ sudo pacman -S --noconfirm okular
Once installed, let’s open the README.md file:
$ okular README.mdNext, we navigate to File → Print, which will open the Print dialog:
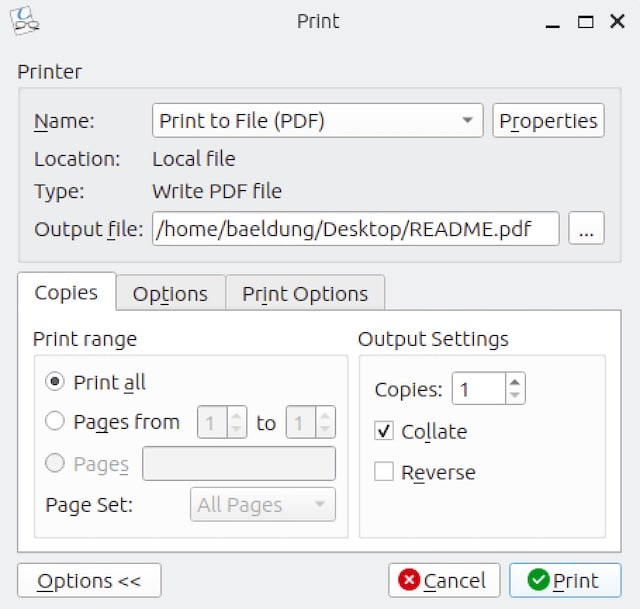
In this dialog, we set the options accordingly and press “Print” to save the document as PDF.
In this article, we covered how we can convert Markdown files to PDF. For that purpose, we used Pandoc, which provides support for several PDF engines.
Finally, we also covered how to use Okular to print a Markdown document to a PDF file.