

Learn through the super-clean Baeldung Pro experience:
>> Membership and Baeldung Pro.
No ads, dark-mode and 6 months free of IntelliJ Idea Ultimate to start with.
Learn through the super-clean Baeldung Pro experience:
>> Membership and Baeldung Pro.
No ads, dark-mode and 6 months free of IntelliJ Idea Ultimate to start with.
As an open-source operating system, Linux has multiple security features, both embedded and external, vetted by the community.
In this tutorial, we’ll discuss the Machine Owner Key (MOK) system in Linux. Then, we’ll proceed with an example of signing a module using mokutil within the Secure Boot environment.
MOK, or Machine Owner Key, is a security feature in Linux. Basically, it enables users to add their own trusted signing keys to the system’s Secure Boot configuration. Normally, trusted keys are provided by hardware vendors or operating system developers. Thus, MOK ensures that only trusted software and kernel modules run on the system.
However, sometimes it’s necessary to load custom software or third-party drivers that aren’t signed by the default trusted keys. This is where MOK comes to help. It enables users to add their specific keys. In turn, this makes the system trust and run custom-signed software, even with Secure Boot enabled.
Besides signing custom modules, MOK helps protect against malware, rootkits, and other malicious attacks that could compromise a system’s security.
There are some common scenarios where we use MOK:
Let’s now see the inner workings of MOK.
As already mentioned, MOK provides a way for users to add their keys to the system’s trusted key database. Thus, when a user signs a custom kernel module or software with their key, the system recognizes and trusts that piece of software.
The MOK process involves several steps:
Once the software or module is signed, it can be verified as trusted.
After completing these steps, the system should then allow custom software signed with the user’s private key to run, even with Secure Boot enabled.
To demonstrate MOK and the signing process, we first introduce a simple module.
Let’s write the code for a basic piece of software that serves as a module in C:
$ cat hello.c
#include <linux/init.h>
#include <linux/kernel.h>
#include <linux/module.h>
MODULE_LICENSE("GPL");
static int __init my_driver_init(void)
{
    printk(KERN_INFO "My driver module initialized.\n");
    return 0;
}
static void __exit my_driver_exit(void)
{
    printk(KERN_INFO "My driver module exiting.\n");
}
module_init(my_driver_init);
module_exit(my_driver_exit);
The above program has two functions for two actions:
In summary, the above code defines a simple program that prints a message upon initialization and exit. It uses the printk function to log messages to the kernel log. In addition, the module_init and module_exit functions specify the initialization and exit handlers.
Next, we compile the above program. For this purpose, we need a Makefile to tell make how to compile the code:
$ cat Makefile
obj-m += hello.o
all:
        make -C /lib/modules/$(shell uname -r)/build M=$(PWD) modules
clean:
        make -C /lib/modules/$(shell uname -r)/build M=$(PWD) clean
Let’s break down the Makefile:
Moreover, we have two make commands.
The first is make -C /lib/…(PWD) modules that builds the module. Further, it looks for the running kernel using uname -r. Thus, it uses the configuration and header files of the currently active kernel. Next, it looks for the kernel source code in the current directory as specified by M=$(PWD). Further, modules set the default build as a module.
The next make command is make -C /lib/…(PWD) clean. It’s similar to the last one. However, it uses the clean target to clean every generated file in the module directory.
Furthermore, we run the make command:
$ make
make -C /lib/modules/6.8.0-45-generic/build M=/home/linuxvm/test modules
make[1]: Entering directory '/usr/src/linux-headers-6.8.0-45-generic'
...
Consequently, we get several files, including hello.o, in the module directory.
Now that we’ve produced a module, let’s check what happens if we directly try to load the module without signing it:
$ sudo insmod hello.ko
insmod: ERROR: could not insert module hello1.ko: Key was rejected by service
Thus, we get an error while inserting the module due to an unexpected key. Let’s understand what we should do to remedy this.
Let’s now see an example of signing a custom module with mokutil.
The mokutil tool can usually be installed via a native package manager such as apt:
$ sudo apt install mokutilAfterward, we can manage MOK keys stored inside the Shim database.
The next step is to create a public and private key pair. This key pair is used to sign custom modules.
To that end, we use the openssl tool:
$ openssl req -new -x509 -newkey rsa:2048 -keyout MOK.priv -outform DER -out MOK.der -nodes -days 36500 -subj "/CN=MY_MOK_PAIR2/"As a result, we get a new MOK key pair:
These keys are used for signing an example module.
Let’s enroll the public signing key, MOK.der, into the MOK database:
$ sudo mokutil --import MOK.derEventually, we set a password for the MOK enrollment. This password is required when we reboot the system.
During boot, the MOK Manager appears:
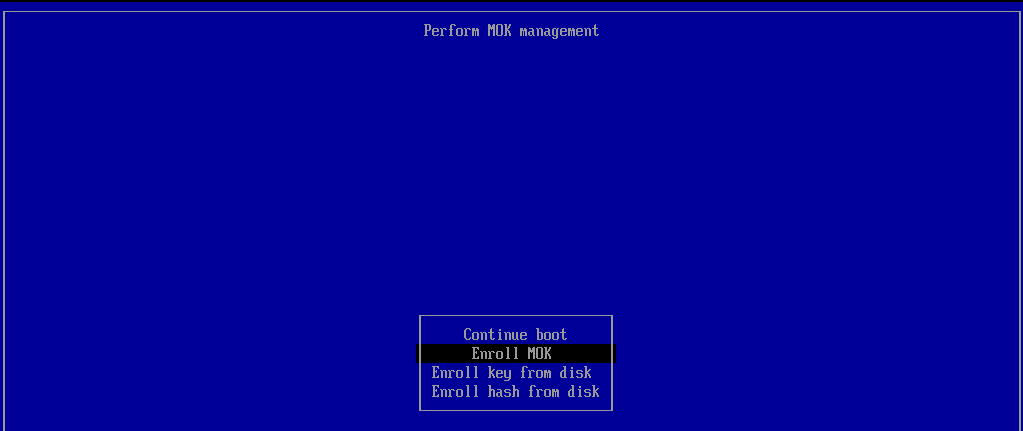
Here, we complete several steps.
First, we select the Enroll MOK option and continue:
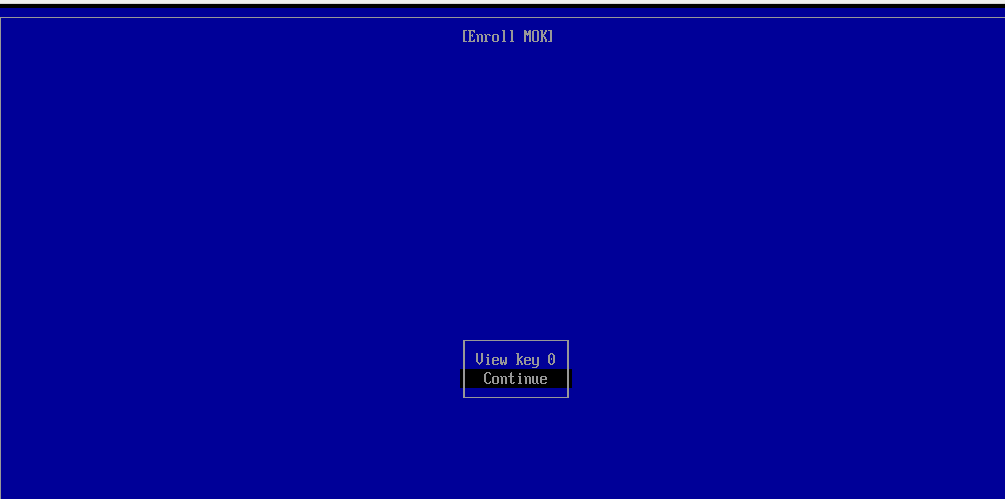
Then, we choose yes and enter the password we set earlier to confirm the enrollment:

Finally, we select the Reboot option:

At this point, we should be ready to sign with the newly-added key.
After the above steps, we use the private key (MOK.priv) to sign the module:
$ sudo /usr/src/linux-headers-$(uname -r)/scripts/sign-file sha256 MOK.priv MOK.der hello.ko
Let’s again load the module:
$ sudo insmod hello.koSimilarly, we can unload the module without any error:
$ sudo rmmod hello.koTo verify, we check the syslog messages or use dmesg:
$ cat  /var/log/syslog | grep 'My driver'
Oct 1 14:30:16 linuxvm kernel: [ 297.976768] My driver module initialized.
Oct 1 14:35:58 linuxvm kernel: [ 639.977058] My driver module exiting.
Finally, we can see the module messages.
In this article, we first saw the purpose and functionality of MOK. After that, we learned how users can securely add their own keys to the system’s Secure Boot configuration.
In a practical section, we covered the steps required to sign a custom kernel module:
Thus, we’ve shown how custom software or modules run on a system while maintaining the protections offered by Secure Boot.