Yes, we're now running our only Summer Sale. All Courses are 30% off until 20th July, 2026:
How to Mount an LVM Volume
Last updated: March 18, 2024

Learn through the super-clean Baeldung Pro experience:
>> Membership and Baeldung Pro.
No ads, dark-mode and 6 months free of IntelliJ Idea Ultimate to start with.
1. Overview
Logical volume management (LVM) is a storage management system that allows flexible space allocation on storage devices. LVM groups physical volumes into a volume group, and a volume group can, in turn, be split into several logical volumes. A filesystem that resides on a logical volume is mountable.
In this tutorial, we’ll explain how to mount an LVM logical volume. We verified the steps on Ubuntu version 20.04
2. Creating a New Volume
Let’s first check how many volume groups we have on our system using the vgs command:
# vgs
  VG            #PV #LV #SN Attr   VSize  VFree
  tempvg        1   0   0   wz--n- 60.00m 60.00m
The output shows that we have a volume group with the name tempvg.
Now, we’ll create a logical volume that utilizes ten mebibytes for the tempvg volume group using the lvcreate command. We’ll leave it to LVM to name the logical volume:
# sudo lvcreate -Zn -n var -L 10m tempvg
  Rounding up size to full physical extent 12.00 MiB
  WARNING: Logical volume vgtemp/var not zeroed.
  Logical volume "var" created.
After successfully creating the logical volume, the volume group should show 48 mebibytes of free space. We can check this by rerunning the vgs command:
# sudo vgs
VG     #PV #LV #SN Attr   VSize  VFree
tempvg 1   1   0   wz--n- 60.00m 48.00m
The volume group’s vfree value has decreased accordingly.
Then, we run vgscan –mknodes to create the symlink in /dev/mapper:
# sudo vgscan --mknodes
Found volume group "tempvg" using metadata type lvm2
Afterward, we run the ls command to verify that the symlink is there:
# ls -l /dev/mapper
total 0
crw------- 1 root root 10, 236 Oct 8 11:11 control
brw-rw---- 1 root disk 252, 0  Oct 8 17:52 tempvg-var
We should see tempvg-var. That’s the virtual block device file, which maps to the /dev/tempvg/var device.
3. Creating a Filesystem on the Logical Volume
Filesystems structure our data. A filesystem has directories, sub-directories, files inside directories, and access controls.
Let’s create a filesystem on our logical volume. We’ll use the fourth extended filesystem (ext4). We can create an ext4 filesystem using the mkfs.ext4 command. The mkfs.ext4 is a symbolic link to the mke2fs command:
# sudo mkfs.ext4 /dev/tempvg/var
mke2fs 1.45.5 (07-Jan-2020)
Creating filesystem with 3072 4k blocks and 3072 inodes

Allocating group tables: done
Writing inode tables: done
Creating journal (1024 blocks): done
Writing superblocks and filesystem accounting information: done
Running this command creates an ext4 filesystem in a disk partition.
4. Mounting an LVM Logical Volume
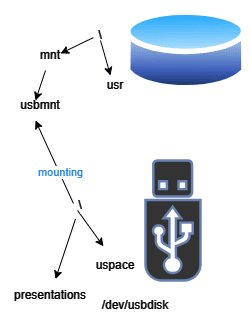
We’ve created a filesystem that resides on a logical volume and has a size and several resource groups. Now, we want to access it. In other words, we’ll attach that filesystem to a directory, which we refer to as its mount point. The process of attaching a filesystem to a directory is known as mounting.
For example, the diagram below shows that the root of the USB filesystem has been mounted on the /mnt/usbmnt directory:
4.1. Linux Commands to Mount the Logical Volume
Let’s now describe the steps of mounting a filesystem in Linux.
First, we use mkdir to create a new directory (mount point):
# sudo mkdir -vp /mnt/tempvg/varmount
mkdir: created directory '/mnt/tempvg'
mkdir: created directory '/mnt/tempvg/varmount'
Then, we call the mount command:
# sudo mount /dev/tempvg/var /mnt/tempvg/varmountHere, we see there’s no screen output for the mount command. We can assume the filesystem has been mounted if there are no warnings or errors.
4.2. Verifying the Mount
We can use the mount command to verify that we’ve mounted our logical volume correctly:
# mount
...
/dev/mapper/tempvg-var on /mnt/tempvg/mountvar type ext4 (rw,relatime)
If mounting is successful, we’ll see the file system /dev/mapper/tempvg-var and the corresponding mount point /mnt/tempvg/mountvar.
Additionally, we can further check if it was successfully mounted by running the df command. The df command reports the file system disk space usage:
# df
Filesystem             1K-blocks Used      Available Use% Mounted on
/dev/sdd               263174212 1808684   247927372 1%   /
/dev/sdc               263174212 15552808  234183248 7%   /mnt/wsl/docker-desktop-data/isocache
/dev/sdb               263174212 125976    249610080 1%   /mnt/wsl/docker-desktop/docker-desktop-user-distro
/dev/loop0             359602    359602    0         100% /mnt/wsl/docker-desktop/cli-tools
tools                  158726324 147623892 11102432  94%  /init
tmpfs                  1983740   0         1983740   0%   /sys/fs/cgroup
drivers                158726324 147623892 11102432  94%  /usr/lib/wsl/drivers
lib                    158726324 147623892 11102432  94%  /usr/lib/wsl/lib
drvfs                  158726324 147623892 11102432  94%  /mnt/c
/dev/mapper/tempvg-var 7792      28        6908      1%   /mnt/tempvg/varmount
Again, we see the virtual device /dev/mapper/tempvg-var and its mount point /mnt/tempvg/varmount.
5. Conclusion
In this article, we explained how to mount a filesystem that resides on a defined logical volume. We can carve out a logical volume from a volume group, structure the logical volume using a filesystem, and access the filesystem via a mount point. Mounting a file system to a local directory makes it available and accessible to the user.