

Learn through the super-clean Baeldung Pro experience:
>> Membership and Baeldung Pro.
No ads, dark-mode and 6 months free of IntelliJ Idea Ultimate to start with.
Last updated: February 7, 2024
Learn through the super-clean Baeldung Pro experience:
>> Membership and Baeldung Pro.
No ads, dark-mode and 6 months free of IntelliJ Idea Ultimate to start with.
IntelliJ IDEA is a powerful and popular IDE (Integrated Development Environment) for Java development. Paired with the JDK (Java Development Kit), it provides a robust platform for building Java applications efficiently.
In this tutorial, we’ll go through setting up and installing IntelliJ IDEA along with the JDK on our Linux system. Whether we’re seasoned Java developers or new to Java programming, this tutorial will guide us in configuring IntelliJ for optimal development.
Notably, we’re going to perform this operation on Kali Linux. However, the same process applies to other Linux distributions as well.
In this section, we’ll go through the process of obtaining and installing the JDK on our Linux system. Additionally, ensuring that our system is up-to-date is a good practice before proceeding with the installation.
First, let’s start by updating our system to fetch the latest package information from all configured sources:
$ sudo apt-get updateThe update command fetches the latest package information from all configured sources.
After updating the system, we’ll proceed to install the JDK package. We’ll utilize an open-source implementation.
For an open-source JDK, let’s use the default-jdk package:
$ sudo apt install default-jdk
[sudo] password for kali:
Reading package lists... Done
Building dependency tree... Done
Reading state information... Done
The following additional packages will be installed:
  default-jdk-headless default-jre default-jre-headless java-common openjdk-17-jdk openjdk-17-jdk-headless openjdk-17-jre openjdk-17-jre-headless
Suggested packages:
  openjdk-17-demo openjdk-17-source visualvm fonts-ipafont-gothic fonts-ipafont-mincho fonts-wqy-microhei | fonts-wqy-zenhei fonts-indic
The following NEW packages will be installed:
  default-jdk default-jdk-headless openjdk-17-jdk openjdk-17-jdk-headless
The following packages will be upgraded:
  default-jre default-jre-headless java-common openjdk-17-jre openjdk-17-jre-headless
5 upgraded, 4 newly installed, 0 to remove and 1275 not upgraded.
Need to get 118 MB of archives.
After this operation, 80.7 MB of additional disk space will be used.
Do you want to continue? [Y/n] y
...
The command initiates the installation of the open-source JDK. Further, the default-jdk package provides a comprehensive set of tools and libraries required for Java development.
Alternatively, we may prefer to use the Oracle JDK Java repository.
Before installing the Oracle JDK, we’ll first add the Linux Uprising Java repository. This repository provides a convenient way to access the Oracle JDK package:
$ sudo apt-get install software-properties-common
$ sudo add-apt-repository ppa:linuxuprising/java
$ sudo apt update
The initial command installs the necessary software-properties-common package, ensuring the availability of the add-apt-repository command. Subsequently, we add the Linux Uprising Java repository and update our system to integrate the Oracle JDK package into our package management system.
Next, we’ll install the Oracle JDK using the apt package manager:
$ sudo apt install oracle-java17-installer

Reading package lists... Done
...
The following NEW packages will be installed:
  gsfonts-x11 oracle-java17-installer oracle-java17-set-default
0 upgraded, 3 newly installed, 0 to remove and 1478 not upgraded.
Need to get 52.6 kB of archives.
After this operation, 199 kB of additional disk space will be used.
Do you want to continue? [Y/n] y
...
The installer will prompt us to accept the Oracle Technology Network License Agreement, and we can proceed by typing a ‘Y’ for Yes. Additionally, during the installation, the system will download the Oracle JDK package from the repository and configure it for use on the system. Furthermore, this process may take a few minutes, depending on our internet connection speed.
Also, we can use the wget command to download the Oracle JDK .deb package:
$ wget https://download.oracle.com/java/21/latest/jdk-21_linux-x64_bin.deb
--2024-01-14 12:41:01--  https://download.oracle.com/java/21/latest/jdk-21_linux-x64_bin.deb
Resolving download.oracle.com (download.oracle.com)... 23.37.0.104
Connecting to download.oracle.com (download.oracle.com)|23.37.0.104|:443... connected.
HTTP request sent, awaiting response... 200 OK
Length: 167684844 (160M) [text/plain]
Saving to: ‘jdk-21_linux-x64_bin.deb’
...
This command downloads the Oracle JDK .deb package and saves it as jdk-21_linux-x64_bin.deb.
Next, we’ll install JDK on the machine:
$ sudo dpkg -i jdk-21_linux-x64_bin.deb
(Reading database ... 414716 files and directories currently installed.)
Preparing to unpack jdk-21_linux-x64_bin.deb ...
update-alternatives: using /usr/lib/jvm/java-17-openjdk-amd64/bin/java to provide /usr/bin/java (java) in auto mode
update-alternatives: using /usr/lib/jvm/java-17-openjdk-amd64/bin/jpackage to provide /usr/bin/jpackage (jpackage) in auto mode
update-alternatives: using /usr/lib/jvm/java-17-openjdk-amd64/bin/keytool to provide /usr/bin/keytool (keytool) in auto mode
update-alternatives: using /usr/lib/jvm/java-17-openjdk-amd64/bin/rmiregistry to provide /usr/bin/rmiregistry (rmiregistry) in auto mode
update-alternatives: using /usr/lib/jvm/java-17-openjdk-amd64/lib/jexec to provide /usr/bin/jexec (jexec) in auto mode
Unpacking jdk-21 (21.0.1-ga) over (21.0.1-ga) ...
Setting up jdk-21 (21.0.1-ga) ...
...
The dpkg command extracts the contents of the specified .deb package to the current directory. Then, the -i option instructs it to install the specified package.
Additionally, after installing the JDK, it’s crucial to verify the installation. Let’s confirm the installed Java version:
$ java -version
Picked up _JAVA_OPTIONS: -Dawt.useSystemAAFontSettings=on -Dswing.aatext=true
java version "17.0.6" 2023-01-17 LTS
Java(TM) SE Runtime Environment (build 17.0.6+9-LTS-190)
Java HotSpot(TM) 64-Bit Server VM (build 17.0.6+9-LTS-190, mixed mode, sharing)
The output displays the Java version, release date, and information about the JRE (Java Runtime Environment).
Additionally, with the JDK successfully installed, we’re now prepared to move on to setting up IntelliJ IDEA on our Linux system.
First, let’s use wget to download the IntelliJ IDEA tar file:
$ wget https://download.jetbrains.com/idea/ideaIC-2023.3.2.tar.gz

--2024-01-14 13:09:34--  https://download.jetbrains.com/idea/ideaIC-2023.3.2.tar.gz
Resolving download.jetbrains.com (download.jetbrains.com)... 108.157.78.22, 108.157.78.81, 108.157.78.75, ...
Connecting to download.jetbrains.com (download.jetbrains.com)|108.157.78.22|:443... connected.
...
HTTP request sent, awaiting response... 200 OK
Length: 804698472 (767M) [binary/octet-stream]
Saving to: ‘ideaIC-2023.3.2.tar.gz’
...
The wget command fetches the IntelliJ IDEA community edition archive directly from the official JetBrains download site and saves it as ideaIC-2023.3.2.tar.gz.
Next, let’s extract the IntelliJ IDEA archive:
$ tar -zxvf ideaIC-2023.3.2.tar.gz
idea-IC-233.13135.103/
idea-IC-233.13135.103/LICENSE.txt
idea-IC-233.13135.103/license/
idea-IC-233.13135.103/license/javolution_license.txt
idea-IC-233.13135.103/license/yourkit-license-redist.txt
idea-IC-233.13135.103/license/saxon-conditions.html
idea-IC-233.13135.103/license/third-party-libraries.html
idea-IC-233.13135.103/license/javahelp_license.txt
...
This command uses the -xvzf options, where x stands for extract, v for verbose, z for gzip, and f for file. Further, We’re unzipping the downloaded tarball to access its contents. Additionally, the output folder from the unzipped tarball is idea-IC-233.13135.103.
Next, we’ll navigate to the bin directory of the extracted IntelliJ IDEA folder:
$ cd idea-IC-233.13135.103/binThen, let’s run the IntelliJ IDEA application:
$ ./idea.sh
Picked up _JAVA_OPTIONS: -Dawt.useSystemAAFontSettings=on -Dswing.aatext=true
CompileCommand: exclude com/intellij/openapi/vfs/impl/FilePartNodeRoot.trieDescend bool exclude = true
2024-01-13 13:23:15,813 [   2772]   WARN - #c.i.s.ComponentManagerImpl - `preload=true` must be used only for core services (service=com.jetbrains.rdserver.statistics.BackendStatisticsManager, plugin=com.jetbrains.codeWithMe)
2024-01-13 13:23:16,449 [   3408]   WARN - #c.i.s.ComponentManagerImpl - com.intellij.psi.search.FilenameIndex initializer requests com.intellij.ide.plugins.PluginUtil instance
...
The ./idea.sh command launches IntelliJ IDEA. Furthermore, It picks up any additional Java options specified and initializes the IDE. Additionally, the output includes various informational messages and warnings related to the IDE’s startup process.
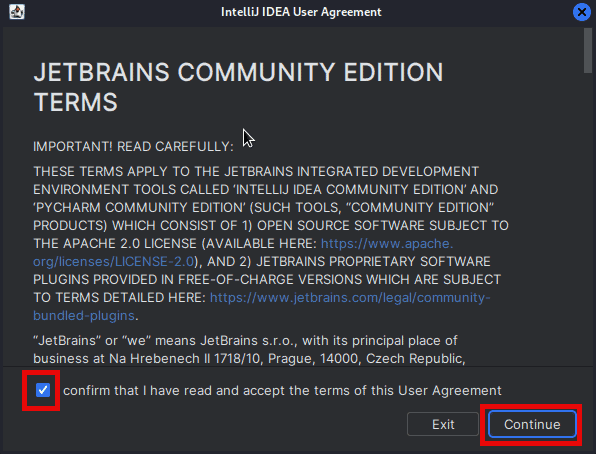
During the setup process, we’ll toggle the checkbox to confirm the User Agreement and click Continue to proceed:
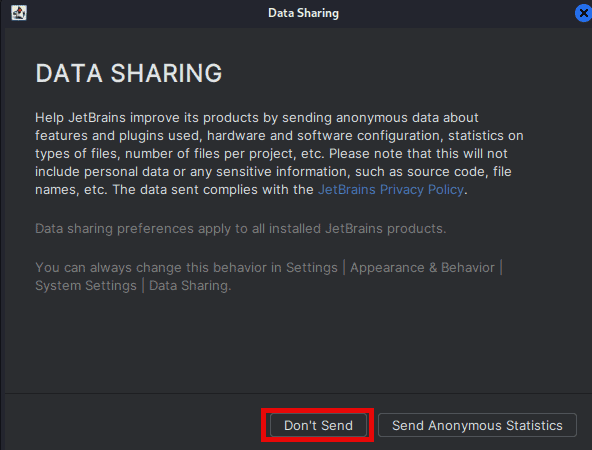
Then, we’ll encounter a prompt about Data Sharing; we’ll choose Don’t Send:
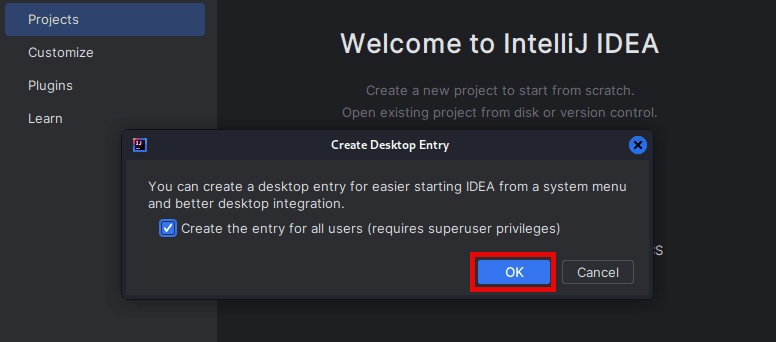
Additionally, to make it easier to access IntelliJ IDEA, let’s create a desktop entry using the Create Desktop Entry option in the tools menu in IntelliJ IDEA.
Let’s click on menu at the left button of the screen. Then, we’ll select Create Desktop Entry and click OK:
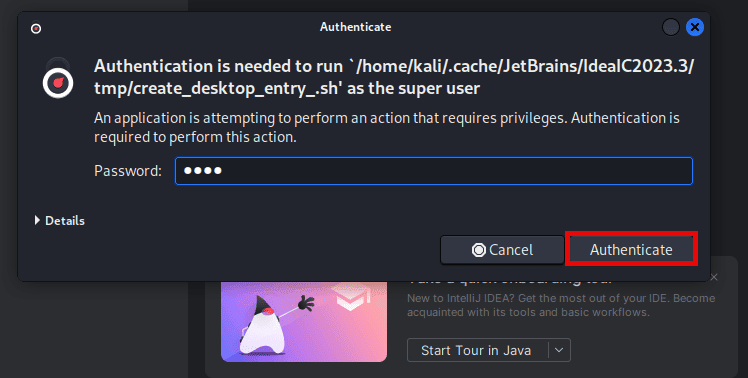
Additionally, we’ll receive a prompt to authenticate with our password. Let’s authenticate with our root password:
Finally, we’ve now successfully installed and set up IntelliJ IDEA on our Linux system.
In this article, we’ve successfully navigated through the process of setting up IntelliJ IDEA along with the JDK on our Linux system. Additionally, whether new to Java or an experienced developer, the steps covered ensure an optimal environment for Java application development.