

Learn through the super-clean Baeldung Pro experience:
>> Membership and Baeldung Pro.
No ads, dark-mode and 6 months free of IntelliJ Idea Ultimate to start with.
Learn through the super-clean Baeldung Pro experience:
>> Membership and Baeldung Pro.
No ads, dark-mode and 6 months free of IntelliJ Idea Ultimate to start with.
Sometimes, it’s more convenient to provide a quick visual summary of a video without actually playing it. First, it allows users to quickly skim through the content of a video without having to play it in its entirety, thus saving time. This can be particularly useful when dealing with long videos or searching for specific scenes or moments.
In this tutorial, we’ll discuss a couple of methods to generate a gallery of thumbnails from a video. In the first method, we’ll use FFmpeg and ImageMagick for that purpose. Next, we’ll cover the alternative Video Contact Sheet tool for a more streamlined approach to this problem.
In this section, we’ll focus on a more manual approach because we’ll be using two different tools. First, we’ll use FFmpeg to extract the images from a video in a PNG format and ImageMagick to stitch them together.
We’ll need to have FFmpeg and ImageMagick installed on our system.
FFmpeg is a powerful command-line tool for manipulating videos and multimedia files. It provides features such as video conversion, extraction, and editing.
Usually, we run ffmpeg in a terminal. So, let’s open up a terminal and extract the images from a video:
$ ffmpeg -i HowLinuxIsBuilt.mp4 -vf "select='eq(mod(n,15),0),scale=-1:120'" -vsync vfr output_%03d.pngLet’s take a closer look at what happens in this command:
FFmpeg uses a constant frame rate (CFR) sync method. So, it assumes that an input video has a fixed frame rate. However, that’s not always the case because some videos may have varying frame rates, where certain frames are held longer or shorter.
In addition, the video filter condition will extract a frame every 15 seconds. So, we can modify the interval by adjusting the number inside mod(n,15).
Once we run the command, we should see a list of PNG images in our output directory:
$ ls -l | head
total 23536
-rw-r--r--@ 1 himhaidar  wheel  10820377 Jan 11  2021 HowLinuxIsBuilt.mp4
-rw-r--r--@ 1 himhaidar  wheel     21140 Jun 13 01:33 capture-01.png
-rw-r--r--  1 himhaidar  wheel     21156 Jun 13 01:33 capture-02.png
-rw-r--r--@ 1 himhaidar  wheel     40502 Jun 13 01:33 capture-03.png
-rw-r--r--  1 himhaidar  wheel     29464 Jun 13 01:33 capture-04.png
-rw-r--r--  1 himhaidar  wheel     38998 Jun 13 01:33 capture-05.png
-rw-r--r--  1 himhaidar  wheel     29190 Jun 13 01:33 capture-06.png
-rw-r--r--@ 1 himhaidar  wheel     69475 Jun 13 01:33 capture-07.png
-rw-r--r-- 1 himhaidar wheel 18985 Jun 13 01:33 capture-08.pngAlternatively, we can achieve the same result by specifying the frame rate explicitly:
$ ffmpeg -i HowLinuxIsBuilt.mp4 -r 1/15 -vf scale=-1:120 -vcodec png capture-%002d.pngLet’s break this down:
The first command performs the operation faster than this one. So, that one is more suitable for extracting a larger set of images. Nonetheless, both approaches are sound if we have videos shorter in length.
By default, FFmpeg will not put timestamps in the images. So, if our use case requires timestamps, we could specify a filter to draw text with custom properties:
$ ffmpeg -i HowLinuxIsBuilt.mp4 -r 1/15 -vf "drawtext=fontfile=/Users/himhaidar/Library/Fonts/OpenSans-Semibold.ttf:timecode='00\\:00\\:00\\:00':r=30:fontcolor=white:fontsize=92:x=20:y=20:box=1:[email protected], scale=-1:120" -vcodec png capture-%002d.pngLet’s break down the drawtext filter:
Once we run this, our thumbnail image will look like this:

Now, we’re ready to make a thumbnail gallery out of the images.
ImageMagick is a software suite for manipulating images. It provides a wide range of features and functions for tasks such as resizing, cropping, converting formats, adding effects, and creating image compositions.
With a set of PNG images from the previous section, we can now stitch them together using the montage tool:
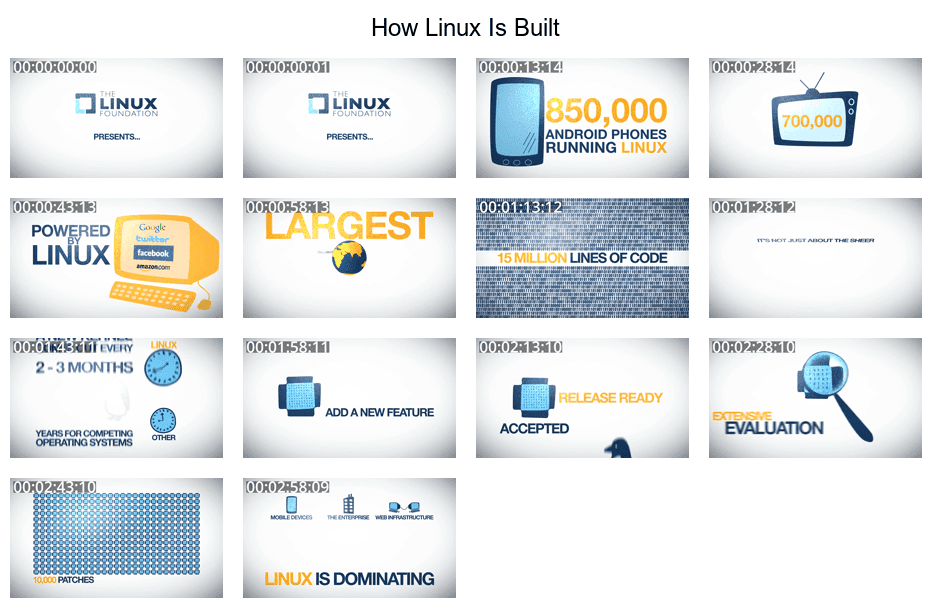
$ montage -title "How Linux Is Built" -tile x4 -geometry +10+10 *.png gallery.pngLet’s break this down:
Let’s see the final image:
We can automate the process of creating a thumbnail gallery from a video by combining the previous steps. The script takes a video file as an argument, performs necessary checks, and spits out a gallery image:
#!/bin/bash

if ! command -v ffmpeg &> /dev/null || ! command -v montage &> /dev/null; then
    echo "This script requires FFmpeg and ImageMagick"
    exit 1
fi

if [ -z "$1" ] || [ -z "$2" ]; then
    echo "Usage: $0 <video_file> <gallery_title>"
    exit 1
fi

video_file="$1"
gallery_title="$2"
temp_dir=$(mktemp -d)
font_file="$HOME/.local/share/fonts/OpenSans-Semibold.ttf"

ffmpeg -i "$video_file" -r 1/15 -vf "drawtext=fontfile=$font_file:timecode='00\\:00\\:00\\:00':r=30:fontcolor=white:fontsize=92:x=20:y=20:box=1:[email protected], scale=-1:120" -vcodec png "$temp_dir/capture-%002d.png" || exit 1
montage -title "$gallery_title" -tile x4 -geometry +10+10 "$temp_dir"/*.png "${video_file}.png" || exit 1

rm -rf "$temp_dir"
Now, we can save this script, make it executable, and use it:
$ thumbs_gen.sh ~/Videos/screencast.mp4 "Installing Docker on Linux"Video Contact Sheet (VCS) is a helper shell script that can generate a thumbnail gallery of a video. Its only dependency is FFmpeg. We can install it from its official website.
Once installed, we can generate the contact sheet (thumbnails gallery) of a video with different options:
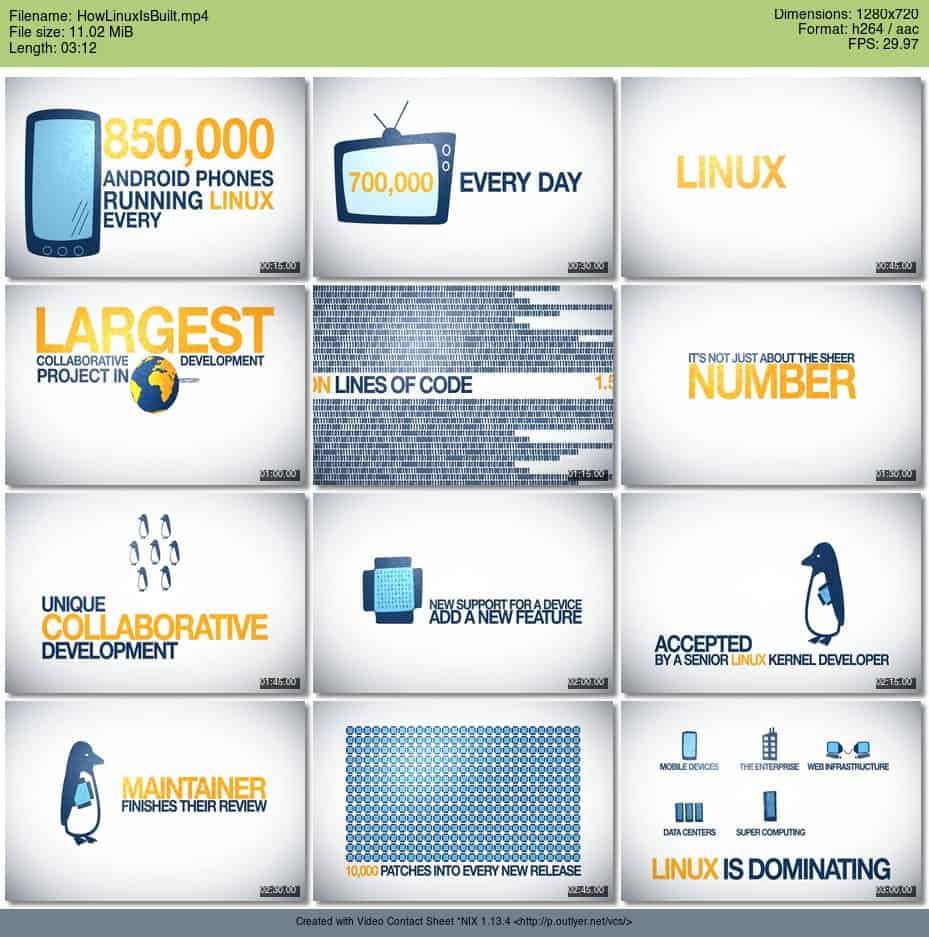
$ vcs HowLinuxIsBuilt.mp4 -U0 -i 15s -c 3 -H 200 -a 300/200 -o gallery.jpgLet’s break this down:
Now, let’s see the contact sheet we’ve generated for the input video:
In this article, we saw how easy it is to generate a thumbnails gallery of a video. For that purpose, we used FFmpeg and ImageMagick.
Moreover, we also used the VCS utility to automatically generate a contact sheet for a given video.
d