

Learn through the super-clean Baeldung Pro experience:
>> Membership and Baeldung Pro.
No ads, dark-mode and 6 months free of IntelliJ Idea Ultimate to start with.
Learn through the super-clean Baeldung Pro experience:
>> Membership and Baeldung Pro.
No ads, dark-mode and 6 months free of IntelliJ Idea Ultimate to start with.
Some laptops have a built-in key combination for toggling the touchpad device, which we can easily use without having to tackle the environment settings. However, there are other laptops that don’t have this functionality. Fortunately, there are tools in our arsenal that we can use on Linux for this very purpose.
In this tutorial, we’ll see how to disable and enable the touchpad and trackpad from the command line. We’ll write a helper script that we can quickly execute to toggle the touchpad on an X11 environment. Apart from that, we’ll also assign a keyboard shortcut to make this process even quicker.
Finally, we’ll discuss the Wayland-based desktop environments, which are now used by most major Linux distributions.
The X Windows System implements a helper utility known as xinput. xinput lets us configure the input devices by querying the identifier of a device to manipulate the available settings for a device.
Most distributions don’t have this installed by default. However, we can easily install it from the official package repository under the canonical name xinput.
On Debian and Ubuntu-based distributions, we can use apt:
$ sudo apt install -y xinputSimilarly, we can use dnf or yum on Fedora and RHEL:
$ sudo yum install -y xinputOnce installed, let’s verify it:
$ xinput --version
xinput version 1.6.3
XI version on server: 2.4
Now, we’re ready to manipulate the touchpad settings from the command line using xinput.
X11 assigns an identifier to every attached input device. We can list the input devices using the –list option:
$ xinput --list
⎡ Virtual core pointer                    	id=2	[master pointer  (3)]
⎜   ↳ Virtual core XTEST pointer              	id=4	[slave  pointer  (2)]
⎜   ↳ Elan Touchpad                           	id=11	[slave  pointer  (2)]
⎜   ↳ Elan TrackPoint                         	id=12	[slave  pointer  (2)]
⎜   ↳ ELAN Touchscreen                        	id=9	[slave  pointer  (2)]
⎣ Virtual core keyboard                   	id=3	[master keyboard (2)]
    ↳ Virtual core XTEST keyboard             	id=5	[slave  keyboard (3)]
    ↳ Power Button                            	id=6	[slave  keyboard (3)]
...
In our case, we are interested in the “Elan Touchpad” device with its ID set to “11“. We’ll use this ID to query the available settings for the device:
$ xinput list-props 11 | head -n5
Device 'Elan Touchpad':
	Device Enabled (187):	1
	Coordinate Transformation Matrix (189):	1.000000, 0.000000, 0.000000, 0.000000, 1.000000, 0.000000, 0.000000, 0.000000, 1.000000
	libinput Tapping Enabled (320):	1
	libinput Tapping Enabled Default (321):	0
Here, we can see that the device is currently enabled because the “187” switch is set to 1.
In the previous section, we got the ID for our device and the switch ID to toggle the device state. Let’s use the switch ID to disable the device:
$ xinput set-prop 11 187 0Let’s break it down:
Now, if we try to use the touchpad device, it won’t work. Let’s re-enable the device by setting the switch to 1:
$ xinput set-prop 11 187 1Alternatively, we can also use the –enable and –disable options for the same purpose:
$ xinput --disable 11Similarly, let’s enable the device:
$ xinput --enable 11It gets a bit tedious if we have to do this multiple times. For that reason, we can create a script that can automate this process for us.
Let’s create a script to search for the touchpad device and toggle its state accordingly:
#!/bin/bash

read TPdevice <<< $( xinput | sed -nre '/TouchPad|Touchpad/s/.*id=([0-9]*).*/\1/p' )
state=$( xinput list-props "$TPdevice" | grep "Device Enabled" | grep -o "[01]$" )

if [ "$state" -eq '1' ];then
    xinput --disable "$TPdevice" && notify-send -i emblem-nowrite "Touchpad" "Disabled"
else
    xinput --enable "$TPdevice" && notify-send -i emblem-nowrite "Touchpad" "Enabled"
fi
The first line reads the touchpad identifier into the TPdevice variable by parsing the output of xinput. The second line greps the state of the device, which is either 0 or 1. Finally, we compare the state against “1” to either disable or enable the device.
For enhancements, we also send a notification to the system notification daemon that will provide us with visual feedback. Moreover, we can use zenity if we don’t have a notification daemon installed.
Now, if we want to take this script a step further, we can assign a keyboard shortcut to invoke the script. It will mimic the behavior of laptops that has this built-in functionality.
The process of creating keyboard shortcuts differs for different desktop environments. However, we can access it from the keyboard settings, which has a dedicated portion for setting keyboard shortcuts.
In the case of XFCE, we can set the shortcut as we see in the image below:
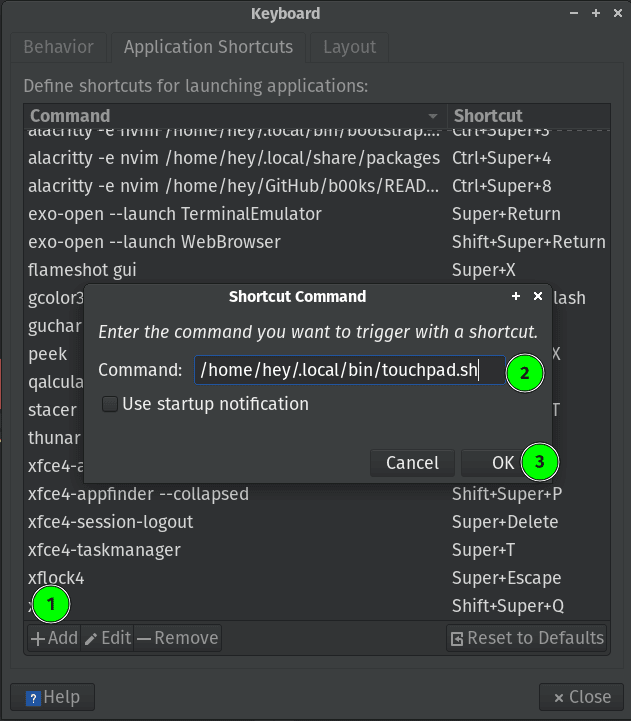
First, we’ll head over to Settings ➝ Keyboard ➝ Application Shortcuts and select “Add” to create a new shortcut. Then, we’ll type in the path to the shell script and press “OK” to save it.
Mind that we need to make the script executable beforehand in order to execute it.
On Wayland, the process is a bit different because every desktop environment implements this feature differently. However, for our example, we’ll discuss GNOME because it uses Wayland by default.
GNOME comes with the gsettings utility that can change the environment settings for different aspects of the desktop. In our case, we’ll query the touchpad and disable it:
$ gsettings set org.gnome.desktop.peripherals.touchpad send-events disabledSimilarly, we can re-enable it by setting the send-events property to enabled:
$ gsettings set org.gnome.desktop.peripherals.touchpad send-events enabledAdditionally, we can also set a script for this and assign a shortcut as we did in the previous sections.
In this article, we learned how we can disable and enable the touchpad device of a laptop. We wrote a simple script to automate this process with a keyboard shortcut.
Finally, we saw how to do the same in a Wayland environment.