Learn through the super-clean Baeldung Pro experience:
>> Membership and Baeldung Pro.
No ads, dark-mode and 6 months free of IntelliJ Idea Ultimate to start with.
Last updated: March 18, 2024

Learn through the super-clean Baeldung Pro experience:
>> Membership and Baeldung Pro.
No ads, dark-mode and 6 months free of IntelliJ Idea Ultimate to start with.
In this tutorial, we’ll develop a hands-on understanding of file comparison in Linux using the diff command.
The diff command is bundled inside the GNU diffUtils package along with other comparison tools such as cmp, sdiff, and diff3. As such, most Linux distros come with a preinstalled copy of the diffUtils package.
So, we can skip the installation if we already have the required binary file for diff. But, if it’s missing or if we need a different version of the package, then we might need to install it ourselves.
Let’s begin by checking our system for the diff binary file:
$ which diff
diff not found
Well, it looks like the diffUtils package isn’t installed, so we’ll need to install it.
First, let’s grab a tar archive of the package from the GNU FTP server using the curl command:
$ curl --silent --output diffutils-3.7.tar.xz ftp://ftp.gnu.org/gnu/diffutils/diffutils-3.7.tar.xz
Then, let’s extract the package and install the binaries inside the /usr/bin directory:
$ tar --extract --file diffutils-3.7.tar.xz
$ cd diffutils-3.7
$ ./configure --prefix=/usr
$ make install
And, we’re ready to go.
Now that we have the diff binary available in our system. Let’s learn a few of its fundamental concepts.
To use the diff command, we need to provide two types of information — namely, options and files to compare:
diff [OPTION]... FILESLike any other Unix command, the use of options with the diff command allows us to get non-default behavior. Naturally, before we can start exploring the wide variety of available options, we need to understand what that default behavior is.
First, let’s use diff to compare it against itself:
$ /usr/bin/diff /usr/bin/diff /usr/bin/diff
$ echo $?
0
We can notice that command execution finished gracefully with an exit code of 0, indicating that the two files are equal.
Now, let’s use it to compare two different binary files, /bin/mv and /bin/cp:
$ /usr/bin/diff /bin/mv /bin/cp
Binary files /bin/mv and /bin/cp differ
$ echo $?
2
In this case, the command suggested that the two files are different, but it did an early exit with a non-zero return code. That’s actually a false alarm, as diff doesn’t do a thorough comparison for binaries.
In fact, diff does the bare minimum to find out if the two binaries are identical or not. To understand this better, we can mimic this behavior by using the –brief (-q) option that only outputs if two files are different:
$ diff --brief /bin/mv /bin/cp
Files /bin/mv and /bin/cp differ
$ echo $?
1Unlike the case of binary file comparison, diff can give us far more insights when used for textual data comparison.
Let’s say we’re conducting a Unix training session for students, in which we introduce them to the “Hello, World!” program:
$ cat script_v0.sh
#!/bin/sh
/bin/echo "Hello, World!"
Now, as a learning assignment, students are required to use a different Unix command to mimic the same functionality. Further, our job is to review their code submissions.
So, let’s go ahead and see one of the submissions where the usage of /bin/echo command is replaced by the shell-builtin echo command:
$ cat script_v1.sh
#!/bin/sh
echo "Hello, World!"
Well, diff is an excellent choice when we need a line-by-line comparison of two code files. So, let’s use it to compare the two scripts, script_v0.sh and script_v1.sh:
$ diff script_v0.sh script_v1.sh
2c2
< /bin/echo "Hello, World!"
---
> echo "Hello, World!"
We can see that diff provided us with an unambiguous list of instructions for changing the first file to be exactly like the second. If we take a closer look, then we can see that the 2c2 instruction indicates that line 2 of both files are different.
Next, let’s take a look at one more code submission that starts with an empty line and uses the shell-builtin printf command:
$ cat script_v2.sh

#!/bin/sh
printf "Hello, \n"
printf "World!\n"
Finally, let’s review this script by comparing it against script_v0.sh:
$ diff script_v0.sh script_v2.sh
0a1
>
2c3,4
< /bin/echo "Hello, World!"
---
> printf "Hello, \n"
> printf "World!\n"
Again, diff identified the two scripts as different. But this time, we can see two instructions in the output.
The 0a1 instruction followed by > suggests that if we add an empty line at the beginning of the first script, then we get the first line of the second script. On the other hand, the 2c3,4 instruction suggests that we need to change line 2 of the first script by a group of lines (3-4) from the second file.
Like earlier, the contents from the first and second scripts have prefix symbols “< ” and “>“, respectively. Moreover, three triple-dashes give improved readability by separating the contents from each file.
Now that we’ve developed a fair understanding of default behavior exhibited by the diff command, it’s time to explore its wide variety of options.
Let’s say we need to compare the list of invited students with the actual list of students who attended the training session.
First, we need help from the marketing team to give us an alphabetically sorted list of students who were invited to the training:
$ cat all_invitations.txt
BILLY
ROHAN
TOM
Now, let’s assume that our logistics management team sent us an alphabetically sorted list of student names who actually attended the training in the attendance.txt file:
$ cat attendance.txt
BILLY
Kiran
tom
Notice that attendance.txt has a mix of uppercase and lowercase characters, while our all_inviations.txt file has everything in uppercase. In such a scenario, we might want to use the –ignore-case option:
$ diff --ignore-case all_invitations.txt attendance.txt
2c2
< Rohan
---
> kiran
So, we can see that Rohan was invited, but he didn’t turn up for the training. On the contrary, Kiran wasn’t invited but did attend the session.
Well, some of the students were not focusing during the session. As a result, they copied code from their friends and added spaces and blank lines to make theirs look unique.
Now, if we’re going to catch plagiarism, then we need to ensure that diff is able to treat the copied solutions as identical.
First, let’s see the script submitted by student-9, who copied the code from script_v1.sh. Further, the script has been altered by adding a blank line and 8 spaces after the echo command to make the script look different from script_v1.sh:
$ cat -te script_v9.sh
#!/bin/sh$
$
echo        "Hello, World!"$
Well, the normal behavior of diff will find the two files to be non-identical:
$ diff script_v1.sh script_v9.sh
2c2,3
< echo "Hello, World!"
---
>
> echo        "Hello World"
So, we need to use the –ignore-blank-lines (-B) and –ignore-space-change (-b) options to catch such plagiarism:
$ diff -B -b -s script_v1.sh script_v9.sh
Files script_v1.sh and script_v9.sh are identical
We can also note that the use of the –report-identical-files (-s) option made it explicitly clear that both files have the same content.
Moreover, if we want a stricter approach in some cases, then we may even use the –ignore-all-space (-w) option to ignore all spaces.
One more plagiarism strategy used by a group of students is the use of comments in their plagiarized copy of the script.
Let’s preview the code in script_v8.sh, which has been copied from script_v1.sh:
$ cat script_v8.sh
#!/bin/sh
#
# Hello World Program
#
echo "Hello World"
Again, we might not be able to catch this plagiarism using the default behavior of the diff command:
$ diff script_v1.sh script_v8.sh
1a2,4
> #
> # Hello World Program
> #
Now, to ignore comments beginning with #, we can use the –ignore-matching-lines option with a regex value of ^#:
$ diff -s --ignore-matching-lines="^#" script_v1.sh script_v8.sh
Files script_v1.sh and script_v8.sh are identicalSo far, we’ve used diff to compare exactly two files at a time. Let’s learn how we can use it to make a comparison across multiple files.
By default, diff expects exactly two file-operands. And, it always compares the file corresponding to the second filename with respect to the one identified by the first filename.
However, if we have a requirement to compare multiple files at once, then we can use either the –from-file or –to-file option:
$ diff [--from-file | --to-file] named_file list_of_filesAs such, named_file is any filename other than – (stdin). Further, when we use the –from-file option, diff compares the named_file to the list of remaining files, whereas with the –to-file option, diff compares the list of files to the named_file.
Now, let’s use the –from-file option to compare script-v0.sh to both script-v1.sh and script-v2.sh:
$ diff --side-by-side --from-file script_v0.sh \
script_v1.sh script_v2.sh
#!/bin/sh                                                       #!/bin/sh
/bin/echo "Hello, World!"                                     | echo "Hello World"
                                                              >
#!/bin/sh                                                       #!/bin/sh
/bin/echo "Hello, World!"                                     |	printf "Hello, \n"
                                                              >	printf "World!\n"
For improved readability, we also used the –side-by-side (-y) output formatting option. So, we can notice that the left side shows the script_v0.sh file, while the right side shows script_v1.sh and script_v2.sh files. Further, a few symbols are used as prefixes on the dissimilar lines:
Next, let’s do a reverse comparison by using the –to-file option:
$ diff --side-by-side --to-file script_v0.sh \
script_v1.sh script_v2.sh
#!/bin/sh                                                       #!/bin/sh
echo "Hello World"                                            |	/bin/echo "Hello, World!"
                                                              <
#!/bin/sh                                                       #!/bin/sh
printf "Hello, \n"                                            |	/bin/echo "Hello, World!"
printf "World!\n"                                             <
We can notice that the output has changed sides. While the left side now shows script_v1.sh and script_v2.sh files, script_v0.sh is output on the right. Like we saw earlier, prefix symbols indicate the changes, but this time, we have a left-angle bracket < to indicate that a line is missing.
Let’s say an analyst from the logistics division needs our help in analyzing historical data. For this purpose, we’re provided with a copy of raw data that includes attendance reports organized in a calendar-like directory structure:
attendance_calendar
├── 2019
│   ├── logistics_incharge.txt
│   ├── reports
│   │   └── January
│   │        ├── 01.txt
│   │        └── 02.txt
│   └── training_incharge.txt
└── 2020
    ├── marketing_incharge.txt
    ├── logistics_incharge.txt
    ├── reports
    │   └── January
    │        ├── 01.txt
    │        └── 02.txt
    └── training_incharge.txt
For better readability, only a few days from January are shown. However, we can assume that attendance data is available for all relevant days from the years 2019 and 2020.
Now, keeping in mind that directories are also treated as files in Unix, let’s use the vanilla behavior of diff to compare the 2019 and 2020 data:
attendance_calendar$ diff --side-by-side 2019/ 2020/
... 2019/logistics_incharge.txt 2020/logistics_incharge.txt
Mrs. Hudson						      |	Mr. Watson
Only in 2020/: marketing_incharge.txt
Common subdirectories: 2019/reports and 2020/reports
... 2019/training_incharge.txt 2020/training_incharge.txt
Mr. Thomson						      |	Mr. Richard
Well, we can see that diff picked files for comparison in alphabetical order, but only the ones lying directly under the specified directories. And, we also got a first-level comparison of the directory structure.
By default, diff doesn’t perform a recursive comparison on files located under sub-directories. But, we can enable it with the –recursive (-r) option.
Let’s say we need to compare the attendance for the 1st day of each month in the first quarter of the years 2019 and 2020. A recursive comparison should work, however, we’ll need to exclude a set of files.
Now, the good news for us is that diff offers two options, –exclude=PATTERN and –exclude-from=PATTERN_FILE, to cater to such a use case. So, let’s think about the set of files that needs to be excluded from the comparison:
So, let’s create a file called excluded_patterns.txt and keep all the patterns in lowercase:
$ cat excluded_patterns.txt
0[2-9].txt
[1-3][0-9].txt
april
may
june
july
august
september
october
november
december
Later, we can use a combination of –exclude-from and –ignore-file-name-case options to gracefully handle cases where month names in the two directories differ in only by case.
Finally, let’s put things together and see our recursive comparison in action:
$ diff \
--side-by-side \
--ignore-file-name-case \
--exclude-from=excluded_patterns.txt \
--recursive 2019/reports 2020/reports
... 2019/reports/February/01.txt 2020/reports/February/01.txt
Invitations Sent: 800					      |	Invitations Sent: 1200
Actually Attended: 275 					      |	Actually Attended: 575
... 2019/reports/January/01.txt 2020/reports/January/01.txt
Invitations Sent: 500					      |	Invitations Sent: 1000
Actually Attended: 150					      |	Actually Attended: 300
Only in 2019/reports/March: 01.txt
Since we don’t have a file named 01.txt for March 2020, a detailed comparison report for March is missing.
When working with directories, diff typically compares only those files that are reachable through a similar path under both directories.
Let’s invoke diff with the same options that we used to generate the day-1 comparison report for Q1 in the years 2019 and 2020. However, this time, let’s also use the –starting-file option to start comparison only when it finds a file path matching the keyword “March“:
$ diff \
--side-by-side \
--starting-file=March \
--ignore-file-name-case \
--exclude-from=excluded_patterns.txt \
--recursive \
--from-file 2019/reports 2020/reports
Only in 2019/reports/March: 01.txt
We can notice that diff is complaining that the file 01.txt is not reachable under the 2020 directory. But, it doesn’t give any more comparison insights for such files.
Since 01.txt is only present under the 2019 directory, a better way to look at the comparison is by treating the absent file as an empty file. Interestingly, diff has two options to put this plan in action:
So, let’s first use the –new-file option and check if it does what we expect it to do:
$ diff \
--side-by-side \
--starting-file=March \
--ignore-file-name-case \
--exclude-from=excluded_patterns.txt \
--new-file \
--recursive \
--from-file 2019/reports 2020/reports
... --from-file 2019/reports 2019/reports/March/01.txt 2020/reports/March/01.txt
Invitations Sent: 750					      <
Actually Attended: 350					      <
Well, yes! It did work as expected and gave us more insights.
Now, let’s also see the effect of the restricted –unidirectional-new-file option:
$ diff \
--side-by-side \
--starting-file=March \
--ignore-file-name-case \
--exclude-from=excluded_patterns.txt \
--unidirectional-new-file \
--recursive \
--from-file 2019/reports 2020/reports
Only in 2019/reports/March: 01.txt
Ah! we’re back to square one by using –unidirectional-new-file, instead of –new-file. That’s expected behavior, as the file is not absent from the first directory.
Finally, let’s generate a reverse comparison report by using the –to-file and –unidirectional-new-file options:
$ diff \
--side-by-side \
--starting-file=March \
--ignore-file-name-case \
--exclude-from=excluded_patterns.txt \
--unidirectional-new-file \
--recursive \
--to-file 2019/reports 2020/reports
... --to-file 2019/reports 2020/reports/March/01.txt 2019/reports/March/01.txt
							      >	Invitations Sent: 750
							      >	Actually Attended: 350
We do see the effect of the –unidirectional-new-file option now, as the order of the absent file in the comparison is reversed.
Patching is a mechanism that can help us modify a piece of data by applying a set of diff-like changes to it.
While preparing several analysis reports using the copy of data provided to us, we made a few changes to it. Further, we feel that it’s relevant to request the logistics team to make these changes in the original data. Let’s see how diff can help us with patching.
First, let’s take a look at the changes we made to our working file 01.txt.modified, which was originally cloned from the 2020/reports/January/01.txt file:
$ diff 01.txt 01.txt.modified
2a3
> Empty Seats: 700
We can see that we added a new line that mentions the seats that were empty on that day during the training.
Now, to get these changes absorbed by the team keeping the original copy of data, we can do two things:
Well, the second choice is more focused, as we’re sending minimal data and still getting the job done.
Further, diff can generate the output in the form of edit (ed) scripts that can help us automate the patching process. For this, we need to use the –ed (-e) option.
Next, let’s generate an ed script for the changes that we made to the 01.txt file:
$ diff --ed 01.txt.modified 01.txt > 01.txt.ed
$ cat 01.txt.ed
2a
Empty Seats: 700
.
So, once the team has received our ed script, first they need to create a backup file called 01.txt.orig. Then, they can use 01.txt.ed script to update the 01.txt file:
$ (cat 01.txt.ed && echo w) | ed - 01.txt
Here, we wrote the instructions from our 01.txt.ed script to stdout followed by the write (w) command. Further, these instructions are passed to the ed command through a pipe.
Finally, the team can verify the updated file and remove the backup file:
$ cat 01.txt
Invitations Sent: 1000
Actually Attended: 300
Empty Seats: 700
$ rm 01.txt.origWell, ed scripts might be one of the oldest ways to create and apply patches. But, they’re not so user-friendly, and getting familiarity with ed concepts brings an overhead at the receiver’s end.
So, to make things run smoother, we can alternatively use the –unified (-u) output formatting option of diff to create a patch file:
$ diff --unified 01.txt 01.txt.modified > 01.txt.diff
$ cat 01.txt.diff
--- 01.txt	2020-04-01 14:37:00.000000000 +0530
+++ 01.txt.modified	2020-04-01 14:36:54.000000000 +0530
@@ -1,2 +1,3 @@
 Invitations Sent: 1000
 Actually Attended: 300
+Empty Seats: 700
At first, the new style might overwhelm us, so let’s understand this, piece by piece:
Now that we know basically how it works, let’s just send the 01.txt.diff file to the team, and they can use the patch command to apply it:
$ patch 01.txt 01.txt.diff
patching file 01.txt
$ cat 01.txt
Invitations Sent: 1000
Actually Attended: 300
Empty Seats: 700
As such, the diff –unified and patch commands together complete the patch workflow with the unified format.
By now, we’ve already used a few output formats such as –side-by-side, –normal (default), and –unified. Let’s learn how we can further control the output format.
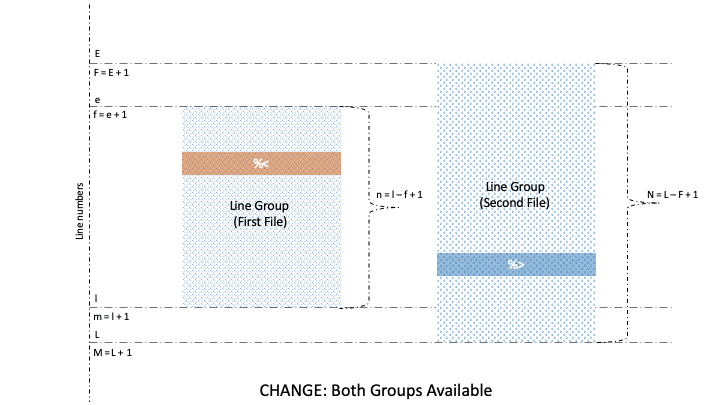
While comparing two files, diff breaks the entire text segments from two files into sequences of identical lines and non-identical lines called hunks. Eventually, diff gives us information about these hunks as a measure of dissimilarity between the two files.
Generally speaking, even single lines fall into this category with a group of size one, where starting and ending line numbers are equal.
As such, the diff command is capable of finding out changes within the two groups. And as a result, it can categorize groups into four types: old, new, unchanged, and changed.
Further, diff iterates within these groups to make a line-wise comparison. So, when it comes to individual lines, it can internally categorize them into three types: old, new, and unchanged.
In short, line types and group types are known as LTYPE and GTYPE.
Output generated by diff is a collection of information of each line within different group types. Further, it gives three options – namely, –line-format, –LTYPE-line-format, and –GTYPE-group-format – for fine control of the output format.
Now, if we replace LTYPE and GTYPE by their possible values, then we’ll get a bunch of options such as –old-line-format, –new-line-format, –unchanged-line-format, –old-group-format, –new-group-format, –unchanged-group-format, and –changed-group-format.
Naturally, lines and groups have different characteristics. So, diff has two categories for formatting, namely Line Format (LFMT) and Group Format (GFMT). Let’s take a look at different GFMT symbols for identifying the boundaries of line groups belonging to the first and second file:
After visualizing the meaning of line number and line content symbols in GFMT, it is also important to understand the process of formatting for the line content clearly. So, let’s see the connection between GFMT and LFMT formatting for lines:
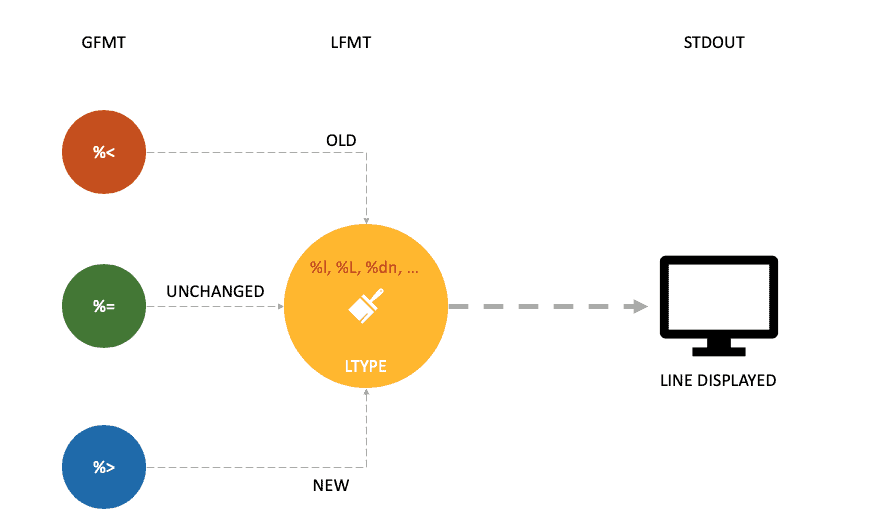
Well, there are three GFMT symbols, namely %<, %=, and %>, that identify the values of non-identical or identical lines from the two files. Further, each of these symbols is formatted by LTYPE formatting rules, after which the output is rendered on stdout.
Now, let’s apply the LFMT and GFMT rules of diff to simulate a custom, side-by-side output format.
First, let’s take a look at the trainers’ data from 2019 and 2020:
$ cat trainers_2019.txt
Bill
Catherine
Dave
Eve
Raymond
Susan
Zack
$ cat trainers_2020.txt
Bill
Eve
Feynman
Gabrina
Raymond
Susan
Zoe
Now, let’s use –LTYPE-line-format and –GTYPE-group-format options to generate our own version of the side-by-side output format:
diff \
--old-group-format='[%(f=l?L%df:L%df,L%dl)] vs [❌]:
%<' \
--new-group-format='[❌] vs [%(F=L?L%dF:L%dF,L%dL)]: %>' \
--changed-group-format='[%(f=l?L%df:L%df,L%dl)] vs [%(F=L?L%dF:L%dF,L%dL)]:
%< %>' \
--unchanged-group-format='[%(f=l?L%df:L%df,L%dl)] vs [%(F=L?L%dF:L%dF,L%dL)]:
%=' \
--old-line-format='-	%L' \
--new-line-format='				+	%L' \
--unchanged-line-format='✔️	%l				%L' \
trainers_2019.txt trainers_2020.txt
Though our command contains a lot of familiar symbols from LFMT and GFMT, if we look closely, we might be able to see a few patterns:
Finally, let’s see a nice-and-neat, side-by-side diff generated by our last command:
[L1] vs [L1]:
✔️      Bill                            Bill
[L2,L3] vs [❌]:
-       Catherine
-       Dave
[L4] vs [L2]:
✔️      Eve                             Eve
[❌] vs [L3,L4]:
                                +       Feynman
                                +       Gabrina
[L5,L6] vs [L5,L6]:
✔️      Raymond                         Raymond
✔️      Susan                           Susan
[L7] vs [L7]:
-       Zack
                                +       Zoe
We created our customized output format from a demo perspective, therefore, it might not be handling all the edge cases. So, for production code, we must either improve its reliability by handling edge cases, or we may use the –side-by-side option.
In this tutorial, we focused on in-depth coverage of the diff command. Further, we used it to solve several use cases such as code review, plagiarism-check, directory comparison, and file patching.
As such, with more exploration and practice, it’s easy to appreciate diff as a versatile comparison utility.