

Learn through the super-clean Baeldung Pro experience:
>> Membership and Baeldung Pro.
No ads, dark-mode and 6 months free of IntelliJ Idea Ultimate to start with.
Learn through the super-clean Baeldung Pro experience:
>> Membership and Baeldung Pro.
No ads, dark-mode and 6 months free of IntelliJ Idea Ultimate to start with.
In this tutorial, we’ll be looking at what are the .crt and the .key files in the context of an HTTPS server. Additionally, we’ll also look at how we can generate them using openssl.
When setting up the SSL/TLS on an HTTP server, the server will demand a certificate file (with the .crt extension) and a private key file (with the .key extension). The certificate file is a public-key certificate following the x.509 standard. It contains information about the identity of the server, such as its name, geolocation, and public key. Essentially, it’s a certificate that the server serves to the connecting users to prove that they are what they claim to be.
On the other hand, the private key file is a file containing the private part of the public-private key pair. Whenever the server receives any incoming HTTPS request, it decrypts the data using this private key.
Let’s look at some sample configurations from different servers. In Nginx, here’s how we would configure the ngx_http_ssl_module to enable HTTPS:
ssl_certificate example.com.crt;
ssl_certificate_key example.com.key;
In Apache, the equivalent would look something like this:
SSLEngine on
    SSLCertificateFile "example.com.cert"
SSLCertificateKeyFile "example.com.key"The process of generating the certificate and private key files is rather straightforward through the use of several commands. However, depending on the purpose of the certificate (either production usage or local testing), we’ll have to go through different processes.
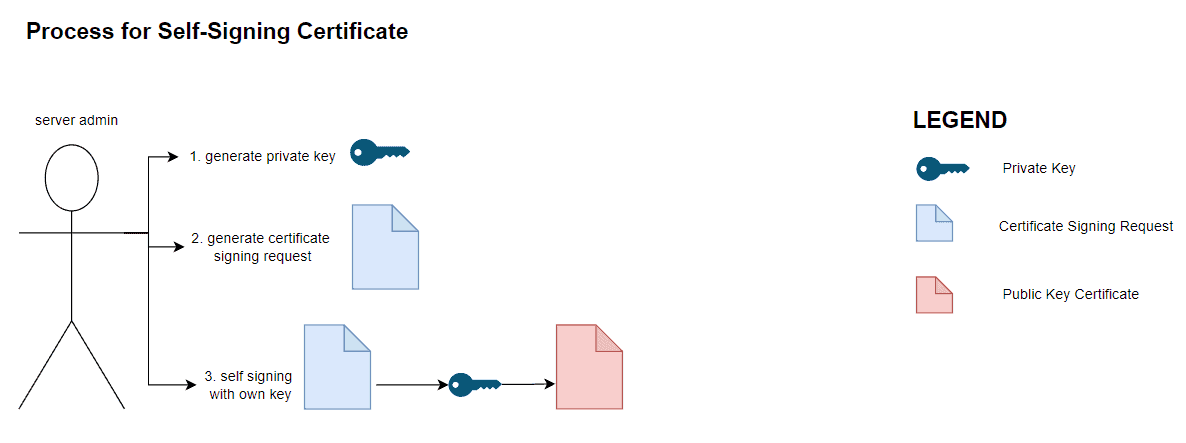
Firstly, for certificates that are intended for local development and testing, we can create and sign the certificate ourselves:
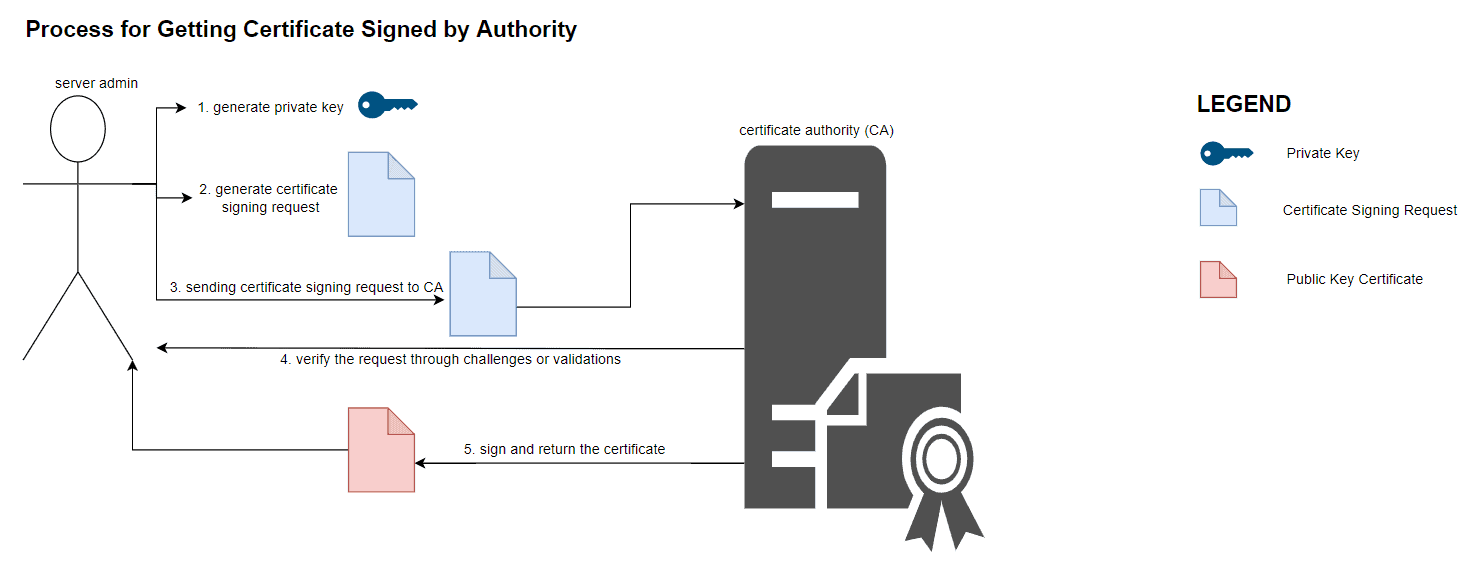
On the other hand, if a certificate is intended for production usage, we need to have it signed by a certificate authority. In this case, it follows a similar but more involved process as illustrated by the diagram below:
Although both certificates provide the same information for connecting users, the difference between them is the legitimacy of the certificate. When we present certificates signed by an external certificate authority, most browsers will, by default, trust it. This is because those clients come preinstalled with a list of reputable and trusted root certificate authorities. These authorities include Letsencrypt, DigiCert, and Globalsign.
On the other hand, a self-signed certificate does not bear the name of these reputable certificate authorities and therefore is not as trustable. When they are presented to connecting browsers and clients, they’ll prompt a variation of the “Invalid Certificate Authority” error. For example, here’s how Firefox will display the error:

In short, these browsers do not trust certificates signed by some no-name authority. For development purposes, it’s acceptable since browsers will offer a way to bypass the error. However, the same is not applicable to production certificates. This is because the error prompt will undermine the confidence users have in the website.
One thing to note about engaging external certificate authorities is that most of them charge a fee for signing certificates. One exception is Letsencrypt which would sign certificates for free provided that the authenticity of the certificates is validated through challenges.
The openssl command is a command-line tool that implements the SSL/TLS network protocols. Additionally, it also contains commands that support the secure network protocol, such as generating a public-private key pair, creating a certificate signing request, and decoding the certificate file. In this tutorial, we’ll be using this tool extensively.
To install, simply use the package manager of our Linux distro. For example, we can install openssl with apt-get in Ubuntu:
$ sudo apt-get update -qq
$ sudo apt-get install -y openssl
Running the openssl version command would allow us to quickly verify the installation:
$ openssl version
OpenSSL 1.1.1f 31 Mar 2020The process of generating a certificate file that’s signed by an external reputable certificate authority is slightly different. Instead of generating a certificate file ourselves, we’ll generate a certificate signing request (CSR) and hand it over to the certificate authority for their signature. Let’s look at the steps for generating a CSR in the sections below.
Regardless of whether a certificate is self-signed or signed by a certificate authority, we’ll first need to generate a private key which we’ll keep:
$ openssl genrsa 2048 > example.com.keyTo generate a certificate signing request, we use the req subcommand from the openssl toolkit:
$ openssl req -new -key example.com.key -out example.com.csrWhen we invoke, the command will prompt us for the details of the entity we are generating the certificate for.
Using the openssl req command, we can inspect the content of the certificate signing request:
$ Certificate Request:
    Data:
        Version: 1 (0x0)
        Subject: C = US, ST = New York, L = New York City, O = Awesome Tech, OU = Engineering, CN = example.com, emailAddress = [email protected]
        Subject Public Key Info:
            Public Key Algorithm: rsaEncryption
                RSA Public-Key: (2048 bit)
                Modulus:
                    00:9f:31:cb:05:27:01:88:1a:1e:4d:3b:d0:8f:13:
                    b9:23:72:70:0d:a5:ec:ca:dc:51:5c:a6:74:6e:d9:
                    6d:4d:05:dc:4f:fc:1d:85:3f:86:16:a0:37:a9:25:
                    8f:6e:a3:33:3e:79:6e:09:d6:af:cf:33:9f:e7:07:
                    2a:ec:57:f9:44:45:9b:e9:93:fa:29:c4:3a:81:01:
                    10:8c:cd:e2:49:76:dc:0b:a3:5a:45:0a:c4:f0:bd:
                    c9:52:a1:02:1f:01:e9:f9:94:3f:52:79:eb:e4:8d:
                    33:c8:d0:4a:bb:59:e5:11:96:fe:7e:d2:91:c4:95:
                    a3:73:84:59:2b:c1:0b:b0:84:b2:d6:a1:b6:b4:eb:
                    24:52:30:2a:91:de:88:9a:51:21:da:92:90:85:c9:
                    22:63:87:04:f6:31:34:f8:a6:74:cf:9f:c8:7c:05:
                    94:53:7d:82:17:2f:53:15:9d:3c:91:1e:3e:97:02:
                    7c:46:97:18:eb:4b:f4:33:b6:5d:0a:5b:6d:17:a5:
                    09:59:4f:ff:f8:8a:bf:10:20:f0:00:e8:5e:90:ec:
(TRUNCATED)
Compared to the self-signed certificate, the certificate signing request does not have an Issuer attribute. This is because this document is not a certificate but a certificate signing request document. Then, we can pass this file to any of the publicly available certificate authorities for their signature. Depending on the authority, different validations and challenges might apply in order to validate the authenticity of the certificates.
On a high level, the process starts by us generating a private key using the openssl‘s genrsa command. After that, we’ll create a certificate signing request for our server. To generate a public-key certificate from a certificate signing request document, we’ll have a certificate authority to sign on it.
Since we are not interested in an external certificate authority in this process, we’ll create our own root certificate authority by generating a self-signed certificate. Finally, we can obtain the public-key certificate by signing the certificate request document using the root certificate authority we’ve generated in the earlier steps.
The details of the process can be found in another article on the site.
In this tutorial, we’ve looked at the certificate (.crt) and private key (.key) files that are essential for setting up an HTTPS server. Additionally, we’ve also talked briefly about the difference between self-signed certificates as compared to certificates signed by an external CA. Finally, we’ve learned some openssl commands for generating keys, self-signed certificates, and certificate signing requests.