

Learn through the super-clean Baeldung Pro experience:
>> Membership and Baeldung Pro.
No ads, dark-mode and 6 months free of IntelliJ Idea Ultimate to start with.
Last updated: August 30, 2024
Learn through the super-clean Baeldung Pro experience:
>> Membership and Baeldung Pro.
No ads, dark-mode and 6 months free of IntelliJ Idea Ultimate to start with.
A lot of companies use Microsoft’s Active Directory (AD) service. It helps when managing a mixed Windows and Linux environment. In fact, it’s a very popular directory service, because AD manages access to an organization’s resources from one place.
In this tutorial, we’ll see how to list an Active Directory user’s attributes from a Linux system.
Specifically, we’ll use the Active Directory service set up and running on Windows Server 2016. Also, AD users will log in to Ubuntu 20.04, which will be the client machine.
Notably, there are some requirements to meet before we can see a user’s attributes in Active Directory.
Mainly, our Linux machine needs to be part of the Active Directory group. Also, we must have sufficient permissions to query the directory.
Let’s look over how our machines are set up. On Ubuntu 20.04, we’ve got the following configuration:
Similarly, the Active Directory has the following configuration:
For demonstration, we’ll also use the Active Directory user Baeldung. We can, of course, use actual names instead of the example.com site and the Baeldung user.
The samba-common-bin package provides the samba-tool command on Ubuntu.
The samba-tool command has a user show subcommand. We can use user show to output the attributes of an Active Directory user. This is followed by the –attributes option. The latter sets the attributes to display.
Let’s use it to show the attributes for our user Baeldung:
$ sudo samba-tool user show baeldung --attributes=* -U baeldung -H ldap://example.com
Password for [WORKGROUP...
dn: CN=Baeldung,CN=Users,...
distinguishedName: CN=Baeldung...
...
The SMB credentials are set with the -U option, while -H specifies the server. The user show subcommand displays the user AD object.
We’ve used an asterisk (*) as the value of the attributes option. As a result, the command shows all the available attributes for the user Baeldung. This includes the user’s SID, primary group ID, and the home directory.
Basically, the ldapsearch command looks for the entries in the LDAP database and returns the results. First, it connects to an LDAP server. Then, it binds to it. Lastly, it does a search using a filter. The output uses an LDIF format.
Let’s use it to search and show our user’s attributes:
$ ldapsearch -x -LLL -b "cn=baeldung,cn=Users,dc=example,dc=com" -D "[email protected]" -W -H ldap://example.com
Enter LDAP Password:
dn: CN=Baeldung,CN=Users,DC=example...
cn: Baeldung
...
In the above example, we’ve used a few options:
Finally, we can see different attributes of the user Baeldung.
The getent command queries the Name Service Switch (NSS) database. Let’s use the getent command to list the attributes of Active Directory user Baeldung:
$ getent passwd [email protected]
[email protected]:*:111:100:Baeldung...
In the example above, getent looks for the [email protected] entry in the passwd database. Also, it shows all values of the Active Directory user’s attributes.
The output format is like the regular /etc/passwd format.
The id command is also a simple way to print out the user’s attributes.
Similar to getent, let’s use it to see the attributes of our user Baeldung:
$ id [email protected]
uid=1094801105([email protected]) gid=...
Notably, the id command shows only the real and effective user and group ID values.
JXplorer is a GUI-based LDAP viewer and editor. We can connect to and search through an Active Directory by using it. Also, it can look for user objects and show their attributes in a user-friendly interface.
Let’s install JXplorer on Ubuntu 20.04, with the usual apt command:
$ sudo apt install jxplorerWe can launch JXplorer from the GUI or the command line. Once launched, we navigate the options to connect to our Active Directory domain. To connect, we specify the domain controller hostname, port, and credentials.
We start by going to the File menu. Now, we choose the Connect option. In the pop-up box, we enter the required information:
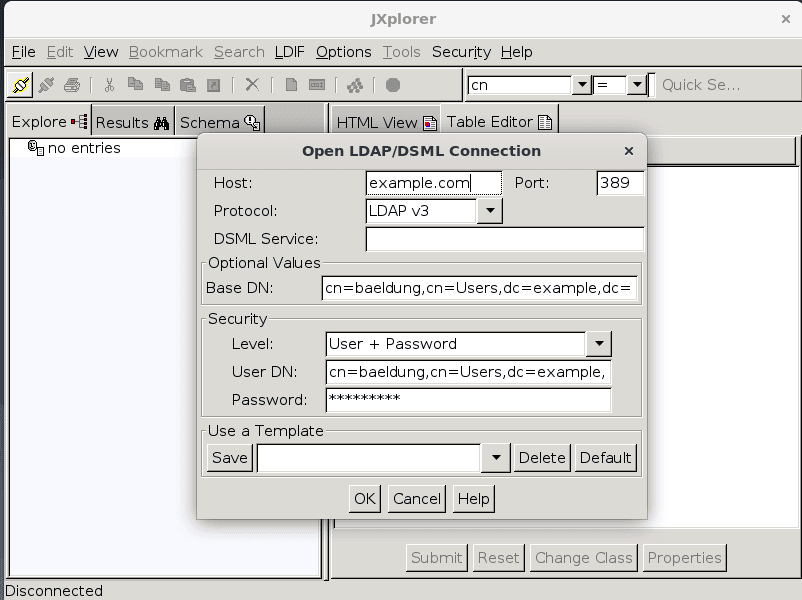
Finally, we hit the OK button. At this point, we can see the details of our user:
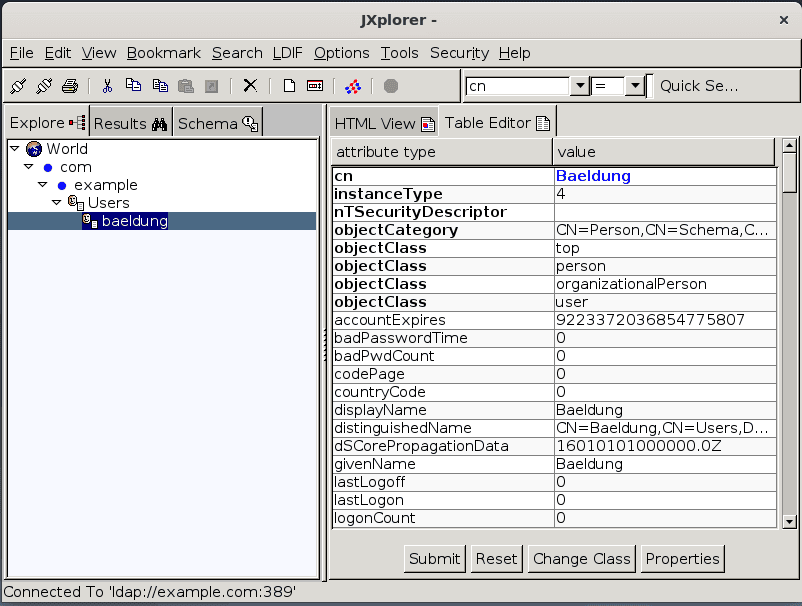
Similarly, we can get the details of other users as well.
In this article, we’ve seen different ways to get a user’s attributes from Active Directory. To sum up, to use samba-tool or ldapsearch for LDAP queries, we need to know the proper syntax. The id command is simple to use but provides little information. Similarly, getent is also helpful, but again, it prints only small details.
On the whole, JXplorer is a good choice for a GUI environment, which many Windows environments already are. It makes it easy to see the user’s attributes in Active Directory and customize them.
Thus, getting the user’s attributes can be straightforward. We just need to make sure that the Active Directory and Linux servers are set up right.