

Mocking is an essential part of unit testing, and the Mockito library makes it easy to write clean and intuitive unit tests for your Java code.
Get started with mocking and improve your application tests using our Mockito guide:
Handling concurrency in an application can be a tricky process with many potential pitfalls. A solid grasp of the fundamentals will go a long way to help minimize these issues.
Get started with understanding multi-threaded applications with our Java Concurrency guide:
Spring 5 added support for reactive programming with the Spring WebFlux module, which has been improved upon ever since. Get started with the Reactor project basics and reactive programming in Spring Boot:
Since its introduction in Java 8, the Stream API has become a staple of Java development. The basic operations like iterating, filtering, mapping sequences of elements are deceptively simple to use.
But these can also be overused and fall into some common pitfalls.
To get a better understanding on how Streams work and how to combine them with other language features, check out our guide to Java Streams:
Explore Spring Boot 3 and Spring 6 in-depth through building a full REST API with the framework:
Yes, Spring Security can be complex, from the more advanced functionality within the Core to the deep OAuth support in the framework.
I built the security material as two full courses - Core and OAuth, to get practical with these more complex scenarios. We explore when and how to use each feature and code through it on the backing project.
You can explore the course here:
Spring Data JPA is a great way to handle the complexity of JPA with the powerful simplicity of Spring Boot.
Get started with Spring Data JPA through the guided reference course:
Refactor Java code safely — and automatically — with OpenRewrite.
Refactoring big codebases by hand is slow, risky, and easy to put off. That’s where OpenRewrite comes in. The open-source framework for large-scale, automated code transformations helps teams modernize safely and consistently.
Each month, the creators and maintainers of OpenRewrite at Moderne run live, hands-on training sessions — one for newcomers and one for experienced users. You’ll see how recipes work, how to apply them across projects, and how to modernize code with confidence.
Join the next session, bring your questions, and learn how to automate the kind of work that usually eats your sprint time.
Yes, we're now running our only Summer Sale. All Courses are 30% off until 20th July, 2026:
Yes, we're now running our only Summer Sale. All Courses are 30% off until 20th July, 2026:
1. Introduction
In this writeup, we’ll explore an interesting example with JHipster – building a simple microservices architecture. We’ll show how to build and deploy all the required pieces, and in the end, we’ll have a full-blown microservice application up and running.
If you’re new to JHipster, please check our introductory article before proceeding to have a good understanding of the basics of this project generation tool.
2. Monolithic vs. Microservice
In our initial article, we illustrated how to create and bootstrap a monolithic application which is relatively easy to maintain.
Our microservice system, on the other hand, will separate the front-end the back-end which, in turn, can also be split into several small applications, each dealing with a subset of the full application domain. Naturally, as with all microservice implementations, this solves some problems but also introduces some complexity, such as dealing with component registry and security.
JHipster will take care of most difficulties of managing the microservice applications, with the help of modern open-source tools like Netflix’s Eureka Server and Hashicorp’s Consul.
There are, of course, some things to consider here, like how big or complicated our domain is, how critical is our application and what levels of availability do we want need to have, are we going to host our services on different servers and locations, etc. The goal of these tools is of course to these permutations possible and easy to manage.
2.1. JHipster Microservice Components
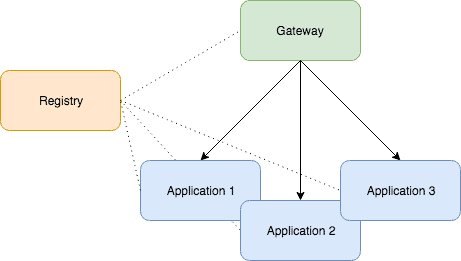
When working on a Microservice architecture with JHipster, we’ll need to build and deploy at least three different projects: a JHipster Registry, a Microservice Gateway, and at least one Microservice Application.
The JHipster Registry is an essential piece of the microservice architecture. It ties all the other components together and enables them to communicate with each other.
The Microservice Application contains the back-end code. Once running it will expose the API for the domain it is concerned with. A Microservice Architecture may be composed of many microservice applications, each containing a few related entities and business rules.
And the Microservice Gateway has all the front-end (Angular) code and will consume the API created by the whole group of micro service applications:
3. Installation
For all the details about the installation process, check our introductory article on JHipster.
4. Creating a Microservice Project
Now let’s install the three core components of our microservice project.
4.1. Installing JHipster Registry
Since the JHipster Registry is a standard JHipster, so we just need to download and run it. There is no need to modify it:
git clone https://github.com/jhipster/jhipster-registry
cd jhipster-registry && ./mvnw
This will clone the jhipster-registry project from GitHub and start the application. Once it successfully starts up, we can visit http://localhost:8761/ and log in with user admin and password admin:

4.2. Installing a Microservice Application
Here is where we start to build the actual features of our project. In this example, we’ll create a simple Microservice Application that manages cars. So first we’ll create the application, and then we’ll add an entity to it:
# create a directory for the app and cd to it
mkdir car-app && cd car-app
# run the jhipster wizard
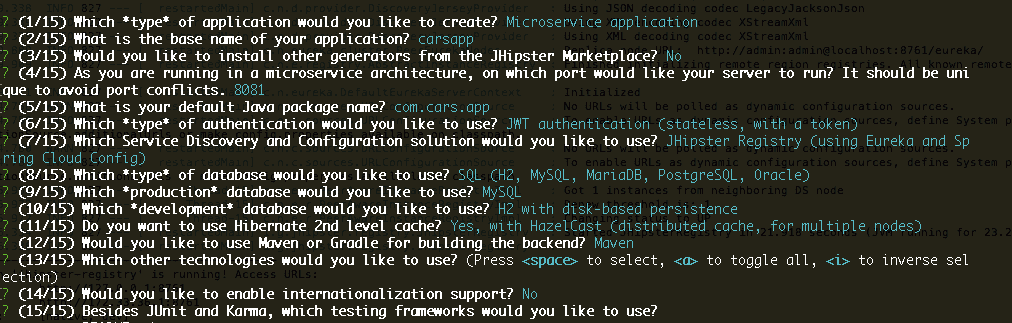
jhipsterOnce the wizard starts, let’s follow the instructions to create a Microservice type application named carapp. Some other relevant parameters are:
- port: 8081
- package: com.car.app
- authentication: JWT
- service discovery: JHipster Registry
The screenshot below shows the complete set of options:
Now we’ll add a car entity to our application:
# runs entity creation wizard
jhipster entity car
The entity creation wizard will start. We should follow the instructions to create an entity named the car with three fields: make, model, and price.
In this case we are creating a single entity, if we aim to create many entities then we should use a graphical tool(JHipster UML or JDL Studio).
Once that’s finished, our first Microservice application is complete. If we have a look at the generated code, we’ll notice that there’s no javascript, HTML, CSS or any front-end code. Those will all be produced once the Microservice Gateway is created. Also, check out the README file for important information about the project and useful commands.
To finish up, let’s run our newly created component:
./mvnwBefore running the above command, we should ensure that the jhipster-registry component is up and running. Otherwise, we’ll get an error.
If everything went according to plan, our car-app would start, and the jhipster-registry log will tell us that the app was successfully registered:
Registered instance CARAPP/carapp:746e7525dffa737747dcdcee55ab43f8
  with status UP (replication=true)
4.3. Installing a Microservice Gateway
Now the front-end bit. We’ll create a Microservice Gateway and indicate to it that we have an entity on an existent component for which we want to create the front-end code:
# Create a directory for our gateway app
mkdir gateway-app && cd gateway-app
# Runs the JHipster wizard
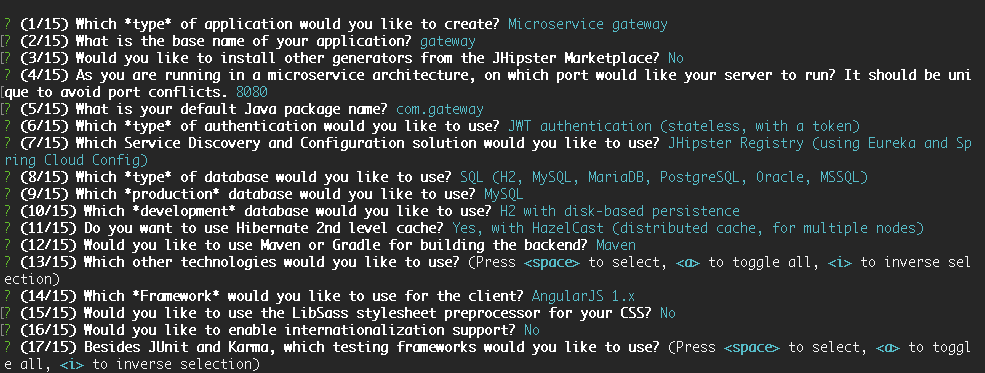
jhipsterLet’s follow the instructions to create an application of type Microservice gateway. We’ll name the application gateway, and select the following options for the other parameters:
- port: 8080
- package: com.gateway
- auth: JWT
- service discovery: JHipster Registry
Here is a summary of the complete set of parameters:
Let’s move on to entity creation:
# Runs entity creation wizard
jhipster entity car
When asked if we want to generate from an existent microservice, choose Yes, then type in the relative path to the car-app root directory (ex.: ../car-app). Finally, when asked if we want to update the entity, choose Yes, regenerate the entity.
JHipster will find the Car.json file which is part of the existent Microservice Application we’ve created earlier and will use the metadata contained in that file to create all the necessary UI code for that entity:
Found the .jhipster/Car.json configuration file, entity can be automatically generated!Time to run the gateway-app and test if everything is working:
# Starts up the gateway-app component
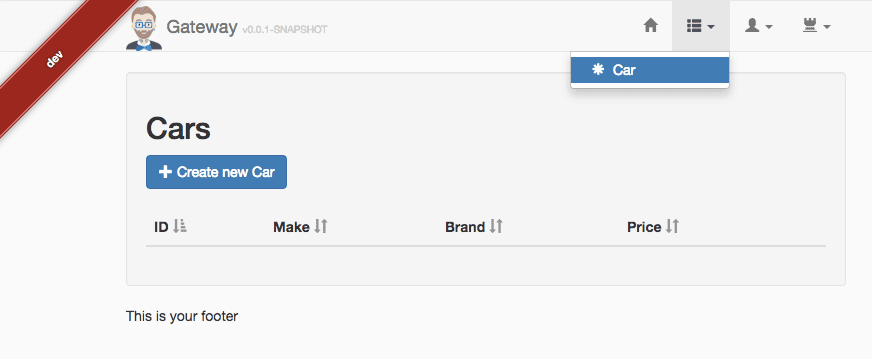
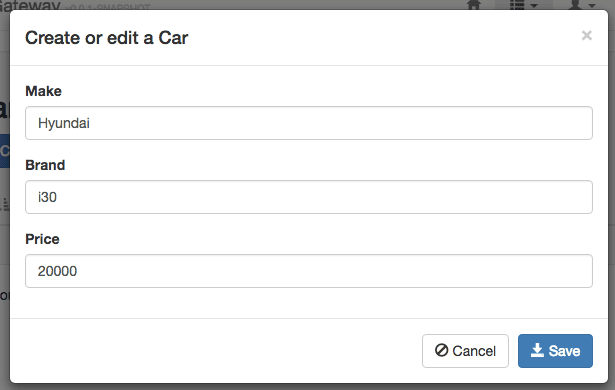
./mvnwLet’s now navigate to http://localhost:8080/ and log in with user admin and password admin. On the top menu, we should see an item Car that will take us to the car list page. All good!
4.4. Creating a Second Microservice Application
Next, let’s take our system one step further and create a second component of type Microservice Application. This new component will manage car dealers, so we’ll add an entity called the dealer to it.
Let’s create a new directory, navigate to it and run the yo jhipster command:
mkdir dealer-app && cd dealer-app
jhipster
After that, we type in dealerapp as the application’s name and choose port 8082 for it to run (it is critical that this is a different port than the ones we’re using for the jhipster-registry and car-app).
For the other parameters, we can choose any option we want. Remember this is a separate microservice so that it can use different database types, cache strategy, and tests than the car-app component.
Let’s add a couple of fields to our dealer entity. For example name and address:
# Runs the create entity wizard
jhipster entity dealer
We shouldn’t forget to navigate to gateway-app and tell it to generate the front-end code for the dealer entity:
# Navigate to the gateway-app root directory
cd ../gateway-app
# Runs the create entity wizard
jhipster entity dealer
Finally, run ./mvnw on the dealer-app root directory to start up that component.
Next, we can visit our gateway application at http://localhost:8080 and refresh the page to see the newly created menu item for the Dealer entity.
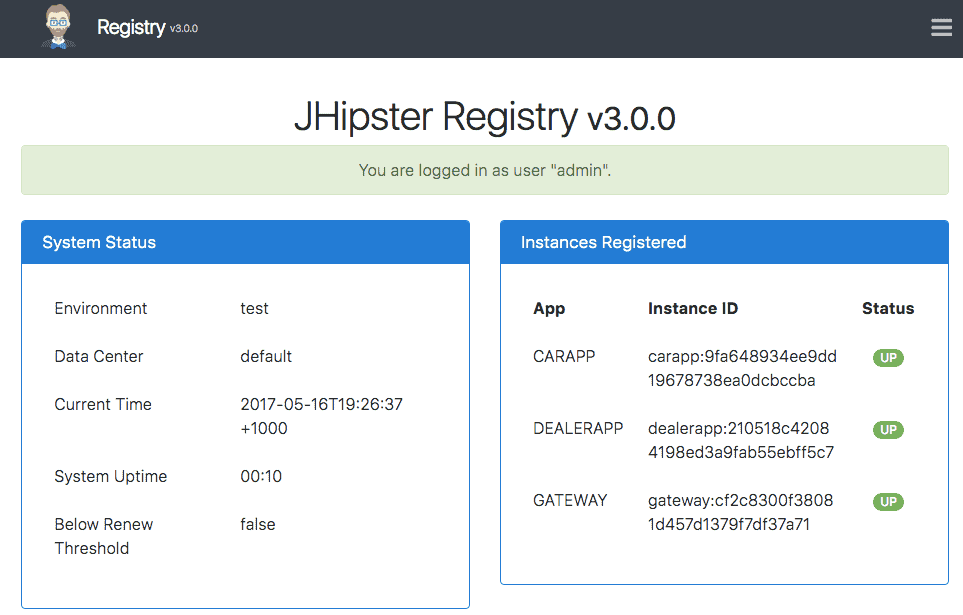
Before we wrap up, let’s have a look at the jhipster-registry application again at http://localhost:8761/. Click on the Applications menu item to check that all of our three components were successfully identified and registered:

That’s it! We’ve created a sophisticated architecture comprised of one Gateway app with all the front-end code backed by two microservices in just a few minutes.
5. Conclusion
Starting a Microservice Architecture project with JHipster is quite easy; we only need to create as many Microservice Applications as we need and one Microservice Gateway and we are ready to go.
You can explore the framework further over at the official JHipster website.


