

Mocking is an essential part of unit testing, and the Mockito library makes it easy to write clean and intuitive unit tests for your Java code.
Get started with mocking and improve your application tests using our Mockito guide:
Handling concurrency in an application can be a tricky process with many potential pitfalls. A solid grasp of the fundamentals will go a long way to help minimize these issues.
Get started with understanding multi-threaded applications with our Java Concurrency guide:
Spring 5 added support for reactive programming with the Spring WebFlux module, which has been improved upon ever since. Get started with the Reactor project basics and reactive programming in Spring Boot:
Since its introduction in Java 8, the Stream API has become a staple of Java development. The basic operations like iterating, filtering, mapping sequences of elements are deceptively simple to use.
But these can also be overused and fall into some common pitfalls.
To get a better understanding on how Streams work and how to combine them with other language features, check out our guide to Java Streams:
Explore Spring Boot 3 and Spring 6 in-depth through building a full REST API with the framework:
Yes, Spring Security can be complex, from the more advanced functionality within the Core to the deep OAuth support in the framework.
I built the security material as two full courses - Core and OAuth, to get practical with these more complex scenarios. We explore when and how to use each feature and code through it on the backing project.
You can explore the course here:
Spring Data JPA is a great way to handle the complexity of JPA with the powerful simplicity of Spring Boot.
Get started with Spring Data JPA through the guided reference course:
Refactor Java code safely — and automatically — with OpenRewrite.
Refactoring big codebases by hand is slow, risky, and easy to put off. That’s where OpenRewrite comes in. The open-source framework for large-scale, automated code transformations helps teams modernize safely and consistently.
Each month, the creators and maintainers of OpenRewrite at Moderne run live, hands-on training sessions — one for newcomers and one for experienced users. You’ll see how recipes work, how to apply them across projects, and how to modernize code with confidence.
Join the next session, bring your questions, and learn how to automate the kind of work that usually eats your sprint time.
Yes, we're now running our only Summer Sale. All Courses are 30% off until 20th July, 2026:
Yes, we're now running our only Summer Sale. All Courses are 30% off until 20th July, 2026:
1. Introduction
In this article, we’re going to explain how filters and interceptors work in the Jersey framework, as well as the main differences between these.
We’ll use Jersey 3 here, and we’ll test our application using a Tomcat 10 server.
2. Application Setup
Let’s first create a simple resource on our server:
@Path("/greetings")
public class Greetings {
    @GET
    public String getHelloGreeting() {
        return "hello";
    }
}
Also, let’s create the corresponding server configuration for our application:
@ApplicationPath("/*")
public class ServerConfig extends ResourceConfig {

    public ServerConfig() {
        packages("com.baeldung.jersey.server");
    }
}
If you want to dig deeper into how to create an API with Jersey, you can check out this article.
You can also have a look at our client-focused article and learn how to create a Java client with Jersey.
3. Filters
Now, let’s get started with filters.
Simply put, filters let us modify the properties of requests and responses – for example, HTTP headers. Filters can be applied both in the server and client side.
Keep in mind that filters are always executed, regardless of whether the resource was found or not.
3.1. Implementing a Request Server Filter
Let’s start with the filters on the server side and create a request filter.
We’ll do that by implementing the ContainerRequestFilter interface and registering it as a Provider in our server:
@Provider
public class RestrictedOperationsRequestFilter implements ContainerRequestFilter {

    @Override
    public void filter(ContainerRequestContext ctx) throws IOException {
        if (ctx.getLanguage() != null && "EN".equals(ctx.getLanguage()
          .getLanguage())) {

            ctx.abortWith(Response.status(Response.Status.FORBIDDEN)
              .entity("Cannot access")
              .build());
        }
    }
}
This simple filter just rejects the requests with the language “EN” in the request by calling the abortWith() method.
As the example shows, we had to implement only one method that receives the context of the request, which we can modify as we need.
Let’s keep in mind that this filter is executed after the resource was matched.
In case we want to execute a filter before the resource matching, we can use a pre-matching filter by annotating our filter with the @PreMatching annotation:
@Provider
@PreMatching
public class PrematchingRequestFilter implements ContainerRequestFilter {

    @Override
    public void filter(ContainerRequestContext ctx) throws IOException {
        if (ctx.getMethod().equals("DELETE")) {
            LOG.info("\"Deleting request");
        }
    }
}
If we try to access our resource now, we can check that our pre-matching filter is executed first:
2018-02-25 16:07:27,800 [http-nio-8080-exec-3] INFO  c.b.j.s.f.PrematchingRequestFilter - prematching filter
2018-02-25 16:07:27,816 [http-nio-8080-exec-3] INFO  c.b.j.s.f.RestrictedOperationsRequestFilter - Restricted operations filter
3.2. Implementing a Response Server Filter
We’ll now implement a response filter on the server side that will merely add a new header to the response.
To do that, our filter has to implement the ContainerResponseFilter interface and implement its only method:
@Provider
public class ResponseServerFilter implements ContainerResponseFilter {

    @Override
    public void filter(ContainerRequestContext requestContext,
      ContainerResponseContext responseContext) throws IOException {
        responseContext.getHeaders().add("X-Test", "Filter test");
    }
}
Notice that the ContainerRequestContext parameter is just used as read-only – since we’re already processing the response.
2.3. Implementing a Client Filter
We’ll work now with filters on the client side. These filters work in the same way as server filters, and the interfaces we have to implement are very similar to the ones for the server side.
Let’s see it in action with a filter that adds a property to the request:
@Provider
public class RequestClientFilter implements ClientRequestFilter {

    @Override
    public void filter(ClientRequestContext requestContext) throws IOException {
        requestContext.setProperty("test", "test client request filter");
    }
}
Let’s also create a Jersey client to test this filter:
public class JerseyClient {

    private static String URI_GREETINGS = "http://localhost:8080/jersey/greetings";

    public static String getHelloGreeting() {
        return createClient().target(URI_GREETINGS)
          .request()
          .get(String.class);
    }

    private static Client createClient() {
        ClientConfig config = new ClientConfig();
        config.register(RequestClientFilter.class);

        return ClientBuilder.newClient(config);
    }
}
Notice that we have to add the filter to the client configuration to register it.
Finally, we’ll also create a filter for the response in the client.
This works in a very similar way as the one in the server, but implementing the ClientResponseFilter interface:
@Provider
public class ResponseClientFilter implements ClientResponseFilter {

    @Override
    public void filter(ClientRequestContext requestContext,
      ClientResponseContext responseContext) throws IOException {
        responseContext.getHeaders()
          .add("X-Test-Client", "Test response client filter");
    }

}
Again, the ClientRequestContext is for read-only purposes.
4. Interceptors
Interceptors are more connected with the marshalling and unmarshalling of the HTTP message bodies that are contained in the requests and the responses. They can be used both in the server and in the client side.
Keep in mind that they’re executed after the filters and only if a message body is present.
There are two types of interceptors: ReaderInterceptor and WriterInterceptor, and they are the same for both the server and the client side.
Next, we’re going to create another resource on our server – which is accessed via a POST and receives a parameter in the body, so interceptors will be executed when accessing it:
@POST
@Path("/custom")
public Response getCustomGreeting(String name) {
    return Response.status(Status.OK.getStatusCode())
      .build();
}
We’ll also add a new method to our Jersey client – to test this new resource:
public static Response getCustomGreeting() {
    return createClient().target(URI_GREETINGS + "/custom")
      .request()
      .post(Entity.text("custom"));
}
4.1. Implementing a ReaderInterceptor
Reader interceptors allow us to manipulate inbound streams, so we can use them to modify the request on the server side or the response on the client side.
Let’s create an interceptor on the server side to write a custom message in the body of the request intercepted:
@Provider
public class RequestServerReaderInterceptor implements ReaderInterceptor {

    @Override
    public Object aroundReadFrom(ReaderInterceptorContext context)
      throws IOException, WebApplicationException {
        InputStream is = context.getInputStream();
        String body = new BufferedReader(new InputStreamReader(is)).lines()
          .collect(Collectors.joining("\n"));

        context.setInputStream(new ByteArrayInputStream(
          (body + " message added in server reader interceptor").getBytes()));

        return context.proceed();
    }
}
Notice that we have to call the proceed() method to call the next interceptor in the chain. Once all the interceptors are executed, the appropriate message body reader will be called.
3.2. Implementing a WriterInterceptor
Writer interceptors work in a very similar way to reader interceptors, but they manipulate the outbound streams – so that we can use them with the request in the client side or with the response in the server side.
Let’s create a writer interceptor to add a message to the request, on the client side:
@Provider
public class RequestClientWriterInterceptor implements WriterInterceptor {

    @Override
    public void aroundWriteTo(WriterInterceptorContext context)
      throws IOException, WebApplicationException {
        context.getOutputStream()
          .write(("Message added in the writer interceptor in the client side").getBytes());

        context.proceed();
    }
}
Again, we have to call the method proceed() to call the next interceptor.
When all the interceptors are executed, the appropriate message body writer will be called.
Don’t forget that you have to register this interceptor in the client configuration, as we did before with the client filter:
private static Client createClient() {
    ClientConfig config = new ClientConfig();
    config.register(RequestClientFilter.class);
    config.register(RequestWriterInterceptor.class);

    return ClientBuilder.newClient(config);
}
5. Execution Order
Let’s summarize all that we’ve seen so far in a diagram that shows when the filters and interceptors are executed during a request from a client to a server:
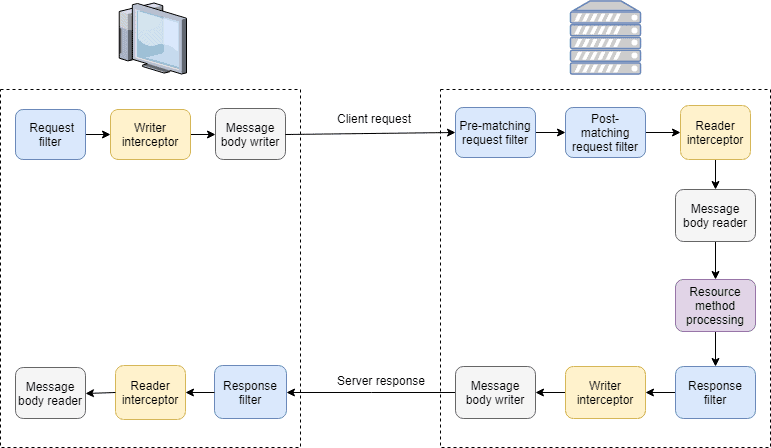
As we can see, the filters are always executed first, and the interceptors are executed right before calling the appropriate message body reader or writer.
If we take a look at the filters and interceptors that we’ve created, they will be executed in the following order:
- RequestClientFilter
- RequestClientWriterInterceptor
- PrematchingRequestFilter
- RestrictedOperationsRequestFilter
- RequestServerReaderInterceptor
- ResponseServerFilter
- ResponseClientFilter
Furthermore, when we have several filters or interceptors, we can specify the exact executing order by annotating them with the @Priority annotation.
The priority is specified with an Integer and sorts the filters and interceptors in ascending order for the requests and in descending order for the responses.
Let’s add a priority to our RestrictedOperationsRequestFilter:
@Provider
@Priority(Priorities.AUTHORIZATION)
public class RestrictedOperationsRequestFilter implements ContainerRequestFilter {
    // ...
}
Notice that we’ve used a predefined priority for authorization purposes.
6. Name Binding
The filters and interceptors that we’ve seen so far are called global because they’re executed for every request and response.
However, they can also be defined to be executed only for specific resource methods, which is called name binding.
6.1. Static Binding
One way to do the name binding is statically by creating a particular annotation that will be used in the desired resource. This annotation has to include the @NameBinding meta-annotation.
Let’s create one in our application:
@NameBinding
@Retention(RetentionPolicy.RUNTIME)
public @interface HelloBinding {
}
After that, we can annotate some resources with this @HelloBinding annotation:
@GET
@HelloBinding
public String getHelloGreeting() {
    return "hello";
}
Finally, we’re going to annotate one of our filters with this annotation too, so this filter will be executed only for requests and responses that are accessing the getHelloGreeting() method:
@Provider
@Priority(Priorities.AUTHORIZATION)
@HelloBinding
public class RestrictedOperationsRequestFilter implements ContainerRequestFilter {
    // ...
}
Keep in mind that our RestrictedOperationsRequestFilter won’t be triggered for the rest of the resources anymore.
6.2. Dynamic Binding
Another way to do this is by using a dynamic binding, which is loaded in the configuration during startup.
Let’s first add another resource to our server for this section:
@GET
@Path("/hi")
public String getHiGreeting() {
    return "hi";
}
Now, let’s create a binding for this resource by implementing the DynamicFeature interface:
@Provider
public class HelloDynamicBinding implements DynamicFeature {

    @Override
    public void configure(ResourceInfo resourceInfo, FeatureContext context) {
        if (Greetings.class.equals(resourceInfo.getResourceClass())
          && resourceInfo.getResourceMethod().getName().contains("HiGreeting")) {
            context.register(ResponseServerFilter.class);
        }
    }
}
In this case, we’re associating the getHiGreeting() method to the ResponseServerFilter that we had created before.
It’s important to remember that we had to delete the @Provider annotation from this filter since we’re now configuring it via DynamicFeature.
If we don’t do this, the filter will be executed twice: one time as a global filter and another time as a filter bound to the getHiGreeting() method.
7. Conclusion
In this tutorial, we focused on understanding how filters and interceptors work in Jersey 3 and how we can use them in a web application.


