

Mocking is an essential part of unit testing, and the Mockito library makes it easy to write clean and intuitive unit tests for your Java code.
Get started with mocking and improve your application tests using our Mockito guide:
Handling concurrency in an application can be a tricky process with many potential pitfalls. A solid grasp of the fundamentals will go a long way to help minimize these issues.
Get started with understanding multi-threaded applications with our Java Concurrency guide:
Spring 5 added support for reactive programming with the Spring WebFlux module, which has been improved upon ever since. Get started with the Reactor project basics and reactive programming in Spring Boot:
Since its introduction in Java 8, the Stream API has become a staple of Java development. The basic operations like iterating, filtering, mapping sequences of elements are deceptively simple to use.
But these can also be overused and fall into some common pitfalls.
To get a better understanding on how Streams work and how to combine them with other language features, check out our guide to Java Streams:
Explore Spring Boot 3 and Spring 6 in-depth through building a full REST API with the framework:
Yes, Spring Security can be complex, from the more advanced functionality within the Core to the deep OAuth support in the framework.
I built the security material as two full courses - Core and OAuth, to get practical with these more complex scenarios. We explore when and how to use each feature and code through it on the backing project.
You can explore the course here:
Spring Data JPA is a great way to handle the complexity of JPA with the powerful simplicity of Spring Boot.
Get started with Spring Data JPA through the guided reference course:
Refactor Java code safely — and automatically — with OpenRewrite.
Refactoring big codebases by hand is slow, risky, and easy to put off. That’s where OpenRewrite comes in. The open-source framework for large-scale, automated code transformations helps teams modernize safely and consistently.
Each month, the creators and maintainers of OpenRewrite at Moderne run live, hands-on training sessions — one for newcomers and one for experienced users. You’ll see how recipes work, how to apply them across projects, and how to modernize code with confidence.
Join the next session, bring your questions, and learn how to automate the kind of work that usually eats your sprint time.
1. Overview
J2CL allows us to write web applications in Java and compile them into optimized JavaScript, making it a powerful tool for leveraging the Java ecosystem while targeting modern browsers. By integrating J2CL with Maven, we can streamline the development process and efficiently manage dependencies.
In this tutorial, we’ll walk through setting up a J2CL project with Maven, customizing the web interface, and implementing the core functionality of a simple Task Manager app. We’ll explore how to interact with a RESTful backend using Java and JavaScript interoperability.
To create a complete working example, we’ll use restful-api.dev, which exposes free REST APIs for storing and retrieving data.
2. Setting up the J2CL Project Structure With Maven
J2CL is a Google project that uses Bazel as its default build system. However, to simplify project setup and use a more familiar workflow, we’ll use the Maven plugin developed by Vertispan.
2.1. j2cl-archetype-simple
A minimal J2CL project requires careful configuration of pom.xml and other files. To get started with something off the shelf, we can use the j2cl-archetype-simple Maven archetype:
mvn archetype:generate -DarchetypeGroupId=com.vertispan.j2cl.archetypes \
-DarchetypeArtifactId=j2cl-archetype-simple \
-DarchetypeVersion=0.22.0 \
-DgroupId=com.baeldung.j2cl.taskmanager \
-DartifactId=j2cl-task-manager \
-Dversion=1.0-SNAPSHOT \
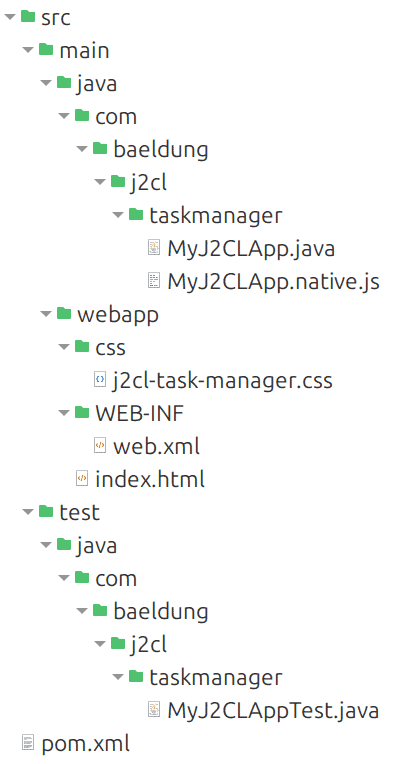
-Dmodule=MyJ2CLAppThese are the generated files:
Here is a brief summary:
- index.html – Page sent to the browser
- j2cl-task-manager.css – CSS
- MyJ2CLApp.java – Main Java class
- MyJ2CLApp.native.js – JavaScript entry point
- MyJ2CLAppTest.java – Contains tests annotated with @J2clTestInput
- web.xml – Deployment Descriptor for Java EE (Jakarta EE).
- pom.xml – Integrates J2CL, Elemental2, JSInterop, and Jetty Server for deployment
We’ll discuss these files in more detail. For this tutorial, web.xml and MyJ2CLAppTest.java aren’t needed and we can delete them.
2.2. Java Version
Let’s pay attention to these two lines in pom.xml:
<maven.compiler.target>11</maven.compiler.target>
<maven.compiler.source>11</maven.compiler.source>
While J2CL itself could handle Java 11, the current implementation of the Maven plugin enforces Java 8 compatibility. This means that while we can run the transcompilation process with a newer JDK (such as JDK 21), our code must strictly adhere to Java 8 syntax and features.
In addition, all the dependencies in pom.xml are based on Java 11, so we don’t want to touch anything to avoid breaking them. For example, if we specify a later version of Java, the version of Jetty included in the archetype will no longer work.
2.3. Build and View the Result in a Browser
This approach significantly reduces development turnaround time because changes to Java code are automatically recompiled and reflected in the browser, resulting in a more efficient workflow:
- Open a terminal and run: mvn j2cl:watch
- Wait for the message: “Build Complete: ready for browser refresh”
- Open another terminal and run: mvn jetty:run
- Wait for the message: “Started Jetty Server”
- Leave both terminals open
- Open in a browser http://localhost:8080/
This way, any changes to the Java code will be reflected almost immediately in the JavaScript code. If we want to produce the final optimized JavaScript file instead, we can use: mvn j2cl:build
Here is the demo page generated by the archetype. During development, we’ll want to keep the developer tools open and the browser cache disabled:
For more information, we can consult the documentation for the J2CL Maven plugin goals.
2.4. Customizing the Web Page
This is the index.html for our Task Manager. To ensure that the Maven goals continue to work as intended, the paths to the CSS and JavaScript files must be the same as those used by the archetype:
<!DOCTYPE html>
<html>
<head>
    <meta http-equiv="Content-Type" content="text/html; charset=utf-8" />
    [... Other optional meta tags, e.g. for mobile devices, Google Translate, robots, etc. ...]
    <title>J2CL Task Manager</title>
    <link rel="stylesheet" href="css/j2cl-task-manager.css">
</head>
<body>
    <h1>Task Manager</h1>
    <input type="text" id="taskInput" placeholder="Enter a task" />
    <button id="addTask">Add Task</button>
    <ul id="taskList"></ul>

    <script src='j2cl-task-manager/j2cl-task-manager.js'></script>
</body>
</html>
Here is the j2cl-task-manager.css:
body {
    background-color: #cefb56;
	color: black;
	font-family: Calibri, Arial, sans-serif;
}

.deleteButton {
	margin-left: 1rem;
}

.errorMessage {
    display: block;
    width: fit-content;
    color: darkred;
    background-color: white;
    border-radius: 1rem;
    border: 1px solid #f5c6cb;
    padding: 0.2rem;
    margin: 0.5rem 0;
}
There’s not much to explain, so far it’s very simple HTML and CSS code.
3. Task Manager App
At a high level, our Task Manager allows users to perform these operations:
- Add tasks via an input field and store them in memory
- Synchronize tasks with a remote REST API by either creating a new task list or updating an existing one
- If a task list doesn’t exist, the application creates a new one and assigns it a unique identifier (UUID), which is then stored in the URL for future reference
- Retrieve tasks from the API using the UUID, allowing users to resume their session with the same task list
- Delete tasks both locally and on the server, ensuring data consistency between the UI and the backend
Before we dive into the code, let’s take a look at the documentation.
3.1. Documentation of Available Classes and Annotations
J2CL is an evolution of the Google Web Toolkit (GWT), and as such includes a subset of the standard Java library that has been emulated for use in the browser environment. The list of supported classes and methods can be found in the official GWT emulation reference.
But this is just the starting point. We also have Elemental2 to interact with the browser DOM and communicate with external APIs. JSInterop, on the other hand, provides us with a bridge between Java and JavaScript via annotations.
For an in-depth introduction to JSInterop and Elemental2, we can refer to the presentations GWTcon: JsInterop, Elemental2 and coding beyond 2.8 and JsInterop specifications.
3.2. JavaScript Entry Point
This is the content of MyJ2CLApp.native.js:
setTimeout(function(){
  var ep = new MyJ2CLApp();
  ep.onModuleLoad()
}, 0);
onModuleLoad() simulates the behavior of GWT, where the onModuleLoad() method is the entry point of the application. The setTimeout(…, 0) construct is commonly used in JavaScript to delay execution until the current execution stack is cleared. In this case, it ensures that there won’t be any surprises when a Java class hasn’t yet been loaded by JavaScript.
3.3. Sequence Diagram of the MyJ2CLApp Class
We can better understand our Java methods by having a clear idea of the code execution flow:

For simplicity, we don’t address the complexities of concurrency, i.e., using the same task list on different browsers at the same time.
4. Implementing the Methods
Below is a concise overview of the core methods in MyJ2CLApp.java, including the JSInterop annotations that bridge our Java code to JavaScript. Most of the logic is straightforward: we manipulate the DOM, track tasks in a JsArray, and interact with the REST APIs calling the DomGlobal.fetch(…) API.
4.1. JSInterop Annotations
We annotate the entire class with @JsType to make it accessible from JavaScript code. On the other hand, @JsMethod allows us to use the JavaScript static method JSON.stringify(…) as a native static Java method:
@JsType
public class MyJ2CLApp {
    // Example of using @JsMethod to wrap JSON.stringify
    @JsMethod(namespace = JsPackage.GLOBAL, name = "JSON.stringify")
    private static native String jsonStringify(Object obj);

    // ...
}
4.2. onModuleLoad()
When the application starts, we check whether the browser URL contains a uuid parameter. If so, we fetch the associated tasks from the server. We also wire up the Add Task button:
public void onModuleLoad() {
    if (uuid != null) {
        fetchTasks();
    }

    addTaskButton.addEventListener("click", event -> {
        String taskText = taskInput.value.trim();
        if (!taskText.isEmpty()) {
            sendTask(taskText);
            taskInput.value = "";
        }
    });
}
4.3. fetchTasks()
We retrieve an existing task list with a GET request. A 404 simply means no tasks are stored yet:
private void fetchTasks() {
    DomGlobal.fetch(API_URL + "/" + uuid)
        .then(response -> {
            if (!response.ok && response.status != 404) {
                throw new Error("HTTP error " + response.status);
            }
            return response.status == 404 ? null : response.json();
        })
        .then(data -> {
            if (data != null) {
                // ...
                // Populate tasks in our JsArray and update the UI
            }
            return null;
        })
        .catch_(error -> {
            showErrorMessage("Could not fetch tasks. Check console.");
            return null;
        });
}
4.4. addTaskToUI()
This method is a helper to add a new <li> for each task, complete with a Delete button:
private void addTaskToUI(String taskText) {
    HTMLLIElement taskItem = (HTMLLIElement) DomGlobal.document.createElement("li");
    taskItem.textContent = taskText;

    HTMLButtonElement deleteButton = (HTMLButtonElement) DomGlobal.document.createElement("button");
    deleteButton.textContent = "Delete";
    deleteButton.addEventListener("click", e -> {
        // ...
        // Remove the task from our JsArray, sync with server, then update the UI
    });

    taskItem.appendChild(deleteButton);
    taskList.appendChild(taskItem);
}
4.5. sendTask()
When the user adds a new task, we decide whether to POST a brand-new object or PUT the updated array, based on whether uuid is already set:
private void sendTask(String taskText) {
    tasksArray.push(taskText);
    if (uuid == null) {
        createObjectOnServer()
          .then(ignore -> updateTasksOnServer())
          .then(ignore -> addTaskToUI(taskText))
          // ...
    } else {
        updateTasksOnServer()
          .then(ignore -> addTaskToUI(taskText))
          // ...
    }
}
4.6. createObjectOnServer() and updateTasksOnServer()
createObjectOnServer() performs a POST, letting the server generate an id that we store in uuid:
private Promise<Object> createObjectOnServer() {
    // Build JSON body and call the server
    JsPropertyMap<Object> jsonBody = JsPropertyMap.of();
    jsonBody.set("data", tasksArray);
    // ...
    return DomGlobal.fetch(API_URL, requestInit)
      .then(response -> response.json())
      .then(result -> {
          uuid = [...]; // Extract from server response
          rewriteURLwithUUID(uuid);
          return null;
      });
}
updateTasksOnServer() instead performs a PUT to update the existing record:
private Promise<Object> updateTasksOnServer() {
    JsPropertyMap<Object> jsonBody = JsPropertyMap.of();
    jsonBody.set("id", uuid);
    jsonBody.set("data", tasksArray);
    // ...
    return DomGlobal.fetch(API_URL + "/" + uuid, requestInit)
      .then(response -> {
          if (!response.ok) {
              throw new Error("HTTP " + response.status);
          }
          return null;
      });
}
4.7. showErrorMessage()
This is a simple utility to display an error message and then remove it after a few seconds:
private void showErrorMessage(String message) {
    HTMLDivElement errorDiv = (HTMLDivElement) DomGlobal.document.createElement("div");
    errorDiv.textContent = message;
    errorDiv.classList.add("errorMessage");
    addTaskButton.parentNode.insertBefore(errorDiv, taskList);

    DomGlobal.setTimeout((e) -> errorDiv.remove(), 5000);
}
5. Browser Result Page
This first test is under normal conditions, that is, with a working Internet connection. We can bookmark the URL to always refer to the same task list:
Instead, in this second test, we disconnect from the Internet to generate errors:
Everything works as expected.
6. Conclusion
In this article, we explored how to set up a J2CL project with Maven, customize a simple web page, and implement a Task Manager App using Java and JavaScript. We looked at the essential steps to connect to a RESTful backend, store and retrieve tasks, and dynamically update our UI using DOM manipulation via Elemental2 and JSInterop.
This allows us to build modern web applications without leaving the Java ecosystem. We also saw how to use the Maven plugin to watch for changes, rebuild the transcompiled output in real time, and quickly test everything in the browser.


