1. Overview
To send and receive data over a network, we often use sockets. Sockets are nothing but a combination of an IP address and a port number, which can uniquely identify a program running on any given machine.
In this tutorial, we’ll show how we can read data which is sent to us over a socket.
2. Reading Data From a Socket
Let’s assume, we’ve got a basic understanding of socket programming.
Now, we’ll dig deeper into reading data on a port our server is listening on.
Firstly, we need to declare and initialize ServerSocket, Socket, and DataInputStream variables:
ServerSocket server = new ServerSocket(port);
Socket socket = server.accept();
DataInputStream in = new DataInputStream(new BufferedInputStream(socket.getInputStream()));
Note that we’ve chosen to wrap the socket’s InputStream in a DataInputStream. This allows us to read lines of a text and Java primitive data types in a portable way.
This is nice since now, if we know the type of data we’ll receive, we can use specialized methods like readChar(), readInt(), readDouble(), and readLine().
However, it can be challenging if the type and length of data are not known beforehand.
In that case, we’ll get a stream of bytes from the socket, instead, using the lower-level read() function. But, there is a small problem in this approach: How do we know the length and type of data we’ll get?
Let’s explore this scenario in the next section.
3. Reading Binary Data from a Socket
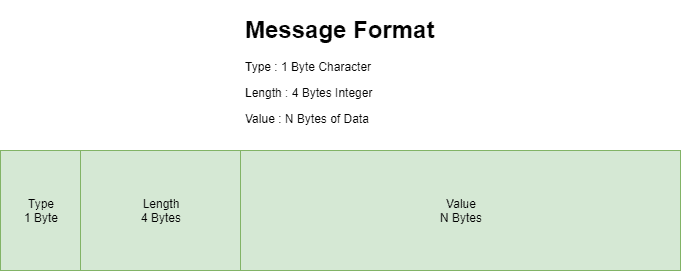
When reading data in bytes, we need to define our own protocol for communication between server and client. The simplest protocol which we can define is called TLV (Type Length Value). It means that every message written to the socket is in the form of the Type Length Value.
So we define every message sent as:
- A 1 byte character that represents the data type, like s for String
- A 4 byte integer that indicates the length to the data
- And then the actual data, whose length was just indicated

Once the client and the server establish the connection, each message will follow this format. Then, we can write our code to parse each message and read n bytes of data of a specific type.
Let’s see how we can implement this using a simple example with a String message.
Firstly, we need to call the readChar() function, to read the type of data and then call the readInt() function to read the length of it:
char dataType = in.readChar();
int length = in.readInt();
After that, we need to read the data which we are receiving. An important point to note here is that the read() function might not be able to read all data in one call. So, we need to call the read() in a while loop:
if(dataType == 's') {
    byte[] messageByte = new byte[length];
    boolean end = false;
    StringBuilder dataString = new StringBuilder(length);
    int totalBytesRead = 0;
    while(!end) {
        int currentBytesRead = in.read(messageByte);
        totalBytesRead = currentBytesRead + totalBytesRead;
        if(totalBytesRead <= length) {
            dataString
              .append(new String(messageByte, 0, currentBytesRead, StandardCharsets.UTF_8));
        } else {
            dataString
              .append(new String(messageByte, 0, length - totalBytesRead + currentBytesRead,
              StandardCharsets.UTF_8));
        }
        if(dataString.length()>=length) {
            end = true;
        }
    }
}
4. Client Code to Send Data
And what about the client side code? Actually, it’s quite simple:
char type = 's'; // s for string
String data = "This is a string of length 29";
byte[] dataInBytes = data.getBytes(StandardCharsets.UTF_8);

out.writeChar(type);
out.writeInt(dataInBytes.length);
out.write(dataInBytes);
That’s all our client is doing!
5. Conclusion
In this article, we discussed how to read data from a socket. We looked at different functions which help us to read data of a particular type. Also, we saw how to read binary data.
The code backing this article is available on GitHub. Once you're
logged in as a Baeldung Pro Member, start learning and coding on the project.


