1. Overview
In this tutorial, we’ll learn how to implement the factory pattern with generics in Java.
2. What Is Factory Pattern?
In object-oriented programming, the factory pattern is a creational design pattern that is responsible for creating objects when it’s called.
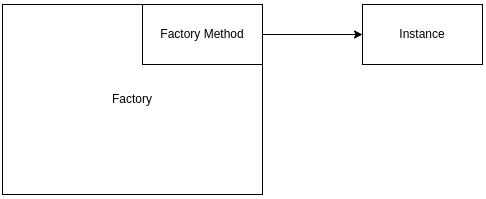
A factory is a class that creates objects of a prototype class, aka interface, from a method call:

The factory pattern is good when we want to create objects of a common interface while hiding the creation logic from the user.
3. How Is It Implemented?
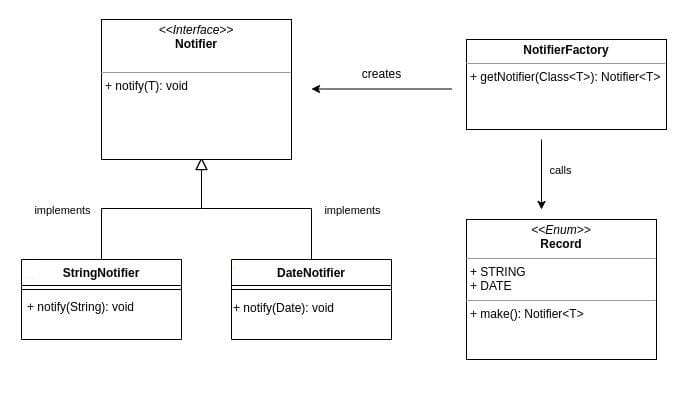
Now let’s learn how to implement it. First, let’s take a look at the class diagram:

Now let’s implement each class in the diagram.
3.1. Implementing the Notifier Interface
The Notifier interface is a prototype, and other notifier classes implement it:
public interface Notifier<T> {
    void notify(T obj);
}
As we can see, the Notifier class is a generic class that has one method named notify.
3.2. Implementing the Notifier Classes
Now let’s implement the two other notifier classes:
public class StringNotifier implements Notifier<String> {

    @Override
    public void notify(String str) {
        System.out.println("Notifying: " + str);
    }
}

public class DateNotifier implements Notifier<Date> {

    @Override
    public void notify(Date date) {
        System.out.println("Notifying: " + date);
    }
}
Now we have two classes that use the Notifier interface – one that will output a simple text and one that will post a date.
3.3. Implementing the Factory
The factory class generates a notifier instance each time its only method, getNotifier(), is called:
public class NotifierFactory {

    public <T> Notifier<T> getNotifier(Class<T> c) {
        if (c == String.class) {
            return Record.STRING.make();
        }
        if (c == Date.class) {
            return Record.DATE.make();
        }
        return null;
    }

}
In the above code, Record is an enum with two constants named STRING and DATE.
3.4. Implementing the Record
The Record enum keeps the record of valid notifier classes and creates an instance each time the factory class calls it:
public enum Record {
    STRING {
        @Override
        public Notifier<String> make() {
            return new StringNotifier();
        }
    },
    DATE {
        @Override
        public Notifier<Date> make() {
            return new DateNotifier();
        }
    };

    public abstract <T> Notifier<T> make();
}
We’ve successfully implemented the factory pattern.
4. Using the Factory
Let’s use the factory in our Main class:
public static void main(String[] args) {
    NotifierFactory factory = new NotifierFactory();
    Notifier<String> stringNotifier = factory.getNotifier(String.class);
    Notifier<Date> dateNotifier = factory.getNotifier(Date.class);

    stringNotifier.notify("Hello world!");
    dateNotifier.notify(new Date());
}
Now we should compile and run our code:
$ javac Main.java
$ java Main
Notifying: Hello world!
Notifying: Wed Oct 19 17:36:38 TRT 2022
As we can see, the factory has successfully created two notifier instances of the appropriate type.
5. Summary
In this article, we learned how to implement and use the factory pattern in Java.
The code backing this article is available on GitHub. Once you're
logged in as a Baeldung Pro Member, start learning and coding on the project.


