Add an Image to a Cell in an Excel File With Java
Last updated: August 15, 2025


Mocking is an essential part of unit testing, and the Mockito library makes it easy to write clean and intuitive unit tests for your Java code.
Get started with mocking and improve your application tests using our Mockito guide:
Handling concurrency in an application can be a tricky process with many potential pitfalls. A solid grasp of the fundamentals will go a long way to help minimize these issues.
Get started with understanding multi-threaded applications with our Java Concurrency guide:
Spring 5 added support for reactive programming with the Spring WebFlux module, which has been improved upon ever since. Get started with the Reactor project basics and reactive programming in Spring Boot:
Since its introduction in Java 8, the Stream API has become a staple of Java development. The basic operations like iterating, filtering, mapping sequences of elements are deceptively simple to use.
But these can also be overused and fall into some common pitfalls.
To get a better understanding on how Streams work and how to combine them with other language features, check out our guide to Java Streams:
Explore Spring Boot 3 and Spring 6 in-depth through building a full REST API with the framework:
Yes, Spring Security can be complex, from the more advanced functionality within the Core to the deep OAuth support in the framework.
I built the security material as two full courses - Core and OAuth, to get practical with these more complex scenarios. We explore when and how to use each feature and code through it on the backing project.
You can explore the course here:
Spring Data JPA is a great way to handle the complexity of JPA with the powerful simplicity of Spring Boot.
Get started with Spring Data JPA through the guided reference course:
Refactor Java code safely — and automatically — with OpenRewrite.
Refactoring big codebases by hand is slow, risky, and easy to put off. That’s where OpenRewrite comes in. The open-source framework for large-scale, automated code transformations helps teams modernize safely and consistently.
Each month, the creators and maintainers of OpenRewrite at Moderne run live, hands-on training sessions — one for newcomers and one for experienced users. You’ll see how recipes work, how to apply them across projects, and how to modernize code with confidence.
Join the next session, bring your questions, and learn how to automate the kind of work that usually eats your sprint time.
1. Overview
In this tutorial, we’ll learn how to add an image to a cell in an Excel file with Java.
We’ll create an Excel file dynamically and add an image to the cell, using apache-poi.
2. Project Setup and Dependencies
Java applications can use apache-poi to read, write, and modify the contents of an Excel spreadsheet dynamically. It supports both .xls and .xlsx Excel formats.
2.1. Maven Dependency for Apache Poi API
First, let’s add the poi dependency to our project:
<dependency>
    <groupId>org.apache.poi</groupId>
    <artifactId>poi</artifactId>
    <version>5.2.5</version>
</dependency>
2.2. Excel Workbook Creation
Workbook workbook = new XSSFWorkbook();
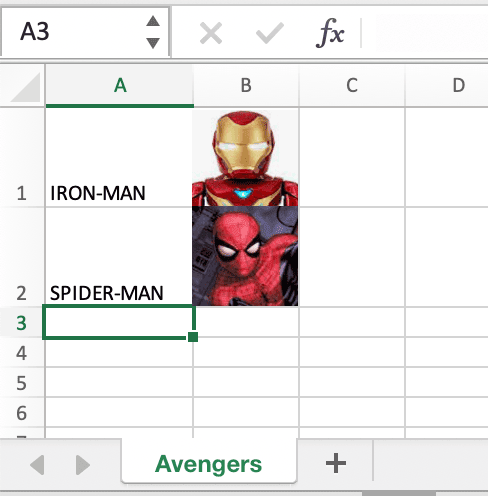
Sheet sheet = workbook.createSheet("Avengers");
Row row1 = sheet.createRow(0);
row1.createCell(0).setCellValue("IRON-MAN");
Row row2 = sheet.createRow(1);
row2.createCell(0).setCellValue("SPIDER-MAN");
Here, we’ve created an Avengers sheet and filled the A1 and A2 cells with two names. Next, we’ll add the Avengers’ images to cells B1 and B2.
3. Insert Image in the Workbook
3.1. Read Image From Local File
To add the images, we’ll first need to read them from our project directory. For our project, we have two images in the resources directory:
- /src/main/resources/ironman.png
- /src/main/resources/spiderman.png
InputStream inputStream1 = TestClass.class.getClassLoader()
    .getResourceAsStream("ironman.png");
InputStream inputStream2 = TestClass.class.getClassLoader()
    .getResourceAsStream("spiderman.png");
3.2. Convert Image InputStream Into a Byte Array
Next, let’s convert the images into byte arrays. Here, we’ll use IOUtils from apache-poi:
byte[] inputImageBytes1 = IOUtils.toByteArray(inputStream1);
byte[] inputImageBytes2 = IOUtils.toByteArray(inputStream2);
3.3. Add Picture in the Workbook
Now, we’ll use the byte array to add a picture to our workbook. The supported picture types are PNG, JPG, and DIB. We’re using PNG here:
int inputImagePictureID1 = workbook.addPicture(inputImageBytes1, Workbook.PICTURE_TYPE_PNG);
int inputImagePictureID2 = workbook.addPicture(inputImageBytes2, Workbook.PICTURE_TYPE_PNG);
As a result of this step, we’ll obtain an index of each picture that we’ll use for creating Drawing objects.
3.4. Create a Drawing Container
The drawing patriarch is the top-level container for all shapes. This will return a Drawing interface – in our case, the XSSFDrawing object. We’ll use this object to create pictures that we will put into our defined cell.
Let’s create the drawing patriarch:
XSSFDrawing drawing = (XSSFDrawing) sheet.createDrawingPatriarch();4. Add Image in a Cell
Now, we’re ready to add the images into our cells.
4.1. Create Anchor Object
First, we’ll create a client anchor object, which is attached to an Excel worksheet and is used to set the position of the image in an Excel sheet. It anchors against a top-left and bottom-right cell.
We’ll create two anchor objects, one for each image:
XSSFClientAnchor ironManAnchor = new XSSFClientAnchor();
XSSFClientAnchor spiderManAnchor = new XSSFClientAnchor();
Next, we need to specify the relative positions of the images to our anchor objects.
Let’s place our first image in cell B1:
ironManAnchor.setCol1(1); // Sets the column (0 based) of the first cell.
ironManAnchor.setCol2(2); // Sets the column (0 based) of the Second cell.
ironManAnchor.setRow1(0); // Sets the row (0 based) of the first cell.
ironManAnchor.setRow2(1); // Sets the row (0 based) of the Second cell.
In the same way, we’ll place the second image in cell B2:
spiderManAnchor.setCol1(1);
spiderManAnchor.setCol2(2);
spiderManAnchor.setRow1(1);
spiderManAnchor.setRow2(2);
4.2. Add Anchor Object and Picture Index to Drawing Container
drawing.createPicture(ironManAnchor, inputImagePictureID1);
drawing.createPicture(spiderManAnchor, inputImagePictureID2);
5. Save Workbook
Before we save, let’s make sure the cells are wide enough for the pictures we’ve added by using autoSizeColumn:
for (int i = 0; i < 3; i++) {
    sheet.autoSizeColumn(i);
}
Finally, let’s save the workbook:
try (FileOutputStream saveExcel = new FileOutputStream("target/baeldung-apachepoi.xlsx")) {
    workbook.write(saveExcel);
}
The resulting Excel sheet should look like this:
6. Conclusion
In this article, we learned how to add an image to the cell of an Excel worksheet in Java using the apache-poi library.
We needed to load the image, convert it into bytes, attach it to the sheet, and then use the drawing tools to locate the image in the correct cells. Finally, we were able to resize the columns and save our workbook.


