

Mocking is an essential part of unit testing, and the Mockito library makes it easy to write clean and intuitive unit tests for your Java code.
Get started with mocking and improve your application tests using our Mockito guide:
Handling concurrency in an application can be a tricky process with many potential pitfalls. A solid grasp of the fundamentals will go a long way to help minimize these issues.
Get started with understanding multi-threaded applications with our Java Concurrency guide:
Spring 5 added support for reactive programming with the Spring WebFlux module, which has been improved upon ever since. Get started with the Reactor project basics and reactive programming in Spring Boot:
Since its introduction in Java 8, the Stream API has become a staple of Java development. The basic operations like iterating, filtering, mapping sequences of elements are deceptively simple to use.
But these can also be overused and fall into some common pitfalls.
To get a better understanding on how Streams work and how to combine them with other language features, check out our guide to Java Streams:
Explore Spring Boot 3 and Spring 6 in-depth through building a full REST API with the framework:
Yes, Spring Security can be complex, from the more advanced functionality within the Core to the deep OAuth support in the framework.
I built the security material as two full courses - Core and OAuth, to get practical with these more complex scenarios. We explore when and how to use each feature and code through it on the backing project.
You can explore the course here:
Spring Data JPA is a great way to handle the complexity of JPA with the powerful simplicity of Spring Boot.
Get started with Spring Data JPA through the guided reference course:
Refactor Java code safely — and automatically — with OpenRewrite.
Refactoring big codebases by hand is slow, risky, and easy to put off. That’s where OpenRewrite comes in. The open-source framework for large-scale, automated code transformations helps teams modernize safely and consistently.
Each month, the creators and maintainers of OpenRewrite at Moderne run live, hands-on training sessions — one for newcomers and one for experienced users. You’ll see how recipes work, how to apply them across projects, and how to modernize code with confidence.
Join the next session, bring your questions, and learn how to automate the kind of work that usually eats your sprint time.
Yes, we're now running our only Summer Sale. All Courses are 30% off until 20th July, 2026:
Yes, we're now running our only Summer Sale. All Courses are 30% off until 20th July, 2026:
1. Overview
In this article, we will do a quick overview of the Jetty web server and then cover various approaches to deploying a WAR file.
Jetty is an open source Java HTTP web server and a servlet container. Jetty is more commonly used in machine to machine communication in the Java ecosystem.
2. Project Setup
The latest version of Jetty can always be downloaded by following this link. We will create a very basic Java web application from the command line with Maven, which we will use for our examples.
In this article, we are using Jetty 9.x, the latest version at the moment.
Let’s head over to our console, navigate to our location of choice and run the following command:
mvn archetype:generate -DgroupId=com.baeldung -DartifactId=jetty-app
  -DarchetypeArtifactId=maven-archetype-webapp -DinteractiveMode=false
This command will create a complete Java web app inside a new jetty-app folder in our current location. It is just one of many ways of creating a Java application with Maven and it suits our purpose.
Since we are going to be dealing with WAR files, let’s navigate to the project root and build it:
cd jetty-appBuilding with Maven:
mvn packageThen jetty-app.war will be created at location jetty-app/target/jetty-app.war.
3. Jetty Structure
Context path. Refers to the location which is relative to the server’s address and represents the name of the web application.
For example, if our web application is put under the $JETTY_HOME\webapps\myapp directory, it will be accessed by the URL http://localhost/myapp, and its context path will be /myapp.
WAR. Is the extension of a file that packages a web application directory hierarchy in ZIP format and is short for Web Archive. Java web applications are usually packaged as WAR files for deployment. WAR files can be created on the command line or with an IDE like Eclipse.
4. Deploying by Copying WAR
The easiest way to deploy a web application to Jetty server is probably by copying the WAR file into the $JETTY_HOME/webapps directory.
After copying, we can start the server by navigating to $JETTY_HOME and running the command:
java -jar start.jarJetty will scan its $JETTY_HOME/webapps directory at startup for web applications to deploy. Our new app will be deployed at /jetty-app context.
When we load the URL http://localhost:8080/jetty-app from the browser, we should see our app running with Hello world! printed to the screen.
5. Deploying Using Context File
Jetty web server offers us a way to deploy a web archive located anywhere in the file system by us creating a context file for it.
This way, even if our WAR file is located on a desktop or we have chosen to keep it in jetty-app/target where Maven places the package, we can just create its context file inside $JETTY_HOME/webapps.
Let’s undeploy the jetty-app.war we just deployed by deleting it from webapps. We will then create jetty-app.xml with the following code and place it inside webapps:
<?xml version="1.0"  encoding="ISO-8859-1"?>
<!DOCTYPE Configure PUBLIC "-//Mort Bay Consulting//DTD Configure//EN"
  "http://www.eclipse.org/jetty/configure.dtd">
<Configure class="org.eclipse.jetty.webapp.WebAppContext">
    <Set name="contextPath">/jetty</Set>
    <Set name="war">absolute/path/to/jetty-app.war</Set>
</Configure>
This context file must have the same name as our WAR, with XML file extension. Notice that we have set the contextPath attribute to /jetty. This means that we will access our web app from the URL http://localhost:8080/jetty.
This ability to customize the context path is one of the great advantages of the context file approach of deploying WARs in Jetty as some app names may not be convenient for this purpose.
6. Deploying With the Jetty Maven Plugin
6.1. Default Deployment
The jetty Maven plugin helps us to do rapid testing and iteration while building Java web applications. To be able to deploy and run applications with it, we only need to add the plugin in pom.xml:
<plugin>
    <groupId>org.eclipse.jetty</groupId>
    <artifactId>jetty-maven-plugin</artifactId>
    <version>9.3.11.v20160721</version>
</plugin>
The latest version can be found by following this Maven link.
We have to make sure that our instance of Jetty running on port 8080 is stopped before we perform the next step.
To deploy our app after adding the plugin, we navigate to the root where pom.xml is located and run the following command:
mvn jetty:runThis command creates a new jetty instance, and the plugin deploys the app to it. We can access it by loading http://localhost:8080.
The jetty Maven plugin continuously scans the web project for any changes and keeps redeploying it.
6.2. Changing the ContextPath
From the previous subsection, the app was deployed under / context. However, if we would like to deploy under a given context path such as /jetty as before, we will have to configure the plugin differently.
We will change our plugin declaration to the following XML:
<plugin>
    <groupId>org.eclipse.jetty</groupId>
    <artifactId>jetty-maven-plugin</artifactId>
    <version>9.3.11.v20160721</version>
    <configuration>
        <webApp>
            <contextPath>/jetty</contextPath>
        </webApp>
    </configuration>
</plugin>
Notice how we have added a configuration block to further customize our deployment. Several configuration options exist to be placed inside this block depending on what one wants.
After these changes, we can re-run the plugin as before and access our app through http://localhost:8080/jetty.
6.3. Changing the Port
A scenario one may face is a port in use exception. May be we have a jetty instance running on port 8080 for production, but we are still in development phase and want to benefit from the ease of iteration that comes with deploying using the Maven plugin.
In such cases, we have to run our test server on a different port. Let’s change the plugin configuration to the following XML:
<configuration>
    <webApp>
        <contextPath>/jetty</contextPath>
    </webApp>
    <httpConnector>
        <port>8888</port>
    </httpConnector>
</configuration>
When we re-run our Maven plugin, we will be able to access our app from http://localhost:8888/jetty.
It is worth noting that with the jetty Maven plugin, we do not need to have an instance of jetty installed and running. Rather, it creates its own jetty instance.
7. Deploying With Jetty Runner
Just like jetty Maven plugin, the jetty-runner offers a fast and easy way to deploy and run our web app. With jetty-runner, we also don’t need to install and run a separate instance of a jetty server.
7.1. Jetty Runner Setup
To use jetty-runner in rapid deployment and running of our web apps, we can download the latest version by following this Maven link.
With jetty-runner, we only need to place its downloaded jar anywhere we please and be ready with the file system path to our web archives.
We can pass in configuration parameters from the command line as well as deploy numerous applications at different contexts and bound to different ports with just one command.
I have placed my jetty-runner jar in the same hierarchy as the jetty-app directory. That is the directory containing our web application.
7.2. Basic Deployment
Let’s deploy our WAR using jetty-runner:
java -jar jetty-runner-9.4.0.M1.jar jetty-app/target/jetty-app.warThis command, just like the case of the Maven plugin, creates a jetty instance and deploys the provided WAR to it. The WAR path can be an absolute or a relative path.
We can load this application using http://localhost:8080.
7.3. Deploy With Context Path
To deploy under /jetty context as before:
java -jar jetty-runner-9.4.0.M1.jar --path /jetty jetty-app/target/jetty-app.warAccessible via http://localhost:8080/jetty.
7.4. Deploy on Given Port
To deploy on a given port number:
java -jar jetty-runner-9.4.0.M1.jar --port 9090 jetty-app/target/jetty-app.warAccessible via http://localhost:9090.
7.5. Deploy Multiple WARs
To deploy several WARs with the same command, we use the –path argument to make each unique:
java -jar jetty-runner --path /one one.war --path /two two.warWe would then access one.war via http://localhost:8080/one and two.war via http://localhost:8080/two.
8. Deploy With Cargo Maven Plugin
Cargo is a versatile library that allows us to manipulate various types of application containers in a standard way.
8.1. Cargo Deployment Setup
In this section, we will look at how to use Cargo’s Maven plugin to deploy a WAR to Jetty, in this case we will deploy a WAR to a Jetty 9.x instance.
To get a firm grip on the whole process, we will start from scratch by creating a new Java web application from the command line:
mvn archetype:generate -DgroupId=com.baeldung -DartifactId=cargo-deploy
  -DarchetypeArtifactId=maven-archetype-webapp -DinteractiveMode=false
This will create a complete Java web application in the cargo-deploy directory. If we build, deploy and load this application as is, it will print Hello World! in the browser.
Since our web application does not contain any servlets, our web.xml file will be very basic. So navigate to the WEB-INF folder of our newly created project and create a web.xml if it was not auto created yet with the following content:
<?xml version="1.0" encoding="UTF-8"?>
<web-app xmlns:xsi="http://www.w3.org/2001/XMLSchema-instance"
  xmlns="http://Java.sun.com/xml/ns/javaee"
    xsi:schemaLocation="http://Java.sun.com/xml/ns/javaee
      http://Java.sun.com/xml/ns/javaee/web-app_3_0.xsd" id="WebApp_ID" version="3.0">

    <display-name>cargo-deploy</display-name>
    <welcome-file-list>
        <welcome-file>index.jsp</welcome-file>
    </welcome-file-list>
</web-app>
To enable Maven to recognize cargo’s commands without typing the fully qualified name, we need to add the cargo Maven plugin in a plugin group in Maven’s settings.xml.
As an immediate child of the root <settings></settings> element, add this:
<pluginGroups>
    <pluginGroup>org.codehaus.cargo</pluginGroup>
</pluginGroups>
8.2. Local Deploying
In this subsection, we will edit our pom.xml to suit our new deployment requirements.
Add the plugin as follows:
<build>
    <plugins>
        <plugin>
            <groupId>org.codehaus.cargo</groupId>
            <artifactId>cargo-maven2-plugin</artifactId>
            <version>1.5.0</version>
            <configuration>
                <container>
                    <containerId>jetty9x</containerId>
                    <type>installed</type>
                    <home>Insert absolute path to jetty 9 installation</home>
                </container>
                <configuration>
                    <type>existing</type>
                    <home>Insert absolute path to jetty 9 installation</home>
                </configuration>
            </configuration>
       </plugin>
    </plugins>
</build>
Notice that we explicitly define the packaging as a WAR, without this, our build will fail. In the plugins section, we then add the cargo maven2 plugin.
The latest version at the time of writing is 1.5.0. However, the latest version can always be found here. Additionally, we add a configuration section where we tell Maven that we are using Jetty container and also an existing Jetty installation.
By setting the container type to installed, we tell Maven that we have a Jetty instance installed on the machine and we provide the absolute URL to this installation.
By setting the configuration type to existing, we tell Maven that we have an existing setup that we are using and no further configuration is required.
The alternative would be to tell cargo to download and setup the Jetty version specified by providing a URL. However, our focus is on WAR deployment.
It’s worth noting that whether we are using Maven 2.x or Maven 3.x, the cargo maven2 plugin works for both.
We can now install our application by executing:
mvn installand deploy it by running:
mvn cargo:deployIf all goes well in the Maven and Jetty console, then we should be able to run our web application by loading http://localhost:8080/cargo-deploy.
If we check the $JETTY_HOME/webapps folder, we will find a deployment descriptor file or what we earlier on called context file called cargo-deploy.xml created by cargo.
8.3. Remote Deploying
By default, Jetty does not come with possibilities for remote deployment. In order to add such a support to Jetty, Cargo uses the Jetty remote deployer Web application.
What this means is that we have to download a web application WAR pre-created by the Cargo developers, deploy this WAR to the target jetty container.
Every time we want to deploy to this remote server using cargo Maven plugin, it will send an HTTP request to the deployer application on the remote server with our WAR for deployment.
This remote deployer can be found here. Head over to the tools section and download the cargo-jetty-7-and-onwards-deployer WAR.
Security considerations
We must set up a security realm in jetty before this can work, for authentication purposes. Create a file called realm.properties in $JETTY_HOME/etc directory of the remote jetty server. The file content is:
admin:password,managerThe admin is the user name by which the client can access the secured apps, password is the password and manager is the role the clients must possess before being granted access.
We must also declare our security requirements in the deployer application. We will unpack the WAR we downloaded from the jetty downloads page, make some changes and pack it back into a WAR.
After unpacking, head over to WEB-INF/web.xml and uncomment the XML code with the Uncomment in order to activate security comment. Or place the following code there:
<security-constraint>
    <web-resource-collection>
        <web-resource-name>Jetty Remote Deployer</web-resource-name>
        <url-pattern>/*</url-pattern>
    </web-resource-collection>
    <auth-constraint>
        <role-name>manager</role-name>
    </auth-constraint>
</security-constraint>

<login-config>
    <auth-method>BASIC</auth-method>
    <realm-name>Test Realm</realm-name>
</login-config>
Deploying the deployer
We can now pack the app back into a WAR and copy it to any location on the remote server. We will then deploy it to Jetty.
During deployment, it is best to use a deployment descriptor file so that we can create a securityHandler and pass to it a loginService. All secured applications must have a login service, or else jetty will fail to deploy them.
Now, let us create a context file in $JETTY_HOME/webapps of the remote jetty instance, remember the rules of naming the context file. Make it the same name as the WAR:
<?xml version="1.0"  encoding="ISO-8859-1"?>
<!DOCTYPE Configure PUBLIC "-//Mort Bay Consulting//DTD Configure//EN"
  "http://www.eclipse.org/jetty/configure.dtd">
<Configure class="org.eclipse.jetty.webapp.WebAppContext">
    <Set name="contextPath">/deployer</Set>
    <Set name="war">absolute/path/to/cargo-jetty-deployer.war</Set>
    <Get name="securityHandler">
        <Set name="loginService">
            <New class="org.eclipse.jetty.security.HashLoginService">
                <Set name="name">Test Realm</Set>
                <Set name="config"><SystemProperty name="jetty.home"
                   default="."/>/etc/realm.properties</Set>
            </New>
        </Set>
    </Get>
</Configure>
Start the remote jetty server and if everything goes well, we should be able to load http://localhost:8080/cargo-jetty-deployer. We should then be able to see something like:
HTTP ERROR 400

Problem accessing /cargo-jetty-deployer/. Reason:

    Command / is unknown
Deploying WAR to remote Jetty
To do a remote deploy we only need to change our configuration section of pom.xml. Remote deploy means that we do not have a local installation of Jetty but have authenticated access to the deployer app running on the remote server.
So let’s change the pom.xml so that the configuration section looks like this:
<configuration>
    <container>
        <containerId>jetty9x</containerId>
        <type>remote</type>
    </container>
    <configuration>
        <type>runtime</type>
        <properties>
      <cargo.hostname>127.0.0.1</cargo.hostname>
            <cargo.servlet.port>8080</cargo.servlet.port>
            <cargo.remote.username>admin</cargo.remote.username>
            <cargo.remote.password>password</cargo.remote.password>
        </properties>
    </configuration>
</configuration>
This time, we change the container type from installed to remote and the configuration type from existing to runtime. Finally, we add hostname, port and authentication properties to the configuration.
clean the project:
mvn cleaninstall it:
mvn installfinally, deploy it:
mvn cargo:deployThat’s it.
9. Deploying from Eclipse
Eclipse allows us to embed servers in order to add web project deployment in the normal workflow without navigating away from the IDE.
9.1. Embedding Jetty in Eclipse
We can embed a Jetty installation into eclipse by selecting window item from taskbar and then preferences from the drop down menu.
We will find a tree grid of preference items on the left panel of the window that appears. We can then navigate to eclipse -> servers or just type servers in the search bar.
We then select Jetty directory if not already open for us and choose the Jetty version we downloaded.
On the right side of the panel will appear a configuration page where we select the enable option to activate this Jetty version and browse to the installation folder.
From the screen shots, jetty 7.x will be replaced by the version of jetty we configured.
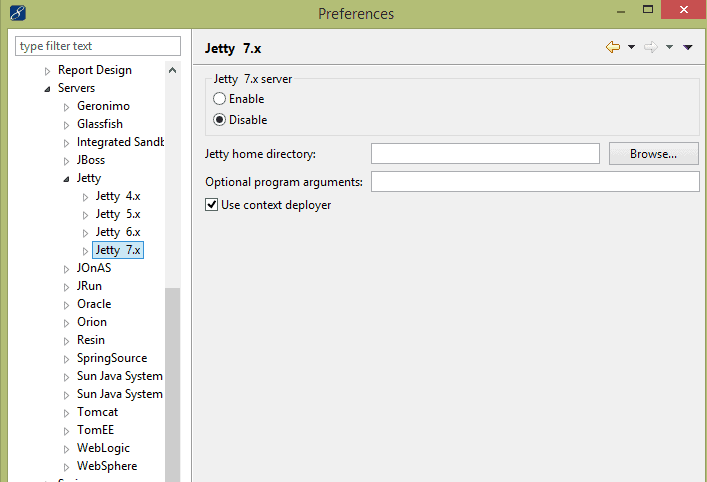
We apply changes and the next time we open the servers view from eclipse’s windows -> show view submenu, the newly configured server will be present and we can start, stop and deploy applications to it.
9.2. Deploying Web Application in Embedded Jetty
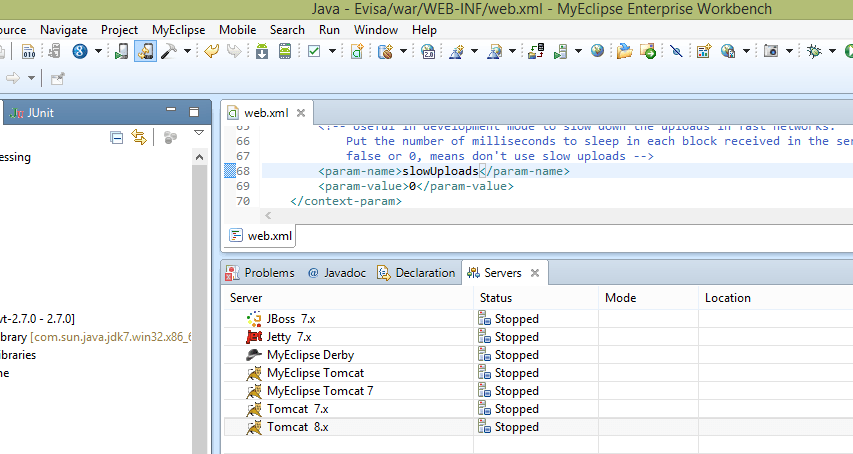
To deploy a web application to the embedded Jetty instance, it must exist in our workspace.
Open the servers view from window -> show view and look for servers. When open, we can just right click on the server we configured and select add deployment from the context menu that appears.
From the New Deployment dialog box that appears, open the project drop down and select the web project.
There is a Deploy Type section beneath the Project combo box when we select Exploded Archive(development mode), our changes in the application will be synced live without having to redeploy, this is the best option during development as it is very efficient.
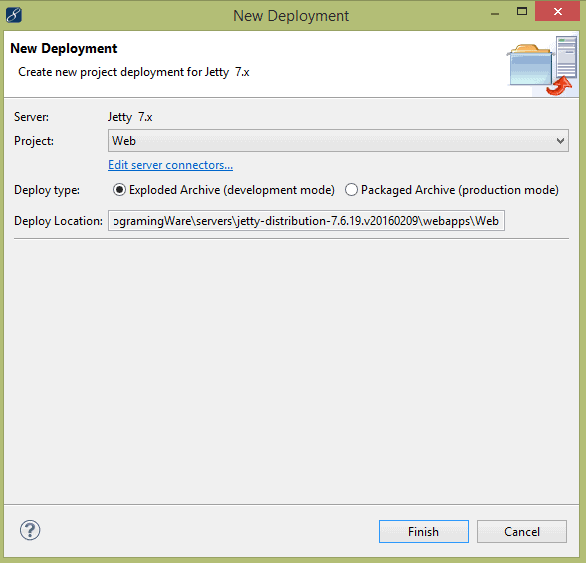
Selecting Packaged Archive(production mode) will require us to redeploy every time we make changes and see them in the browser. This is best only for production, but still, Eclipse makes it equally easy.
9.3. Deploying Web Application in External Location
We usually choose to deploy a WAR through Eclipse to make debugging easier. There may come a time when we want it deployed to a location other than those used by Eclipse’s embedded servers.
The most common instance is where our production server is online, and we want to update the web application.
We can bypass this procedure by deploying in production mode and noting the Deploy Location in the New Deployment dialog box and picking the WAR from there.
During deployment, instead of selecting an embedded server, we can select the <Externally Launched> option from the servers view alongside the list of embedded servers. We navigate to the $JETTY_HOME/webapps directory of an external Jetty installation.
10. Deploying from IntelliJ IDEA
To deploy a web application to Jetty, it must exist and have already been downloaded and installed.
10.1. Local Configuration
Open the Run menu and click the Edit Configurations options.
In the panel on the left search for Jetty Server, if it is not there click the + sign in the menu, search for Jetty and select Local. In the name field put Jetty 9.
Click the Configure… button and in Jetty Home field navigate to the home location of your installation and select it.
Optionally, set the Startup page to be http://localhost:8080/ and HTTP port: 8080, change the port as appropriate.
Go to the Deployment tab and click on the + symbol, select artifact you want to add to the server and click OK
10.2. Remote Configuration
Follow the same instructions as for local Jetty configurations but in the server tab, you must enter the remote location of the installation.
11. Conclusion
In this article, we have covered extensively the various ways of deploying a WAR file in Jetty web server.


