

Learn through the super-clean Baeldung Pro experience:
>> Membership and Baeldung Pro.
No ads, dark-mode and 6 months free of IntelliJ Idea Ultimate to start with.
Last updated: March 18, 2024
Learn through the super-clean Baeldung Pro experience:
>> Membership and Baeldung Pro.
No ads, dark-mode and 6 months free of IntelliJ Idea Ultimate to start with.
In this tutorial, we’re going to explore how to find the visual center of various polygons and eventually show how to do this for any polygon that follows certain rules.
The visual center of a polygon is the point that visually appears to be the center of a bulk of the polygon and is explicitly within the polygon itself. In many cases, this is the same as the actual center, but there are certain classes of polygon for which it isn’t.
The first case we’ll look at is for regular polygons. These are polygons where all of the sides are equal lengths, and all of the interior angles are equal. For example, squares, pentagons, and many others.
In these cases, the visual center is the same as the actual center. So, how do we find the center of a regular polygon? We have two options for doing this.
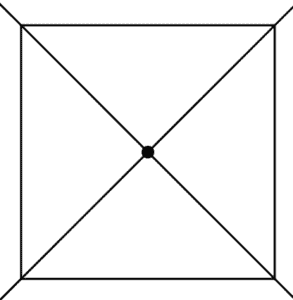
The simplest method is to draw lines from each vertex to the exact opposite point, which will all cross at the exact center. For a polygon that has an even number of sides, this means from each vertex to the exact opposite vertex:
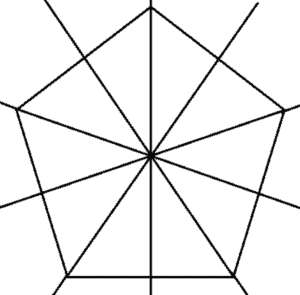
However, for a polygon that has an odd number of sides, this means from each vertex to the center of the opposite edge:
However, we can also calculate this point algorithmically. To do this, we need to find the mean of the vertices on the polygon. For example, let’s take the following square:
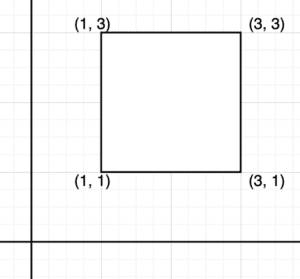
To find our center, we need to take the mean of the vertices. That means:

What about our pentagon?
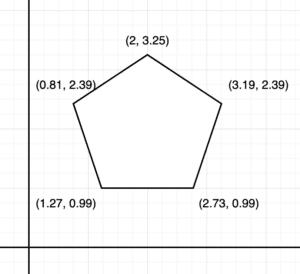
The same idea works here:

This same method will work for any regular polygon.
The next thing to consider is irregular convex polygons. These are polygons that don’t have equal sides or angles – hence being irregular. However, all of the interior angles are less than 180°. This, in turn, means that the line between any pair of points is guaranteed to be within the polygon – or else on the boundary of the polygon, in the case of adjacent vertices.
This set of polygons includes rectangles, isosceles, scalene triangles, and many other shapes that we might expect to work with.
Regular polygons are a subset of these shapes, and the algorithm for finding the center is the same.
For example, if we wanted to find the center of this parallelogram:
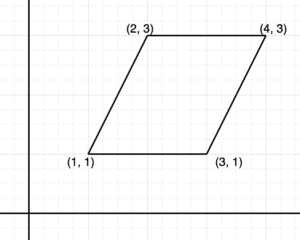
We’d do so as follows:

As such, for any convex polygon of  vertices
  , we can find the center point by doing:

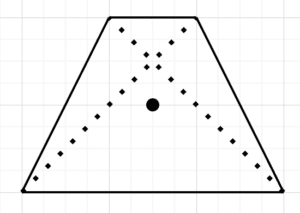
Note that we can’t reliably use the method of intersecting lines for these polygons. It’ll work in some cases but not in all of them. For example, in a trapezoid, the exact center is different from where the lines intersect:
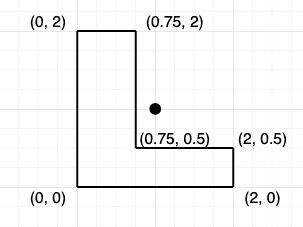
What about concave polygons? These are ones that have internal angles greater than 180°. This means that the exact center of the polygon isn’t guaranteed to be inside it:
So, how do we find the visual center of such a shape?
Using the Centroid formula, we can get a potential solution for many shapes. This requires that the polygon is closed – the last vertex is connected back to the first one. It also requires that the polygon is not self-intersecting – that is, none of the edges overlap.
In order to use this formula, we first calculate the area of the polygon. Any method will work, but the shoelace formula is especially well-suited since some calculations can be reused later. This is calculated as follows:

When doing this, the vertices need to be counted in counter-clockwise order and loop around. So when we reach the last vertex,  now refers back to the first one.
For our above shape, we can solve this as:

Having done this, we can now calculate the coordinates of our center.

We’ll notice that the second part of this formula is the same for both X and Y and the same as in the formula we used to calculate the area. We won’t show all of the workings for this here, but the answer comes out as:

Which does indeed give us a position inside of the polygon:
This formula works for many shapes and is relatively simple to do. However, it’ll fail on excessively concave shapes and doesn’t always return a point that looks central. For example, the above has a point right by one of the edges.
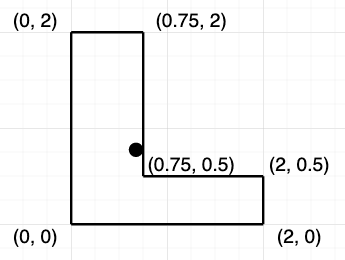
An alternative is to compute the pole of inaccessibility. This is the point within the polygon furthest from any of the edges. However, this is remarkably complicated to do correctly, especially for complex shapes.
The Polylabel algorithm is a heuristic that gives a good approximation of this whilst still being relatively easy to achieve. This works by inscribing a bounding box around the polygon and then repeatably subdividing this to find the point furthest from any vertex.
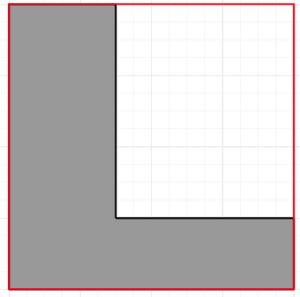
We first draw a bounding box around the entire polygon:
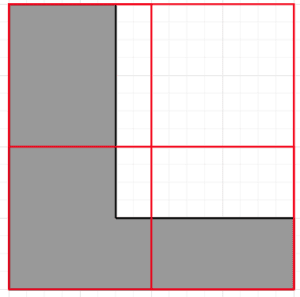
We then divide this box into squares of equal size. For example, here, we can divide it into 4 squares:
For each of these squares, we find the center point – e.g. using one of our methods above. We then determine the distance from this center point to the nearest vertex of our polygon:
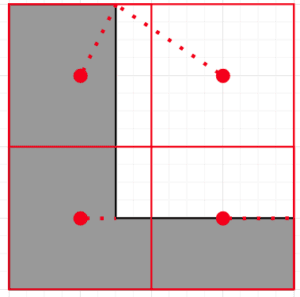
We then select our best point. This is the point within the polygon that’s furthest from its selected vertex, or failing that, the point outside the polygon closest to its selected vertex.
In this case, our top-left point is a distance of 0.55, our bottom-left point is a distance of 0.25, and our bottom-right point is a distance of 0.5. Our top-right point is outside the polygon so that it can be ignored. This means our top-left point is the furthest.
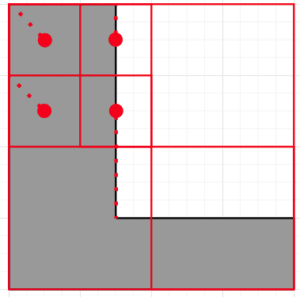
This means that we can treat this subdivision as containing our pole of inaccessibility. We then repeat the entire process again, only using this box instead:
We then keep repeating this process until our subdivisions are within an acceptable level of tolerance, at which point we have our answer:
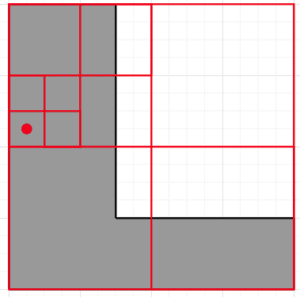
This will then give us the point that’s furthest from any of the vertices of our polygon to within our level of tolerance defined by our subdivisions. This can then be treated as our center.
We’ve seen here a few different methods for finding the visual center of a polygon, depending on the type of polygon and the amount of effort we want to spend to get the answer. These aren’t the only methods; others are notably more complicated to achieve and don’t always give significantly better answers.
Why not try implementing these for yourself and see how they work?