

Yes, we're now running our only Summer Sale. All Courses are 30% off until 20th July, 2026:
Learn through the super-clean Baeldung Pro experience:
>> Membership and Baeldung Pro.
No ads, dark-mode and 6 months free of IntelliJ Idea Ultimate to start with.
1. Introduction
A glossary is an alphabetical list of terms with their definitions. Just like creating a reference section, creating a glossary can be done automatically in LaTeX with the support of specific packages.
In this tutorial, we’ll study step-by-step how to create a glossary in a LaTeX document.
2. Getting Started
2.1. Prerequisites
The current active LaTeX packages dedicated to creating glossaries are nomencl and glossaries. These packages support acronyms and multiple glossaries and can work in several languages (using babel or polyglossia).
Obviously, as for all other LaTeX packages, we need to use the \usepackage command to load the nomencl or glossaries package. There are also certain packages that need to be loaded before glossaries, if they are required: hyperref, babel, polyglossia, inputenc, and fontenc. In that case, these packages must be loaded before glossaries.
2.2. Glossary Generation Steps
The following steps describe the procedure to generate a glossary in LaTeX documents:
- Load the package required to make a glossary
- Generate the glossary using a specific command
- Define the terms and their definitions with glossary entries
- Use the glossary entries to insert terms into the document
- Print the glossary
In what follows, we’ll introduce a step-by-step tutorial for generating a glossary with the glossaries package.
3. Working with the glossaries Package
3.1. Detailed Steps
First, we need to load the glossaries package:
\usepackage{glossaries}Once glossaries have been loaded, the following command is used to generate the glossary:
\makeglossariesNow, we can create entries to define our terms and definitions using the command \newglossaryentry:
\newglossaryentry{<label>}{name={<key>}, description={<value>}}For example:
\newglossaryentry{latex}{name=latex}, description={LaTeX is a document preparation system}As we can see, there are three parameters that are passed to the \newglossaryentry command. For the above example, here are details of the three parameters:
- latex: This parameter is called the label of the entry
- name = latex: The word to be defined by the glossary entry. It is advised to write this in lowercase letters
- description={LaTeX is a document preparation system}: Definition of the current term is specified under the curly braces
We then can produce the desired term in the document, we can use the standard command \gls{} as follows:
In this phrase, the user-defined term \gls{latex} is inserted.The \gls{} command prints the term in lowercase letters. For instance, \gls{latex} will print latex.
To capitalize the first letter or pluralize the term, we use the following additional commands:
% Standard command
\gls{<label>}

% Capitalize first letter. For example, \Gls{latex} will print Latex
\Gls{<label>}

% Pluralize term. For example, \glspl{latex} will print latexs
\glspl{<label>}

% Capitalize and pluralize term. For example, \Glspl{latex} will print Latexs
\Glspl{<label>}
The last step is to display the glossary in the document. To do this, we use the command \printglossaries.
3.2. Basic Example
Now, let’s create a simple glossary following the above steps:
\begin{document}

\section{Section with glossaries}

% Term definitions
\newglossaryentry{fondue}{
    name=fondue,
    description={is a Swiss dish consisting of melted cheese that is served in a
      communal pot heated over a portable stove using a candle or a spirit lamp}
}

\newglossaryentry{raclette}{
    name=raclette,
    description={is a Swiss dish that involves heating cheese and
      scraping off the melted portion and topping it onto meats or vegetables}
}

% Use the terms
\Gls{fondue} is a very popular dish and is often associated with \gls{raclette}.

% Print the glossary
\printglossaries

\end{document}
This will generate the following result:
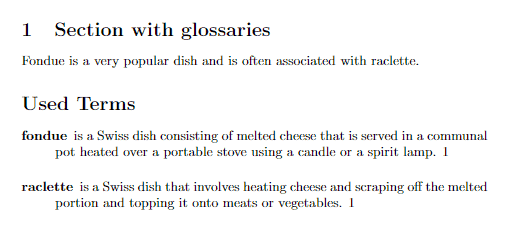
We can see that, resulting from the usage of the commands \Gls{} and \gls, here the term Fondue is capitalized, and raclette is in lowercase letters.
3.3. Acronyms
Acronyms are different from glossary entries. For acronyms, the definition is produced in the text with the acronym in parentheses. For glossary entries, only the name is produced. The package distinguishes between a glossary and a list of acronyms.
By default, acronyms are produced as part of the glossary. To generate a separate list of acronyms, the package needs to be loaded with the acronym option:
\usepackage[acronym]{glossaries}To define an acronym entry, here is the command:
\newacronym{⟨label⟩}{⟨abbrv⟩}{⟨full⟩}Let’s understand the \newacronym command usage and parameter description with an example:
\newacronym{e2e}{E2E}{End to End} - e2e : represents the label. This is used to refer to this acronym later in the document
- E2E : represents the acronym. It is recommended to write the acronym in uppercase
- End to End : represents the definition of the acronym written within the curly braces
To print the list of all acronyms with their definition/description, we can use:
\printglossary[type=\acronymtype]Please note that if we use an online LaTeX platform such as Overleaf to compile our LaTeX documents, this command works just fine. Nevertheless, it may happen that the command \printglossary[type=\acronymtype] needs a temporary file that is created by \printglossary to work properly. To solve this problem, the only thing we need is to put the command \printglossary just before the command \printglossary[type=\acronymtype]. After the first compilation, we can delete the \printglossary command.
Now let’s see what the basic example above looks like when we define the terms as acronyms and use the acronym option:
\documentclass{article}
% Load the package with the acronym option
\usepackage[acronym,nomain]{glossaries}
% Generate the glossary
\makeglossaries
\begin{document}
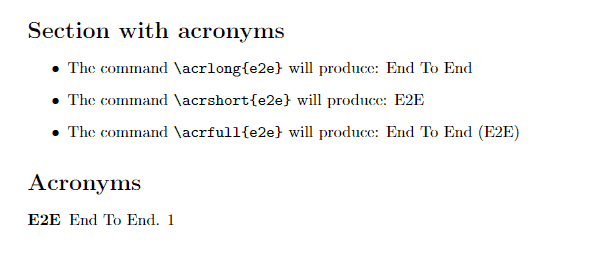
\section*{Section with acronyms}
% Acronym definitions
\newacronym{e2e}{E2E}{End To End}
% Use the acronyms
\begin{itemize}
\item The command \verb+\acrlong{e2e}+ will produce: \acrlong{e2e}
\item The command \verb+\acrshort{e2e}+ will produce: \acrshort{e2e}
\item The command \verb+\acrfull{e2e}+ will produce: \acrfull{e2e}
\end{itemize}
% Print the glossary
\printglossaries[type=\acronymtype]
\end{document}This will generate the following result:
3.4. Change the Default Title of the Glossary
In the above examples, we showed that LaTeX creates the glossary section in the final document with the title “Glossary” (or “Acronyms” with the \acronymtype option). It is possible that we may need to use a different title for our glossary in some situations. To do so, we need to add the additional parameters to the \printglossary command:
\printglossary[title=<User-defined title>, toctitle=<User-defined TOC title>]Following are the two parameters that are passed with \printglossary command:
- title=<User-defined title>: this is what is to be displayed on top of the glossary
- toctitle=<User-defined TOC title>: this entry will be displayed in the table of contents
To display the glossary section in the table of content, we need to add an option when loading the glossaries package:
\usepackage[toc]{glossaries}Finally, let’s take a look at the following simple example:
\begin{document}

\tableofcontents

\section{Section with glossaries}

% Term definitions
\newglossaryentry{fondue}{
    name=fondue,
    description={is a Swiss dish consisting of melted cheese that is served in a communal pot heated over a portable stove using a candle or a spirit lamp}
}

\newglossaryentry{raclette}{
    name=raclette,
    description={is a Swiss dish that involves heating cheese and scraping off the melted portion and topping it onto meats or vegetables}
}

% Use the terms
\Gls{fondue} is a very popular dish and is often associated with \gls{raclette}.


% Print the glossary
\printglossary[type=\acronymtype,title=Used Terms, toctitle=List of Used Terms]

\end{document}
This will yield the following result:
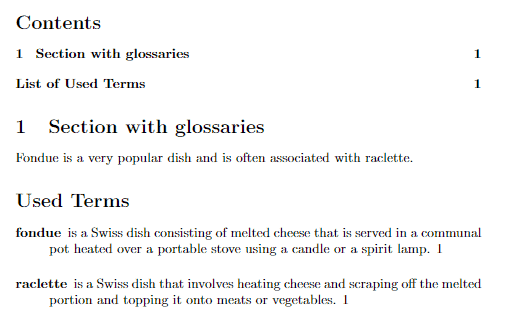
As we can see, the title of the glossary section appears as Used Terms instead of the default one (Glossary). Also, in the table of contents, the glossary section is listed as a List of Used Terms.
4. Conclusion
In this article, we’ve presented a step-by-step tutorial to generate a list of glossaries or acronyms in LaTeX using the glossaries package. We have also learned how to customize the glossary section and how to change its appearance on the table of contents of the LaTeX document.