Learn through the super-clean Baeldung Pro experience:
>> Membership and Baeldung Pro.
No ads, dark-mode and 6 months free of IntelliJ Idea Ultimate to start with.
Last updated: March 19, 2024

Learn through the super-clean Baeldung Pro experience:
>> Membership and Baeldung Pro.
No ads, dark-mode and 6 months free of IntelliJ Idea Ultimate to start with.
In modern software development, the term pipeline gets used a lot. But what is it?
Generally speaking, a build pipeline is a set of automated steps that move code from development to production.
Build pipelines are great for implementing continuous integration workflows for software. They allow us to build smaller changes with greater frequency, with the goal of finding bugs sooner and reducing their impact.
In this tutorial, we’ll look at building a simple build pipeline using Travis CI.
A build pipeline can consist of many different steps, but at a minimum, it should include:
If an application uses different technologies, then additional steps can be included in the build pipeline. For example, we might have an additional step that minifies JavaScript files or publishes updated API documentation.
For our sample build pipeline, we’ll use Travis CI, a cloud-based continuous integration tool.
This has a number of features that make it a great choice for getting started with build pipelines:
At a high level, it works by monitoring a GitHub repository for new commits.
When a new commit is made, it executes the steps of the build pipeline as defined in a configuration file (more on this below). If any step fails, the pipeline terminates and it will notify us.
Out of the box, Travis CI requires very little configuration. The only required configuration is specifying the programming language.
We can always provide more configuration to tailor our pipeline if needed. For example, we can limit what branches trigger builds, add additional steps to the pipeline, and much more.
It’s important to know that Travis CI currently has 2 offerings: a free and a paid version.
The free version, denoted by the .org domain name, offers full capabilities for any public GitHub repository. There are no limits to the number of builds or repositories, although there are resource limits imposed when your pipeline is running.
The paid version, which uses the .com domain name, is required for private GitHub repositories. It also offers more concurrent builds and unlimited build minutes compared to the free plan. There is a free trial for the first 100 builds to test out the paid version.
For this tutorial, we’ll be using the free version mentioned above. Any public repository can be used to create a free pipeline.
All we have to do is log in to Travis CI with our GitHub account and authorize it:
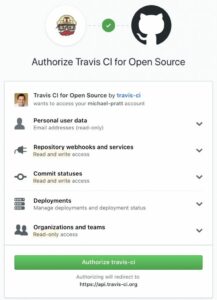
After we grant permissions to our GitHub account, we’re ready to begin configuring our build pipeline.
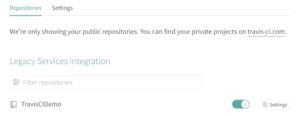
Initially, all of our public repositories are considered inactive. To resolve this, we need to enable our repository from the account settings page.
This lists all of our public repositories, along with a toggle button. Clicking the toggle button will configure Travis CI to start monitoring that repository for new commits, using the default branch of master:
Note that each repository also has a Settings button. This is where we can configure different pipeline behavior:
For this tutorial, the default settings will work fine. Later we’ll see how to override some of the default behavior.
The next step is to create a new file named .travis.yml in the root directory of our repository. This file contains all the information required to configure a pipeline. Without this file, the pipeline will not execute.
For this tutorial we just need to include the bare minimum configuration, which specifies the programming language:
language: javaThat’s it! Without providing any more information, Travis CI will execute a simple pipeline that:
Once we commit the .travis.yml file Travis will kick off our first build. Any further commits to master branch will trigger additional builds. The dashboard also allows us to manually trigger the pipeline at any time without requiring a commit or pull request.
In the previous section, we saw that a single line of configuration is all that we need to run our build pipeline. But most projects will require additional configuration to implement a meaningful pipeline.
This section outlines some of the more useful configurations we might want to add to our pipeline.
The default command used to build Maven projects is:
mvn test -BWe can change this to any command by setting the script directive in .travis.yml:
script: mvn package -DskipTestsIt’s possible to chain together multiple commands in a single script line using the && operator.
Some build commands are complex and may span multiple lines or have complex logic. For example, they may perform different actions based on environment variables.
In these cases, it’s recommended to place the build command in a stand-alone script, and call that script from inside the configuration file:
script: ./build.shThe default build settings for Java projects simply compile the code and execute tests. The resulting artifacts (.jar files, etc.) are discarded at the end of the pipeline unless we deploy them somewhere.
Travis CI supports a variety of well known 3rd party services. Artifacts can be copied to many popular cloud storage systems such as Amazon S3, Google Cloud Storage, Bintray, and more.
It can also deploy code directly to most popular cloud computing platforms such as AWS, Google App Engine, Heroku, and many more.
Below is an example configuration showing how we can deploy to Heroku. To generate encrypted properties, we have to use the Travis CLI tool.
deploy:
  provider: heroku
  api_key:
    secure: "ENCRYPTED_API_KEY"
Additionally, it provides a generic deployment option that allows us to write our own deployment script. This is helpful if we need to deploy artifacts to a 3rd party system that is not natively supported.
For example, we could write a shell script that securely copies the artifacts to a private FTP server:
deploy:
  provider: script
script: bash ./custom-deploy.shBy default, the pipeline will execute for any commit on master. However, most large projects use some form of git branching to manage development cycles.
Travis CI supports both white and blacklisting of git branches to determine which commits should trigger the pipeline.
As an example, consider the following configuration:
branches:
  only:
  - release
  - stable
  except:
  - master
  - nightly
This would ignore commits on the master and nightly branches. Commits to the release and stable branches would trigger the pipeline. Note that the only directive always takes precedence over the except directive.
We can also use regular expressions to control which branches trigger the pipeline:
branches:
  only:
  - /^development.*$/
This would start the pipeline only for commits on branches that start with development.
We can use the git commit message to skip individual commits. Travis CI will examine the message for the following patterns:
Where <KEYWORD> is any of the following values:
If the commit message matches any of these patterns then the pipeline will not run.
The default build environment for Java projects is Ubuntu Linux. Pipelines can also execute on Mac OSX or Windows Server by adding the following configuration into .travis.yml:
os: osx # can also be 'windows'Even with Linux, there are 3 different distributions that we can choose from:
os: linux
  dist: xenial # other choices are 'trusty' or 'precise'
The build platform documentation covers all available environments and their differences.
Just remember that if we change the platform, we might also need to change any custom build or deploy scripts to ensure compatibility. There are several ways to handle multiple operating systems in configuration.
We can also test against a specific version of the JDK by setting the following configuration in the .travis.yml file:
jdk: oraclejdk8Keep in mind that different build environments, even the different Linux distributions, can have different JDK versions available. Consult the documentation for each environment to see the full list of JDK versions.
By default, each time our pipeline runs, it runs as a single job. This means all phases of the pipeline execute sequentially on a single virtual machine with the same settings.
But one of the great features of Travis CI is the ability to create a build matrix. This lets us run multiple jobs for each commit, using different values for some of the settings we saw earlier.
For example, we can use a build matrix to run our pipeline on both Linux and Mac OSX, or with both JDK 8 and 9.
There are two ways to create build matrices. First, we can provide an array of values for one or more of the language and environment configurations we saw earlier. For example:
language: java
jdk:
  - openjdk8
  - openjdk9
os:
  - linux
  - osx
Using this approach, Travis CI will automatically expand every combination of configuration to form multiple jobs. In the above example, the result would be four total jobs.
The second way to create a build matrix is to use the matrix.include directive. This lets us explicitly declare which combinations we want to run:
language: java
matrix:
  include:
  - jdk: openjdk8
    os: linux
  - jdk: openjdk9
    os: osx
The example above would result in two jobs.
Once again, if we build on multiple Operating Systems, we have to be careful to ensure our build and deployment scripts work for all cases. Shell scripts will not work on Windows, for example. We must use proper conditional statements to handle different Operating Systems.
There are more options that provide more granular control over which jobs to create, and how to handle failures.
In this article, we created a simple build pipeline using Travis CI. Using mostly out of the box configuration, we created a pipeline that builds code and runs tests.
We also saw a small sample of just how configurable Travis CI is. It works with a variety of programming languages and 3rd party cloud platforms. The one downside is that it currently only works with GitHub repositories.